|
Let's start the lesson
.gif)
Noel-2021/Christmas 2021
- Preparation
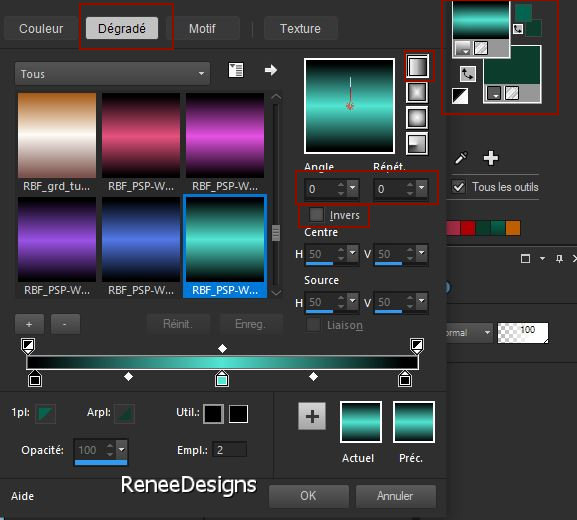
-Material Properties: Set your foreground color to color #056655 =1- Set your background color to color #0a3d2c =2

- Change the foreground material into a linear gradient and select gradient ‘’ RBF_PSP-Works_grd_3_010’’
-Material palette looks like this
1. File: Open a transparent image of 1015 x 685 Pixels – Transparente
2. Flood Fill Tool
 –
fill the layer with the gradient –
fill the layer with the gradient
3. Selections –load/save selection –load selection from disc and select my selection: ‘’Noel-2021-1’’
4. Selections- Promote selection to layer (we can't see anything for the moment)

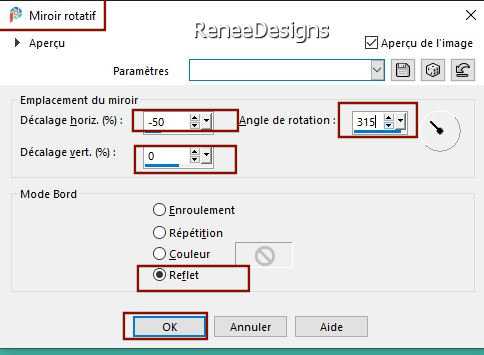
5. Effects -Reflection Effects-Rotating Mirror use the settings below
6. Layers- Duplicate
7. Image - Mirror - Mirror Horizontal (Image - Mirror in older versions of PSP)
8. Image - Mirror - Mirror vertical ( Image - Flip in older versions of PSP)
- Layers-Properties-Lower the Opacity to 51%
9. Layers- Merge- Merge Down
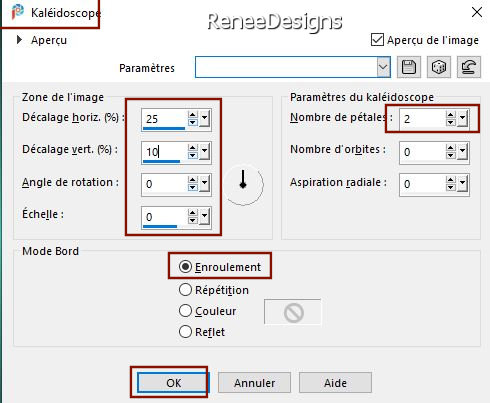
10. Effects -Reflection Effects– Kaleidoscope use the settings below
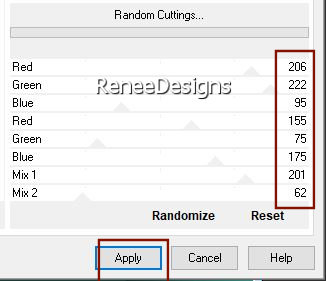
11. Effects –Plugins-
Unlimited 2.0 - Andrew's Filter Collection 61 – Random
Cuttings using the default settings
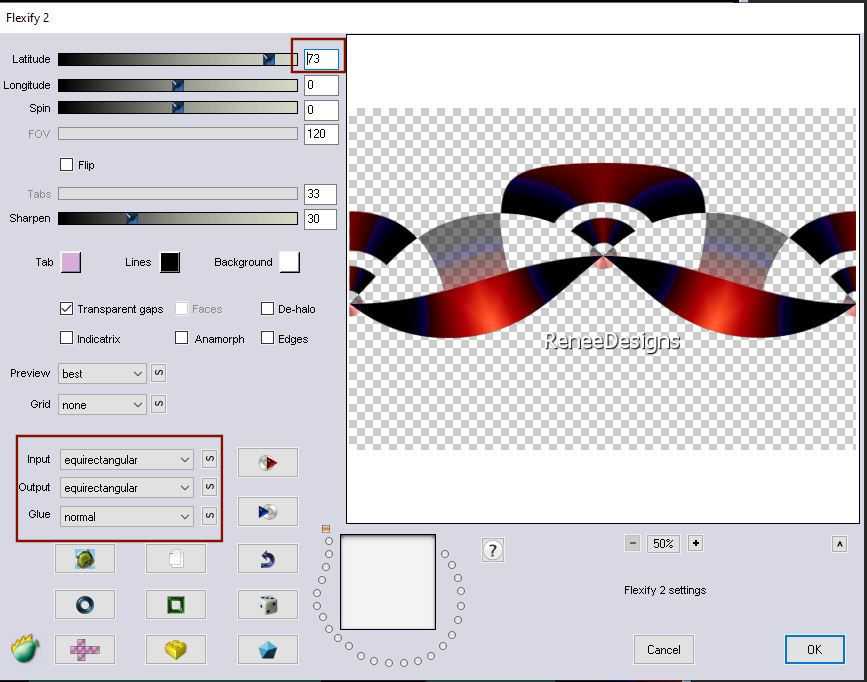
12. Effects – Plugins – Flaming Pear – Flexify 2 use the settings below ( if you have a slight difference for this effect it is not serious )
13. Objects - Align
– Top
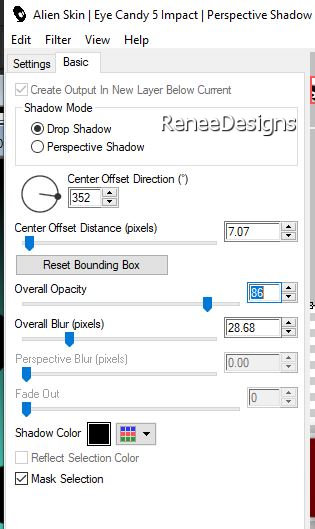
14. Effects - Plugins - Alien Skin EyeCandy 5 - Impact - Perspective
Shadow use the settings below
15. Activate Pick Tool (K) - Mode Scale - Push the bottom node up to 250 pixels in height
-Material Properties: Set your foreground color to color #ffffff=3 – Set your background color to color #0a3d2c= 2
-
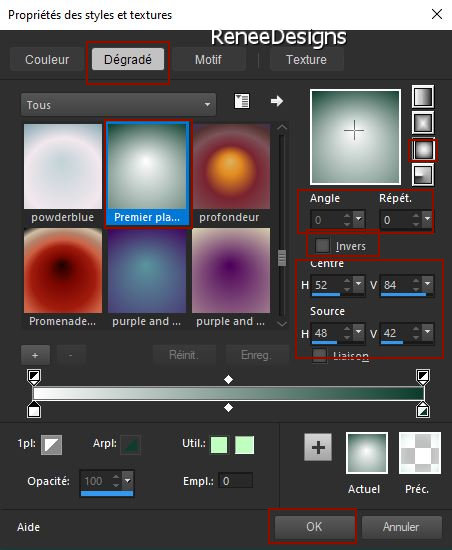
Change foreground color into a sunburst foreground-background gradient with these settings
- Activate the bottom of the layer palette =Raster 1
16. Layers- Duplicate
17. Activate Pick Tool (K) – Mode Scale /Set Scale Y% to 70%

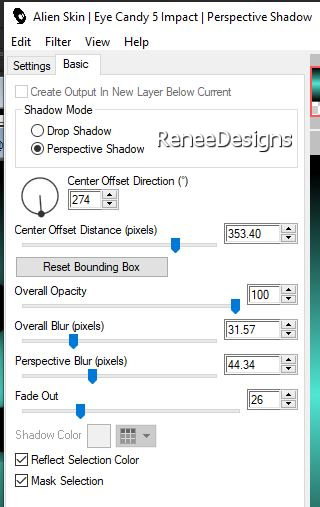
18. Effects - Plugins - Alien Skin EyeCandy 5 - Impact – Perspective
Shadow-Tab-Settings-User Settings and select my file- Preset : ‘’Noel-2021-Shadow’’
19. Layers- New Raster Layer
20. Selections –load/save selection –load selection from disc and select my selection: ‘’Noel-2021-2’’
21. Flood Fill Tool-
Fill the selection with the gradient
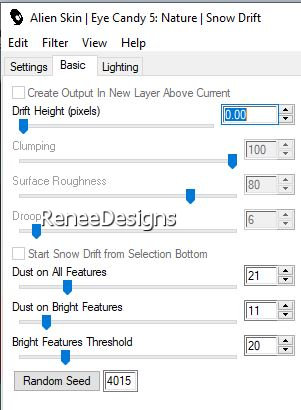
22. Effects – Plugins –Alien Skin EyeCandy 5 – Nature/Snow Drift use the settings below
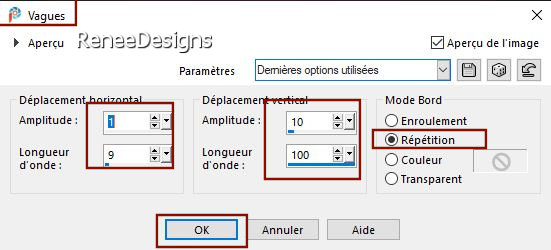
23. Effects- Distortion Effects– Wave with these settings
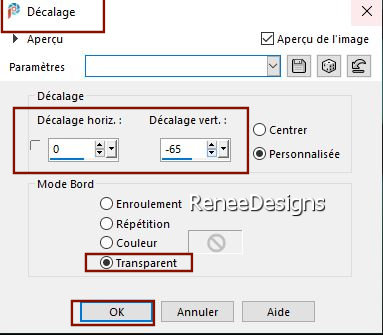
24. Effects – Image Effects – Offset use the settings below
25. Effects - Plugins- Alien Skin EyeCandy 5 - Impact - Motion
Trail-Tab-Settings-User Settings and select my file-Preset : ‘’Noel-2021MT’’
- Activate the bottom of the layer palette (Raster 1)
26. Effects –Plugins
Unlimited 2.0 - Andrew's Filter Collection 61 –Random
Cuttings using the default settings
- In the layer palette-make Raster 2 aktive
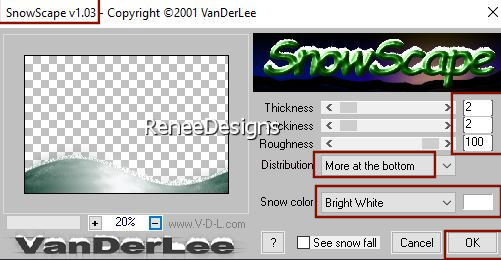
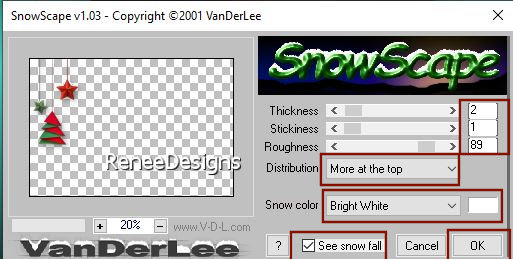
27. Effects – Plugins– VDL Adrenaline – Snowcapes use the settings below
28. Layers-New Raster Layer
29. Selections –load/save selection –load selection from disc and select my selection: ‘’Noel-2021-3’’
30. Flood Fill Tool-Fill the selection with the foreground color #ffffff=3
31.First !!! Open Lighten/Darken Brush (Click L on keyboard) -
Open Smudge Brush use the settings below

- On each line - hold down the mouse button - stretch as needed to get a similar result

32. Effects -Plugins – L&K’s- Sanne with these settings: 90/0
33. Layers-Properties-Set the Blend Mode to " Dissolve "
34. Adjust-Blur-Gaussian Blur-Radius 5 (Repeat- Gaussian Blur with the same settings )
- To replace the top of the layer-palette
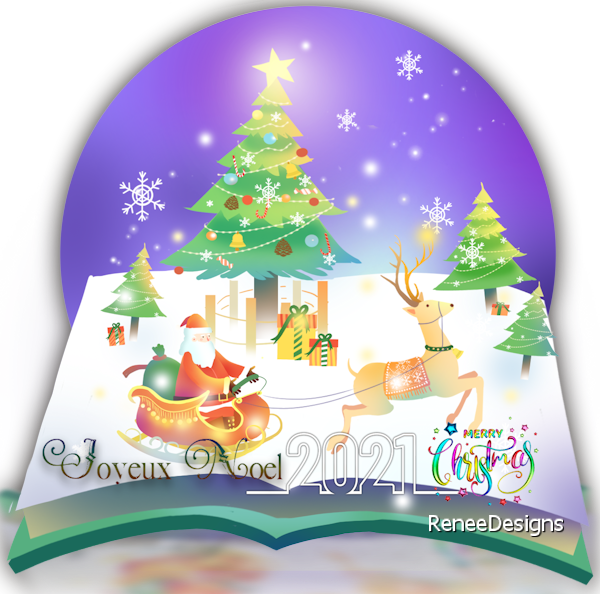
35. Open the tube ‘’
Renee_NOEL2021-Image 1’’ -Edit - Copy- Activate your work -Edit - Paste as a new layer
36. Objects - Align –
Top and Objects- Align - Left
37. Effects -
Plugins-VDL Adrenaline use the settings below
38. Open the tube ‘’
Renee_NOEL2021-Image 2’’ -Edit - Copy- Activate your work -Edit - Paste as a new layer
39. Objects - Align-
Top /Objects -Align- Right
40. Open the tube ‘’
Renee_NOEL2021-Image3’’ -Edit - Copy- Activate your work -Edit - Paste as a new layer
41. Pick Tool: (K) on your keyboard -Enter these parameters on the toolbar
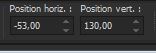 -53/ 130
-.Press ( M ) to close the Pick Tool
Put the image aside for now, we will need it later
42. File: Open a transparent image of 638x 638 Pixels
43. Selections –load/save selection –load selection from disc and select my selection: ‘’Noel-2021-boite-1’’
44. Open the tube ‘’Renee_tubes-Noel2021-boite 1’’ -Edit - Copy- Activate your work -Edit - Paste into selection
45. Layers- New Raster Layer
(
the new selection will cancel the previous one)
46. Selections –load/save selection –load selection from disc and select my selection: ‘’Noel-2021-boite-2’’
47. Color-Palette-Set the Foreground color to color #bebebe=4
Flood Fill Tool –
Fill the selection with the foreground color #bebebe =4
48. Effects –Plugins- Unlimited 2.0 – ICNET-Filters - Paper Textures -
Recycling Paper with these settings: 99/51
49. Effects – Edge Effects- Enhance
50. Effects
3D -Effects– Drop Shadow with these settings: 5/20/80/60 Color White
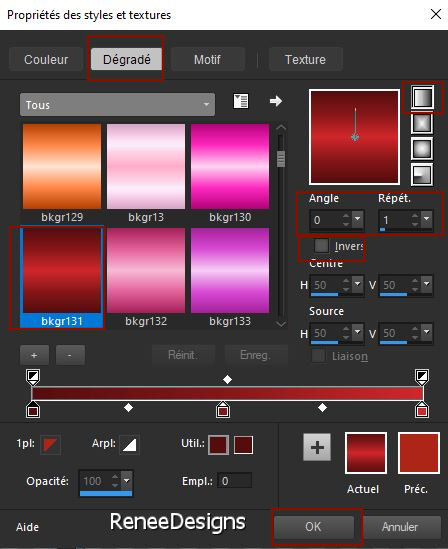
- Change the foreground material into a linear gradient and select gradient ‘’bkgr131’’- with these settings
51. Layers- New Raster Layer
52. Selections –load/save selection –load selection from disc and select my selection: ‘’Noel-2021-boite-3’’
53. Flood Fill Tool
–
Fill the selection with the gradient
54. Layers- New Raster Layer
55. Selections –load/save selection –load selection from disc and select my selection: ‘’Noel-2021-boite-4’’
56. Color-Palette-Set the Foreground color to color #413e3b=6
Flood Fill Tool – Fill the selection with the foreground color #413e3b =6
57. Adjust-Blur-Gaussian Blur-Radius 20
58. Layers- Arrange- Move Down
59. Layers-Properties-Set the Blend Mode to " Multiply "-Lower the Opacity to 49%
- To replace the top of the layer-palette
60. Layers- New Raster Layer
61. Selections –load/save selection –load selection from disc and select my selection: ‘’Noel-2021-boite-5’’
62. Color-Palette-Set the Foreground color to color #ffffff=3
Flood Fill Tool –
Fill the selection with the foreground color #ffffff=3 ( click 2 or 3 times)
63. Layers- New Raster Layer
64. Selections –load/save selection –load selection from disc and select my selection: ‘’Noel-2021-boite-6’’
65. Color-Palette-Set the Foreground color to color #bebebe=4
Flood Fill Tool –
Fill the selection with the foreground color #bebebe =4
66. Layers-Properties-Set the Blend Mode to " Soft Light "-Lower the Opacity to 67%
67.Layers- New Raster Layer
68. Selections –load/save selection –load selection from disc and select my selection: ‘’Noel-2021-boite-7’’
69. Color-Palette-Set the Foreground color to color #ffffff=3
Flood Fill Tool –
Fill the selection with the foreground color #ffffff=3
70. Layers- New Raster Layer
71. Selections –load/save selection –load selection from disc and select my selection: ‘’Noel-2021-boite-8’’
72. Color-Palette-Set the Foreground color to linear gradient and select : gradient bkgr131 (with the same settings as above )
Flood Fill Tool –
Fill the selection with the gradient (bkgr131)
Your work and Layer Palette look like this now-You should have this result
Attention !!! Place your layers as shown in the example below (if necessary, change the blend mode of your layers and their opacities to your liking)
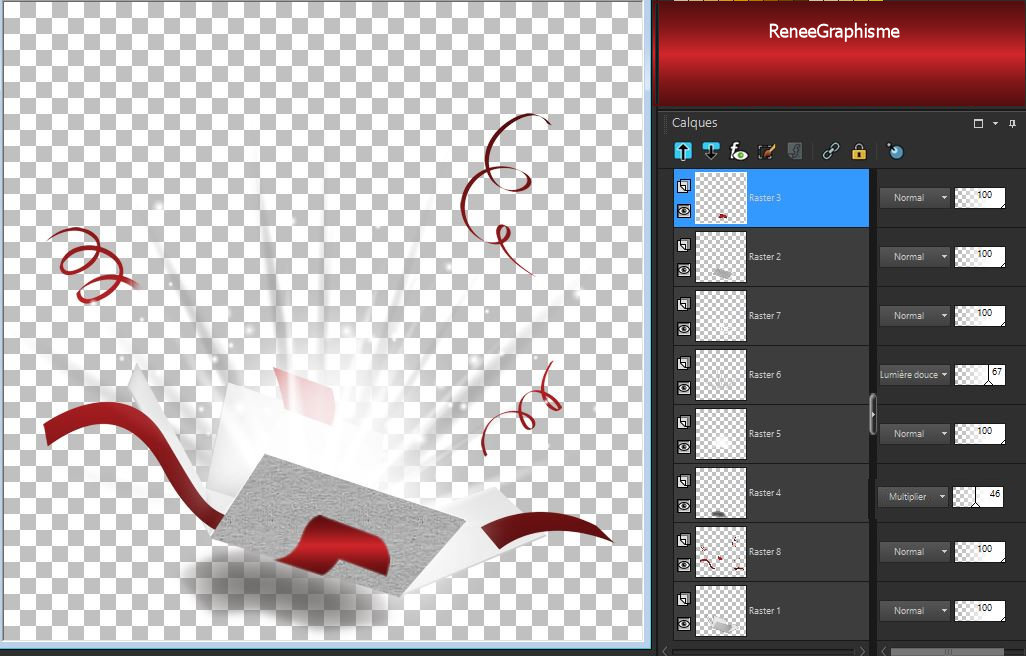
-
Make sure everything is in the right place
73. To replace the top of the layer-palette
74. Open the tube ‘’ Renee_tubes-Noel2021-boite 2’’ -Edit - Copy- Activate your work -Edit - Paste as a new layer ( place to your liking)
75. Layers- Merge-Merge Visible
76. Edit - Copy !!
77. Activate the image from step 41
78. -Edit - Paste as a new layer ( your creation of the box) - Place it at the bottom right(see finished image)
79. Open the tube
‘’ Renee_tubes-Noel2021-boite 3’’
80.
Edit - Copy- Activate your work -Edit - Paste as a new layer and move it in the right place (see finished image)
81. Open the tube ‘’Renee_tubes-Noel2021-boite 4’’ -Edit - Copy- Activate your work -Edit - Paste as a new layer
Place it so that it looks like Santa Claus has come out of the box (see finished image)
82. Open the tube
" titre "- Edit - Copy- Activate your work -Edit - Paste as a new layer -Place at the top on the right
83. Decorate to your taste with the tubes of your choice
84. Layers- Merge-Merge Visible
85. Edit - Copy !!!
86. Open the tube
" cadre/frame "- With the Magic Wand - select the inside of the frame
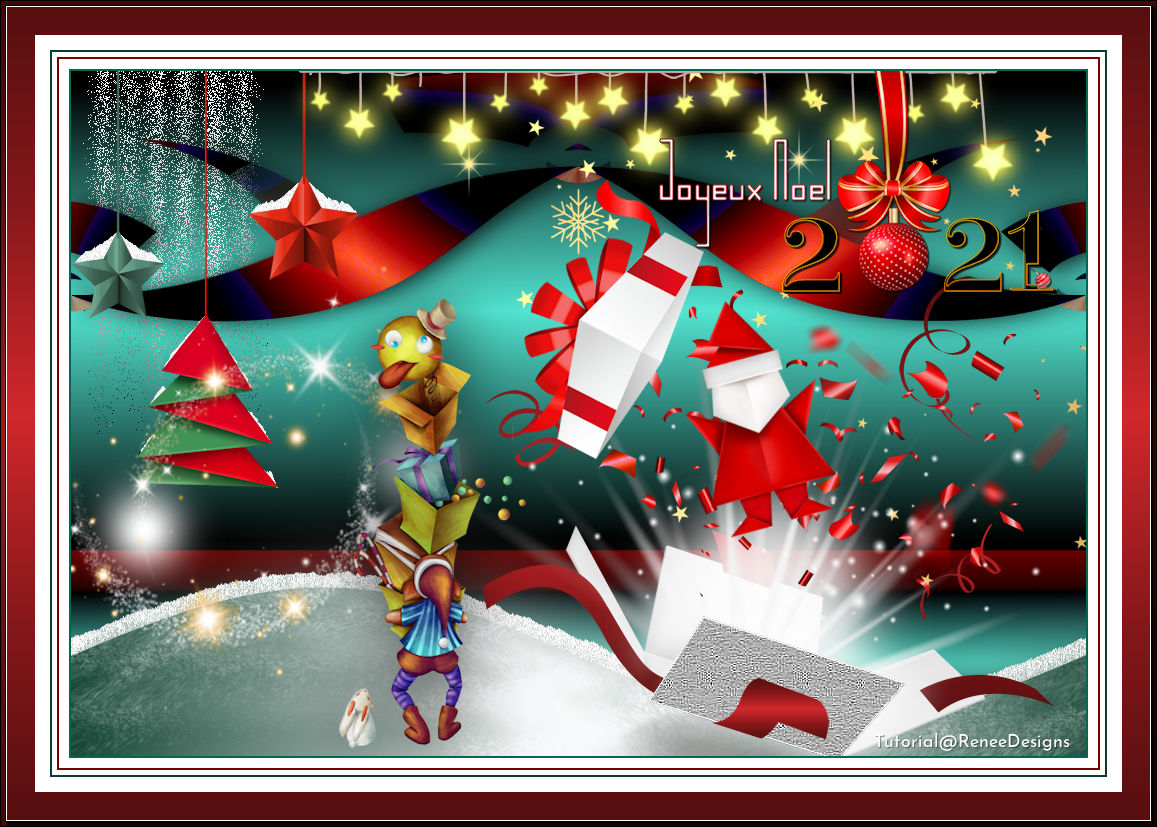
87. Edit - Paste into Selection (Image is still in your PSP memory)

- Paste the author's watermark on your work and your own watermark

Joyeux Noël a tous
et toutes/Merry Christmas to all
That's it - Thank you / I hope you enjoyed this lesson
Renée
This lesson was written by Renée 27/09/2021
Edited and Update
2021
*
Any resemblance with an existing lesson is a coincidence
* Do not forget to thank the people who work with us and for us -I have appointed the tubeurs and translators
Thanks
*
|
 Translations