
Let's start the lesson. Open the Color-Palette
1. File - New - New Image 1050 x 625 pixels transparent
Material Properties:Foregroundcolor =color 1 Backgroundcolor =color 2
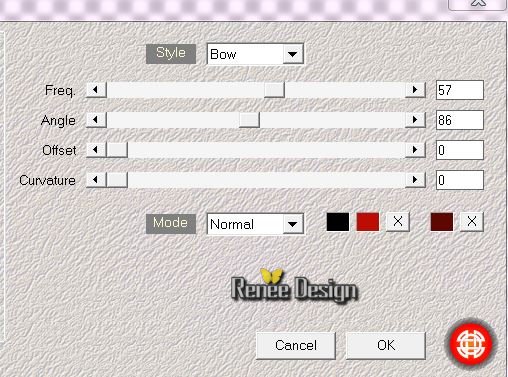
2. Effects- Plugins Mehdi
- Wavy lab with these settings
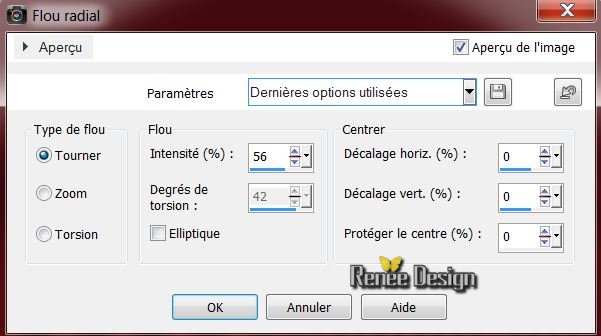
3. Adjust-Blur-Radial Blur with these settings
4. Layers- New raster layer/ Activate Flood Fill Tool and fill the layer with the foregroundcolor
(color 1)
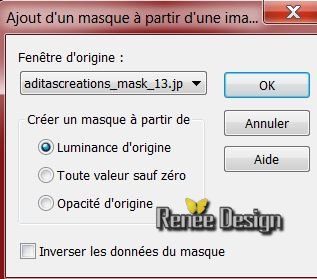
5. Layers-New Mask Layer From Image and choose Mask:''aditascreation_mask_13.jpg''
6. Delete the mask//Would you like this mask merged into the layer below it ? Yes
7. Effects- Edge Effects- Enhance More
Layers- Merge-Merge- Group
8. Effects- plugins -
Vanderlee - Unplugged X - Snow
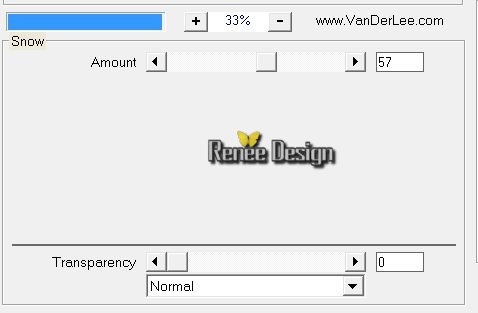
Layer-Palette: set the layer opacity of this layer to 48%
9. Open the
tube "Idavi_clock_winter'' Edit/copy-Edit paste as a new layer.(do not move it is in the right place)
10. Effects - 3D Effects-Drop Shadow use settings below
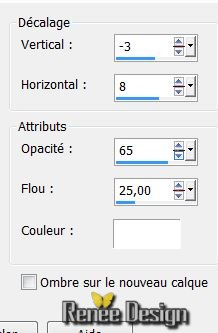
Repeat : Effects - 3D Effects-Drop Shadow with the same settings
11. Layers - New raster layer
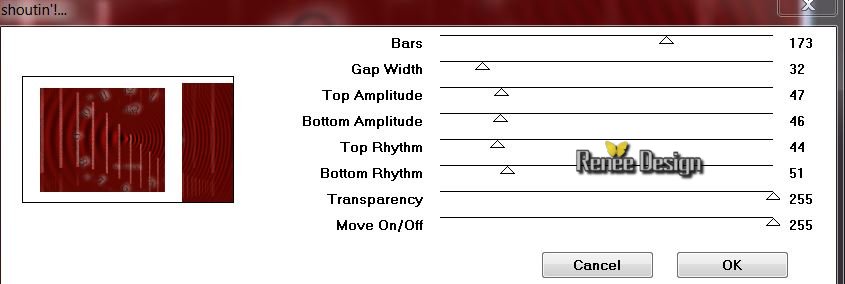
12. Effects-Plugins -
Unlimited VM Extravanga/ Shouting with these settings
13. Activate the magic wand and select the white part
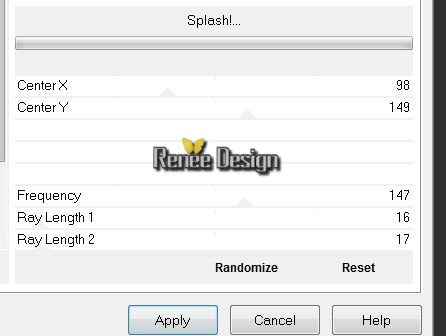
14. Effects- Plugins -VM
Natural -Splash with these settings
15. Selections-Invert
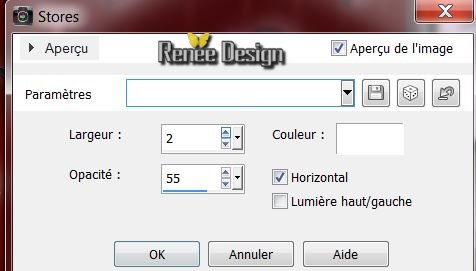
16. Selections - Modify -Select-Selection Borders with these settings
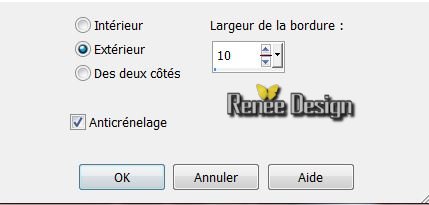
Repeat:
Selections - Modify -Select-Selection Borders with the same settings
17. Flood Fill Tool: fill the selections with color black
18. Effects- Texture Effects- Blinds with these settings - Color white
19. Effects- Plugins -EyeCandy
5 -Impact - Perspective shadow-Tab-Settings - preset /Drop shadow
blury
20. Selections- Deselect All
21. Layers - New raster layer - Flood Fill Tool: fill the selections with color white
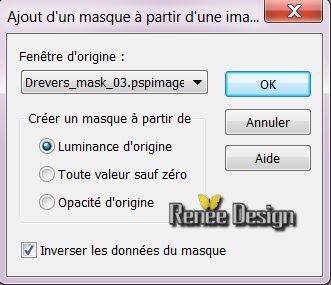
22. Layers-New Mask Layer From Image and choose Mask:
'Drevers_mask_03.pspimage''
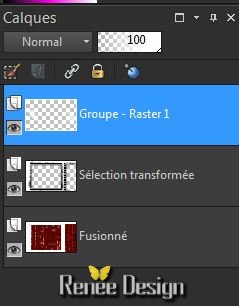
23. Layers- Merge-Merge- Group
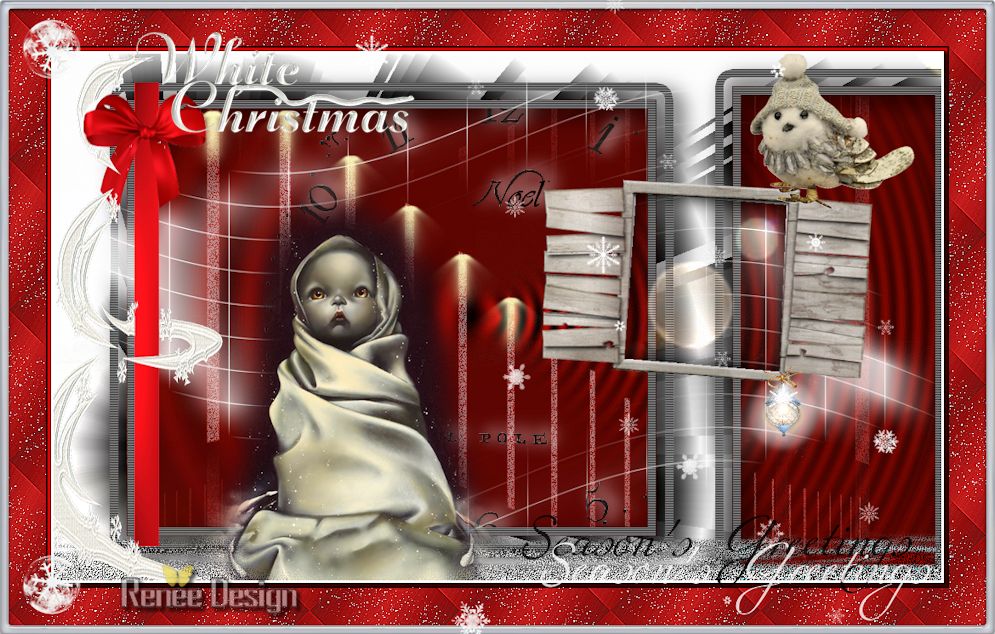
The result
24. Layers- Merge -Merge Visible
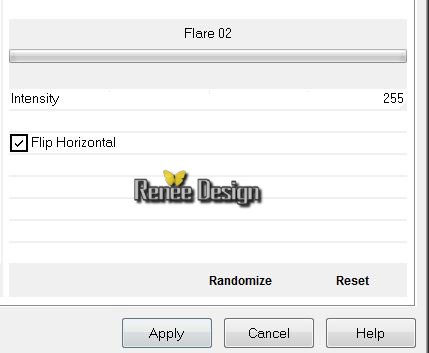
25. Effects- Plugins - ICNET
Unlimited- Lens Flare -Flare 02 with these settings
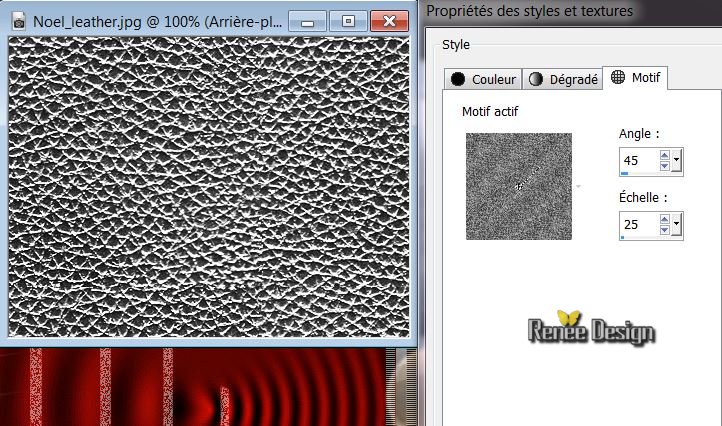
26. Material of the Foreground: -Open the Pattern and choose ''Noel_leather '' in PSP / Foreground to pattern with these settings
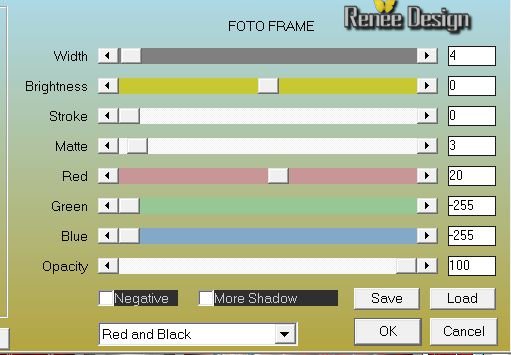
27. Layers - New raster layer// Flood Fill Tool: fill the layer with the foreground pattern
28. Layers-New Mask Layer From Image and choose Mask:''masque_flood.jpg"
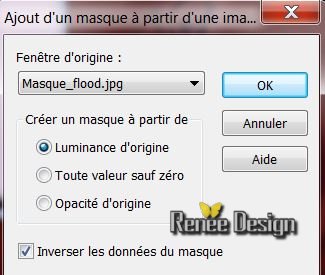
Layers- Merge-Merge- Group
29. Effects- Edge Effects-Enhance More
In the Layerpalette, set Blend Mode to Overlay
Layers- Duplicate
/Image Mirror -In the Layerpalette, set Blend Mode to Difference
30. Open the tube ''noel_2013_fenetre ''Edit / Copy -Edit - Paste as new layer on your working area.With your Move Tool move to the right side
31. Open the
tube''noel_2013_spots'' 'Edit / Copy -Edit - Paste as new layer on your working area.With the move tool, move it in the upper left corner
32. Open the tube ''oiseau _noel_2013 ''Edit / Copy -Edit - Paste as new layer on your working area. With the move tool, move it in the upper right corner
33. Open the tube ''noel_2013_ruban'' Edit / Copy -Edit - Paste as new layer on your working area. With your Move Tool move to the left side//
Open the
tube ''ruban_noel_2013'' Edit / Copy -Edit - Paste as new layer on your working area. With your Move Tool move to the left side
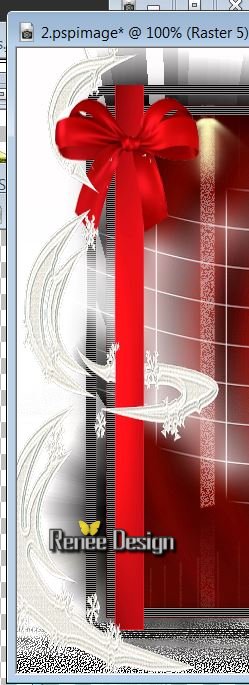
Activate Eraser Tool-Erase some much runs over it (see screen )
34. Open the tube ''baby in the snow-misted by Devil'' -Image Resize 75% /Edit / Copy -Edit - Paste as new layer on your working area. With your move tool move to the left side
35. Open the tube ''lampada'' Edit / Copy -Edit - Paste as new layer on your working area.With your move tool move to the right side
36. Layers- Merge -Merge Visible
37. Image - Add borders-Symmetric checked:3 pixels color white
38. Image - Add borders-Symmetric checked:45 pixels with a contrast color
39. Magic Wand : click with your magic wand in the border of 45 pixels
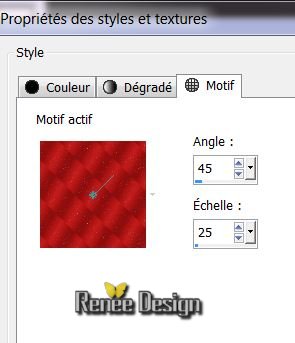
40. Material of the Foreground: Open the Pattern and choose ''texture_noel_2013''
with these settings
41. Activate Flood Fill Tool and fill the selection with the FG-Pattern
42. Effects- Edge Effects-Enhance More
43. Selections-Select invert
44. Effects- Plugins AAA
Frame - Foto frame with these settings
45. Selections- Deselect All
46. Image - Add borders-Symmetric checked:10 pixels color white
47. Magic Wand : click with your magic wand in the border of 10 pixels
48. Effects- Plugins -
Eye Candy 5 -Impact -Glass- Tab-Settings- User Settings and select my file - Preset ''noel_2013_glass''
49. Selections- Deselect All
50. Open the tube
''etoiles_noel_2013'' Edit/copy-Edit paste as a new layer and move .
51. Layers- New raster layer
52. Open the brush ''pinceau_noel-2013'' File- Export Custom Brush (Give it a name)
53. Material Properties: Foregrondcolor to color black and backgroundcolor to color white
54. Activate Brush Tool and select my file: ''pinceau_noel-2013' with these settings // Stamp on the right side 1x color black-1x color white

55. Open the tube
''deco_noel_2013'' Edit/copy-Edit paste as a new layer and move
Layers- Merge-Merge All
Image Resize 995 pixels
Width
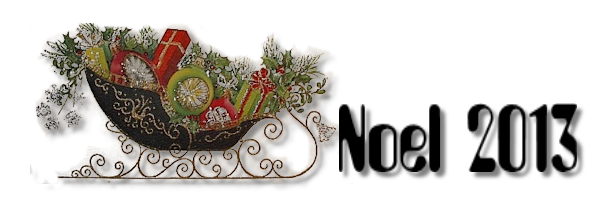
Open the tube titre en png ''
white_christmas '' Edit/copy-Edit paste as a new layer and move .
Save as JPG

I hope you enjoyed this lesson
Renée
This lesson was written by Renée the 7/11/2013
introduction
27/11/2013
Any resemblance with an existing lesson is merely a coincidence *
* Don't forget to thank the people who work for us and with us. I named the tubeurs - Testers and the translators.
Thanks Renée.
*
|


 Translations