|
Noel 2015

Let's start the lesson.
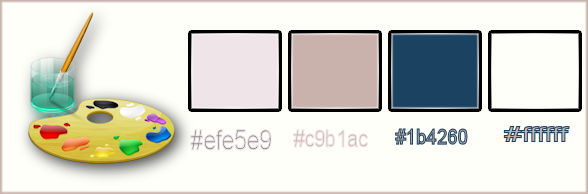
-Material Properties:Set your foreground color to: #efe5e9 - Set your background color to:
#c9b1ac
1.
Open the background image ‘’fond_NOEL-2015’’- /Window - Duplicate (or shift+D) - Close the original and proceed on the copy -Promote Background Layer =Raster 1
2.
Layers- New Raster Layer
3.
Selections Select All
4.
Activate the tube ‘’ At dawn - misted tube of A PSP
Devil.jpg’’
- Edit/Copy-Edit Paste into selection
Selections- Deselect All
5.
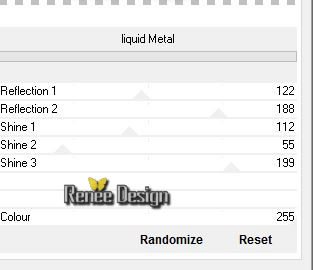
Effects –Plugins- Unlimited Kang 3- Liquid Metal use settings below
6.
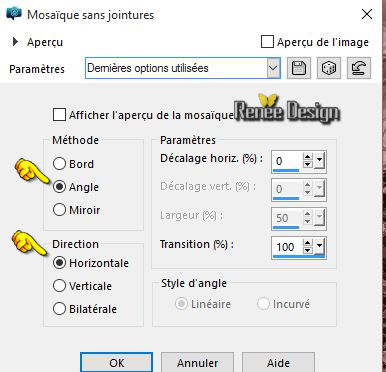
Effects-Image Effects-Seamless Tiling use settings below
7. Effects –Plugins -
Unlimited - Kang 1 – Abortion - using the default settings 183/80/196/222
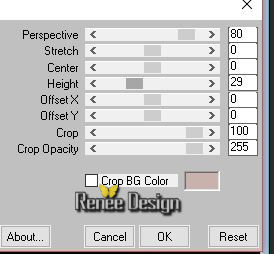
8. Effects –Plugins – Mura’s Meister – Perspective
tilling use settings below
9.
Layers - New Raster Layer
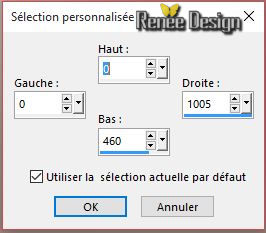
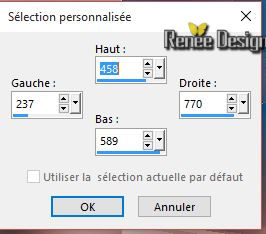
10.
Selection Tool ( S ) Custom selection use settings below
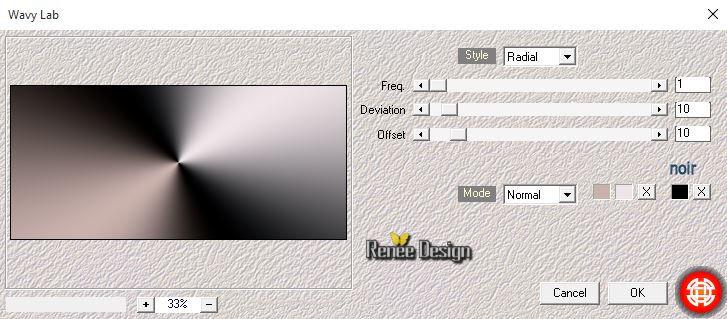
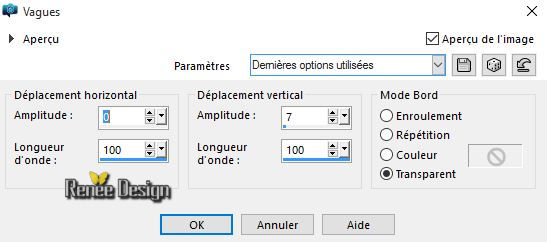
11. Effects- Plugins –Medhi – Wavy Lab use settings below( FG-/BG Color and Black )
Selections- Deselect All
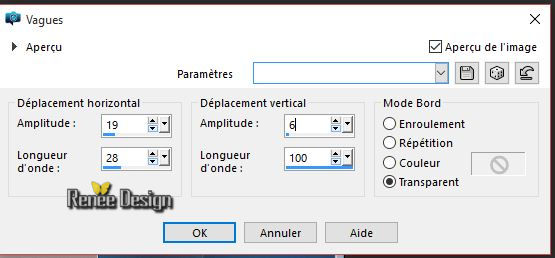
12.
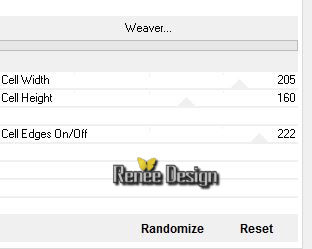
Effects -Plugins – Unlimited Toadies -Weaver use settings below
13.
Effects -Plugins - Unlimited -Filter Factory Gallery B- Button
Deluxe use settings below
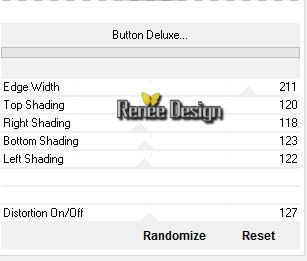
14.
Repeat: Effects-Plugins- Unlimited -Filter Factory Gallery B-Button
Deluxe use settings below
15. Layers- Duplicate– Image Mirror
16. In the Layerpalette- Double click on this Layer and set the Blend Mode to "Soft Light"
17. Layers- Merge- Merge- Down
18.
Selections - Load/save selections - Load selection from disk and select my file:’’selection_NOEL_2015_1’’
19.
Selections- Promote selection to Layer
Selections- Deselect All
20.
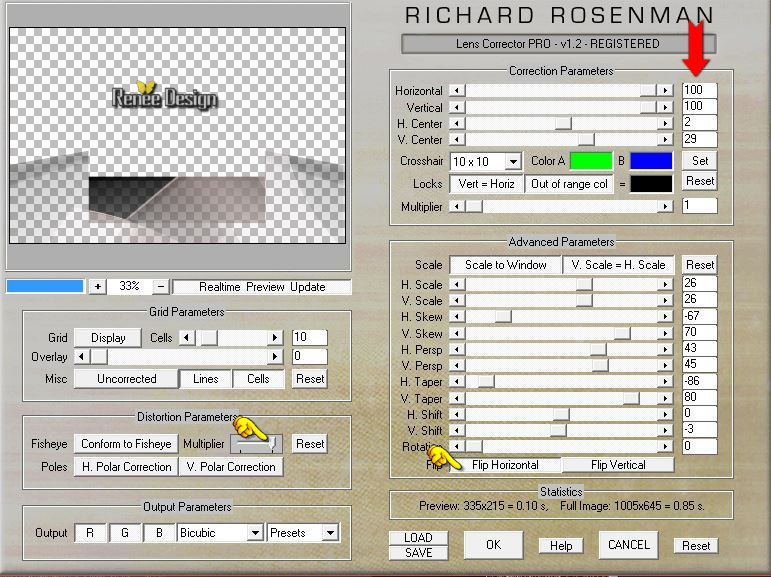
Effects- Plugins – Richard Rosenman –Lens Corrector
Pro use settings below
21. Layers- Duplicate– Image Mirror
22. Layers- Merge- Merge- Down
23. Image
Flip
24. Effects- 3 D Effects- Drop Shadow with these settings 0/0/76/35 Black
-
Layer palette – Make Raster 3 active -Double click on this layer and set the Blendmode to "Hard Light "
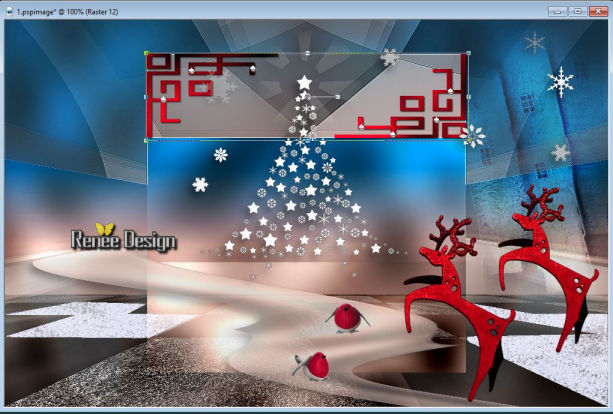
Your Layer palette look like this now-You should have this result
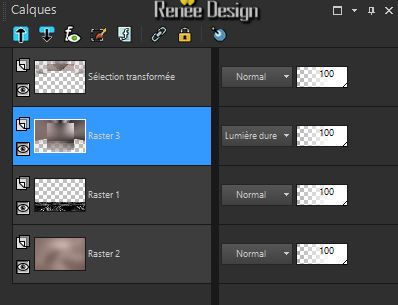
Layer palette: Stay on Raster 3
25.
Effects -Plugins- Unlimited - ICNETFILTERS – Color Filters –
Blue sky with these settings: 166/255
26.
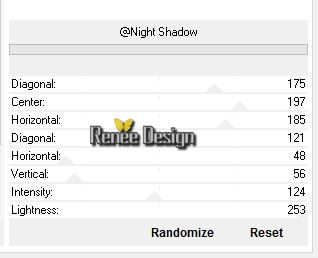
Effects –Plugins- Unlimited - &<Background Designers IV>-
@Night Shadow use settings below
- Layer palette – Make Raster 2 active
27.
Selections - Load/save selections - Load selection from disk and select my file:’’selection_NOEL_2015_2’’
Do not add a New Layer!!!
28.
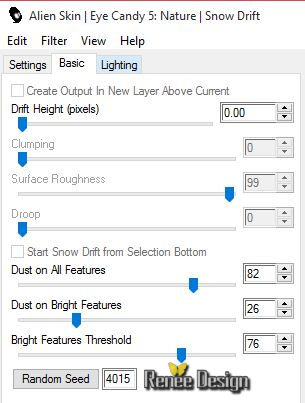
Effects- Plugins - Eyecandy5- Nature – Snow
Drift use settings below
Selections- Deselect All
-
Layer palette – Make Raster 3 active
29.
Selection Tool ( S ) Custom selection use settings below
Keep Selected !!
30. Effects- Distortion Effects- Wave use settings below
31.
Selections- Promote selection to Layer
Selections- Deselect All
32. Effects- Distortion Effects- Wave use settings below
33. Effects- 3 D Effects- Drop Shadow with the same settings //0/0/76/35 #000000
- Activate the top of the layer palette
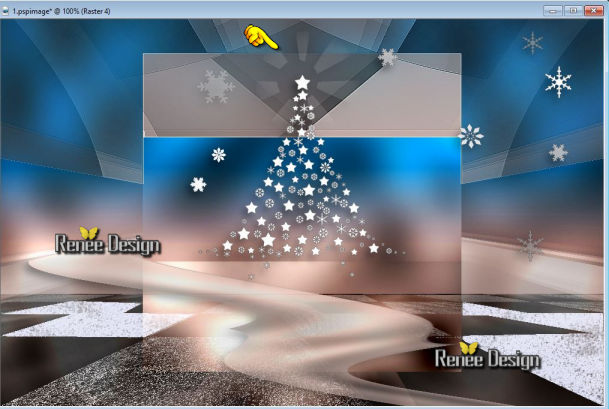
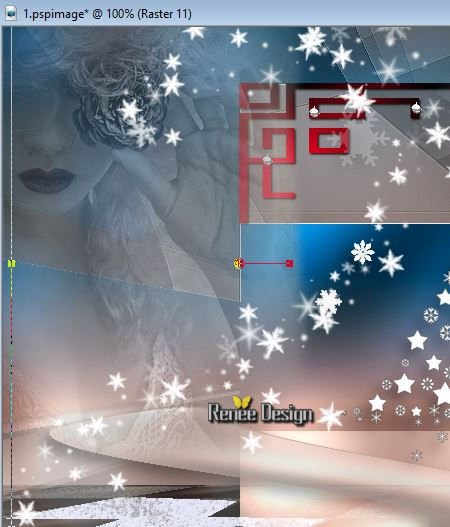
34. Activate the tube ‘’ StarChristmas.pspimage’’
- Edit/ Copy –Edit/ paste as new layer on your working image
- With the move tool, move it in the right place as shown in the example below
35. Effects- 3 D Effects- Drop Shadow with the same settings //0/0/76/35 #000000
36.
Activate the tube ‘’ TwistedHouses1.pspimage’’
Edit/ Copy –Edit/ paste as new layer on your working image
- With the Move Tool, move it in the upper right corner
37.Layers- Arrange- Move 4x Down ( underneath
Raster 3)
- Activate the top of the layer palette
38. Activate the tube ‘’ Joanie_Christmas_Deco_14-11-2013.pspimage’’
- Edit/ Copy –Edit/ paste as new layer on your working image
- With the Move Tool, move it in the bottom right corner
39. Activate the tube ‘’ Renee_tube-deco-noel-oiseaux.pspimage’’
-
Select 2 birds
- Edit/ Copy –Edit/ paste as new layer on your working image and place them to your taste
In the Layer palette: Activate the layer of Promoted Selection:
40. Activate the tube ‘’ Noel-2015_decorouge’’
- Edit/ Copy –Edit/ paste as new layer on your working image
- With the move tool, move it in the right place as shown in the example below
-In the Layer palette-Activate the layer of Promoted Selection:
41. Activate the tube’’ bibichemistfem07’’
- Edit/ Copy –Edit/ paste as new layer on your working image
-With the move tool, move it in the upper left corner
42.
In the Layerpalette, set Opacity to 65%
- Activate the top of the Layer palette
43. Activate the tube ‘’ Noel-2015_deco_etoiles.pspimage’’
- Edit/ Copy –Edit/ paste as new layer on your working image
- With the Move Tool, move it in the upper left corner as shown in the example below
44. Activate the tube ‘’ Doll_9’’
- Edit/ Copy –Edit/ paste as new layer on your working image
- With the Move Tool, move it in the bottom left corner
45. Effects- 3 D Effects- Drop Shadow with the same settings //0/0/76/35 #000000
46. Image - Add borders-Symmetric checked:10 pixels #ffffff
47. Image - Add borders-Symmetric checked: 45 pixels #1b4260
48. Image - Add borders-Symmetric checked: 6 pixels #ffffff
49. Click on your Text Tool / Font "ARBONNIE"
- -Material Properties:Set your foreground color to: #ffffff- Set your background color to:
#c9b1ac
-Write your text "NOEL 2015''
50.
Effects- Plugins - Eyecandy 5 Glass /Preset
Clear
51. Effects- 3 D Effects- Drop Shadow with these settings 1/1/100/1 #ffffff
52.
Layers- Merge- Merge All ( Flatten)
53. Image
Resize to 995 pixels Width
Save as JPG
We wish you all a Merry Christmas
I hope you enjoyed this lesson
Renée
This lesson was written by Renée 30/09/2015
Edited and Update
22/12/2015
*
Any resemblance with an existing lesson is merely a coincidence *
* Don't forget to thank the people who work for us and with us. I named the tubeurs - Testers and the translators.
Thanks Renée.
*
| 


 Translations


 When you see this logo the filter is imported in Unlimited

 _All rights reserved