|
Let's start the lesson.
-
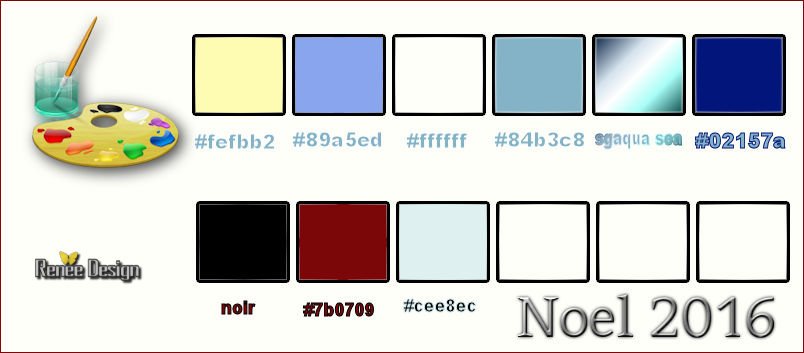
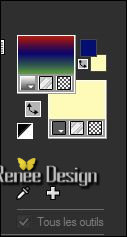
Color Palette- Set your foreground color to #fefbb2- Set your background color to #89a5ed
1.
Open the background image ‘’’Fond_Noel2016’’-Window - Duplicate (or shift+D) - Close the original and proceed on the copy -Promote Background Layer =Raster 1
2.
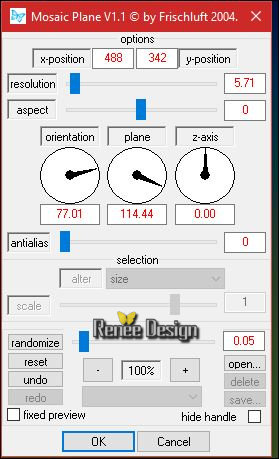
Effects –Plugins – Frischluft- Mosaic Plane use settings below
3.
Effects- Edge Effects- Enhance
4.Layers- Duplicate
-
Image Mirror (CTRL+)
5.
Effects –Plugins – Deformation – Pathways to
Helion
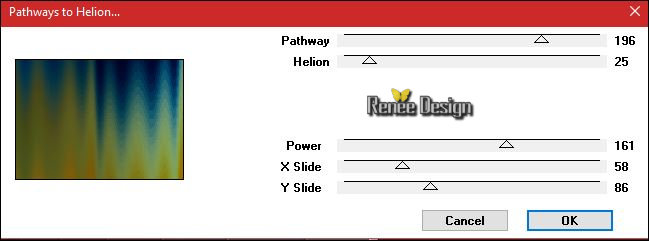
- Double click on this Layer and set the Blend Mode to "Dodge"
6. Open the tube ‘’ Tube_fenetre’’
- Edit/ Copy-Back to your work -Edit - Paste as new layer on your working image
- Do not move it is in the right place
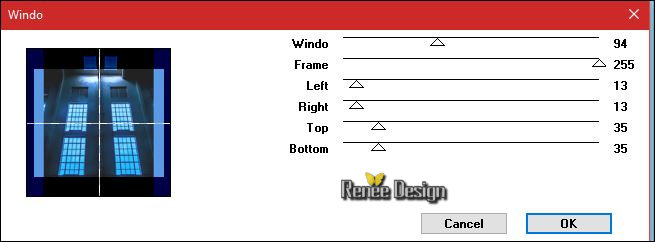
7. Effects –Plugins –Mock – Windo use settings below
(attention: the background color determined the effect of the filter)
8. Effects –Plugins -
Unlimited 2.0 – VM Stylize – Zoom blur using the default setting
39/60
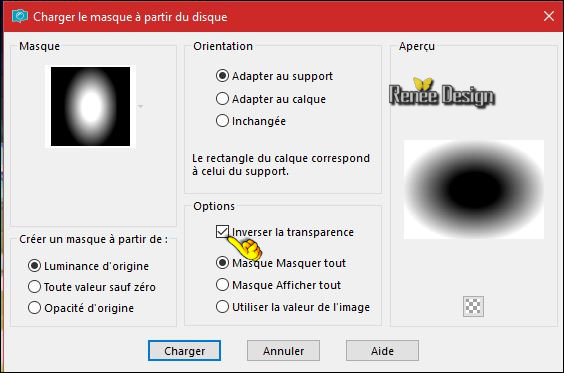
9.
Layers- Load/Save mask-Load Mask from Disk and select:
‘’20/20’
- Layers- Merge- Merge Group
10. Layers- Duplicate
- Layers- Merge-Merge Down
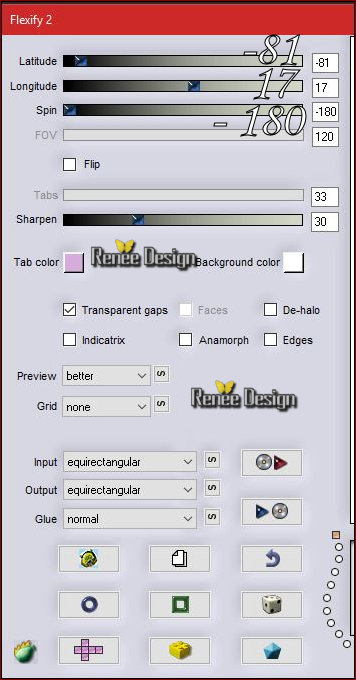
11. Effects
–Plugins – Flaming Pear Flexify2 use settings below
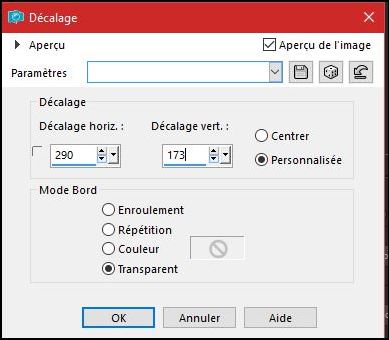
12. Effects- Image Effects- Offset with these settings: H = 0 and V = 200
- Double click on this Layer and set the Blend Mode to " Screen "
- Color Palette- Set your foreground color to #ffffff
13. Layers- New Raster Layer
- Activate Flood Fill Tool and fill the layer with the foreground color #ffffff
- Open the mask ‘’ MasqueRenee_Noel_2016’’ in your PSP and minimize it
14. Layers - New Mask Layer - From Image and choose my file : ‘’
MasqueRenee_Noel_2016 »

-Layers- Merge- Merge Group
15 .
Selections –load/save selection –load selection from disc and select my selection:’’ Noel2016_1’’
-
DELETE 
Selections- Deselect All
16.
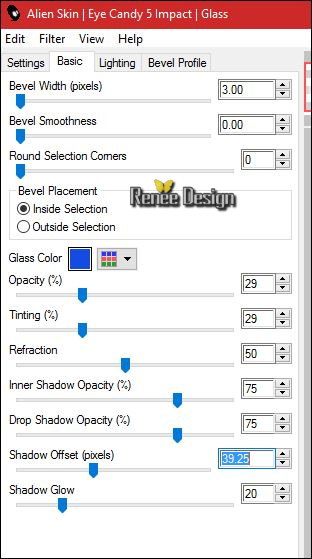
Effects –Plugins – EyeCandy 5 Impact – Glass- tab Settings/User settings choose my Preset
‘’Noel_2016_Glass ‘’
-Or manual settings as shown in the example below-Color #144be0
17. Image
Resize to 35 % resize all layers not checked
18. Effects- Image Effects- Offset with these settings:
19. Effects-Edge Effects- Enhance
- Color Palette- Set your foreground color to #ffffff - Set your background color to #84b3c8
- Color-Palette ; Change foreground material into gradient and select ‘’ sg_aqua sea’’
-
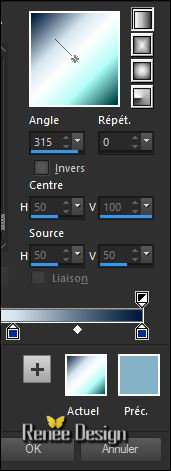
Set your foregroundcolor to linear gradient configured like this
20. Layers- New Raster Layer
21.
Selections –load/save selection –load selection from disc and select my selection:’’ Noel2016_2’’
22. Activate Flood Fill Tool and fill the selection with the gradient
Selections- Deselect All
23. Layers- Duplicate
24. Effects
–Plugins -Filter Attacks –
- Click
on Filter
- Select Border- Zuckersüß
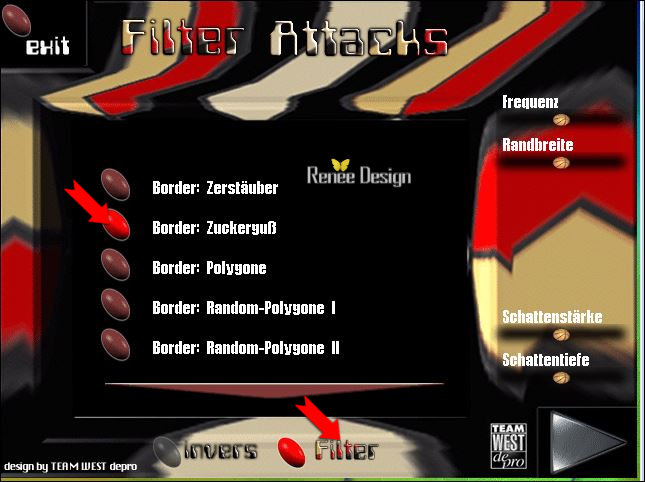
- Click on the menu to open
-Slide the effects of "Randbreite-Schattenstärke-Schattentiefe "to obtain a similar result
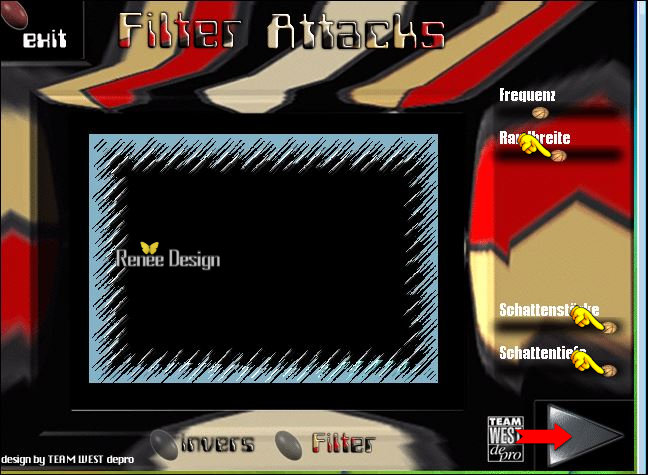
-Click on the little red arrow and OK
- Double click on this Layer and set the Blend Mode to " Screen "
25. Layers- Merge- Merge Down
26. Layers- New Raster Layer
27.
Selections –load/save selection –load selection from disc and select my selection:’’ Noel2016_3’’
28. Activate Flood Fill Tool and fill the selection with the gradient
Selections- Deselect All
29. Effects
– Plugins – L& K’s – Sanne
25/164
30. Layers- Duplicate
31. Effects- Image Effects- Offset with these settings: H = 0 and V = - 18
32. Layers- Merge- Merge Down
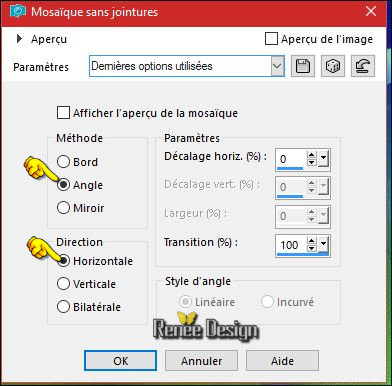
33. Effects- Image Effects- Seamless Tiling use settings below
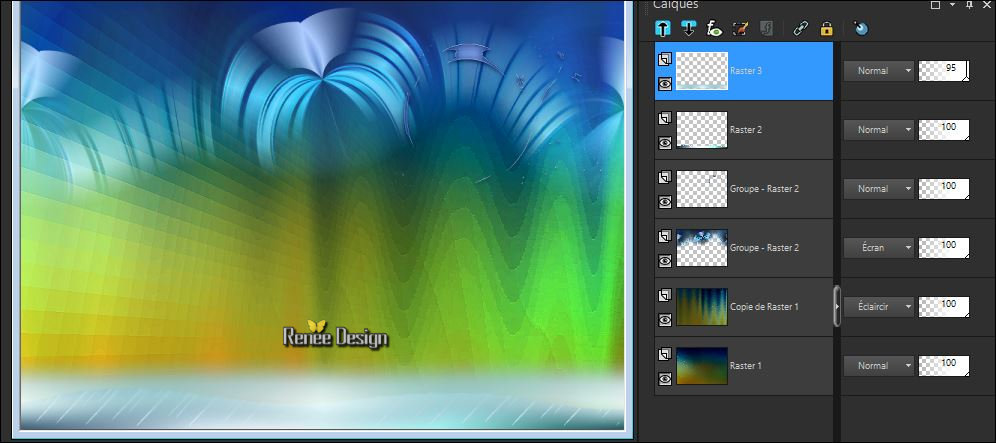
-
Set the layer Opacity of this layer to 95%
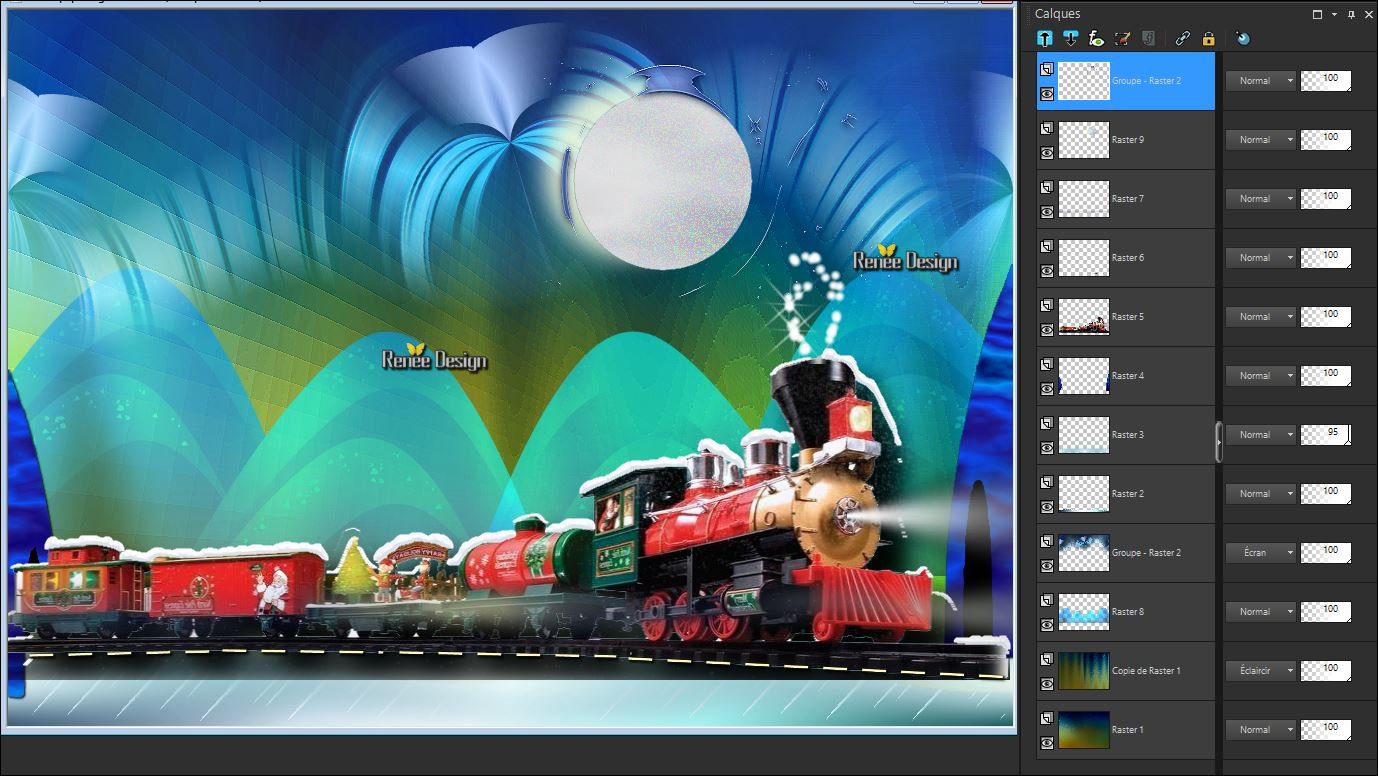
Your Layer palette look like this now-You should have this result
- Color Palette- Set your foreground color to #fefbb2 - Set your background color to
#02157a
34. Layers- New Raster Layer
35.
Selections –load/save selection –load selection from disc and select my selection:’’ Noel2016_5’’
- Activate Flood Fill Tool and fill the selection with the background color #02157a
36. Effects
–Plugins - Unlimited ICNET FILTERS– Render –Plasma
-In the menu select
motif 46
 
Selections- Deselect All
37. Effects- 3 D Effects- Drop Shadow with these settings: 1/1/100/3 black
38. Layers- New Raster Layer
39.
Selections –load/save selection –load selection from disc and select my selection:’’ selection_6’’
40. Color Palette- Set your foreground color to #000000 -Activate Flood Fill Tool and fill the selection with the foreground color #000000
Selections- Deselect All
41. Layers- Merge- Merge Down
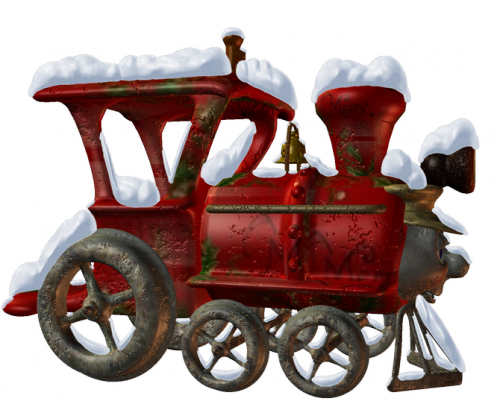
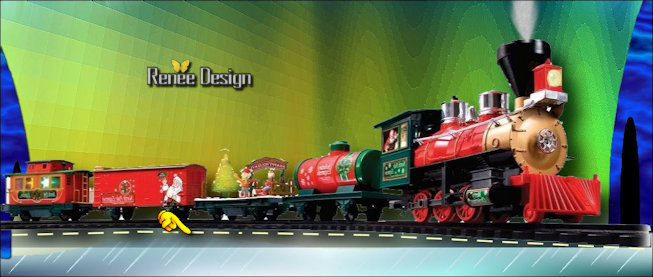
42. Open the tube « Renee_tubes_Noel -2016_Decos ‘’
Do not close we need it later for the rest of the work
- Activate layer ‘’train’ of the tube
-
Edit/ Copy-Back to your work -Edit - Paste as new layer on your working image
43. Effects- Image Effects- Offset with these settings: H = - 9 and V = -
95
44. Activate Pen Tool (V) -Set your foregroundcolor to
#fefbb2
– Line Style: "Dash Dot Dot "with these settings

- Draw a line like this
-
Convert to Raster Layer
45. Effects- 3 D Effects- Drop Shadow with the same settings
- Repeat Drop Shadow
46. Layers- New Raster Layer
47.
Selections –load/save selection –load selection from disc and select my selection:’’ selection_4’’
48. Effects
– Plugins –Rendu – Nuages
Selections- Deselect All
49. Adjust- Blur- Gaussian Blur: Radius 10
- In the Layer-Palette- Make Copy of Raster 1 active
(The second layer from the bottom)
- Back on the tube "DECO"
50. Activate the layer ‘’Colline’’of the tube
- Edit/ Copy-Back to your work -Edit - Paste as new layer on your working image
51.Effects- Image Effects- Offset with these settings: H = 0 and V = -54
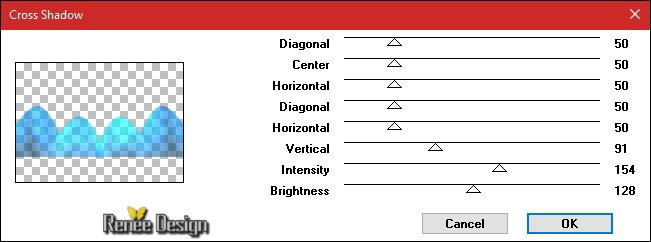
52. Effects
–Plugins -Graphic plus – Cross shadow use settings below
In the Layer-Palette- Make Raster 5 active ( The Train )
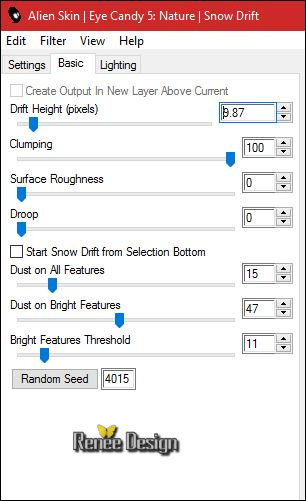
53. Effects
–Plugins – Alien Skin Eyecandy Nature – Snow
drift
-
Tab -Basic , and enter the new settings like this
(You can use
Filter VDL Adrenaline –SnowScape to create snow effect
)
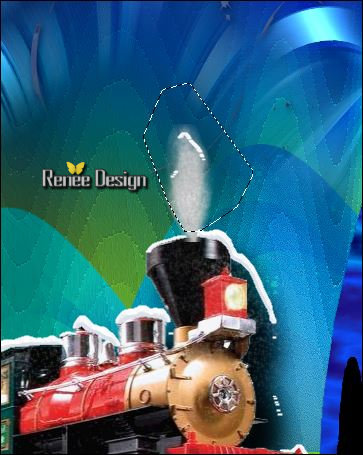
54. Activate Freehand Selection Tool -select this part as shown in the example below
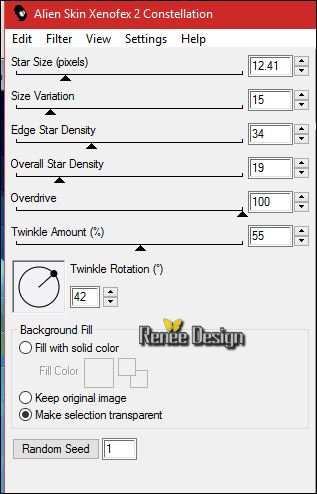
55. Effects
– Plugins – Alien skin Xenofex 2-
Constellation use settings below
Selections- Deselect All
56. Back on the tube ‘’DECOS’’
- Activate the layer ‘’lumiere’ on the tube
- Edit/ Copy-Back to your work -Edit - Paste as new layer on your working image
-Place in front of the locomotive (see finished image)
57. Layers- Merge- Merge Down
- To replace the top of the layers palette
58. Layers- New Raster Layer
59.
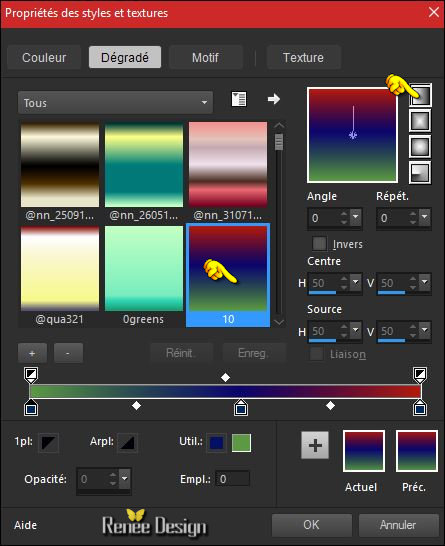
Selections –load/save selection –load selection from disc and select my selection:’’ Noel2016_7’’
- Color-Palette ; Change foreground material into gradient and select "dégradé_10’’
Swap your materials, so the light colour is on the bottom
-
Set your foregroundcolor to linear gradient configured like this
60. Activate Flood Fill Tool and fill the selection with the gradient
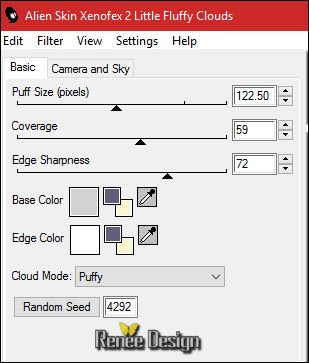
61. Effects
-Plugins –Alien skin Xenofex 2 – Little Fluffy
Clouds
Colors #d2d2d2 and #ffffff (and the colors of the layers palette )
59.
Effects -Plugins- Unlimited 2.0 - UnPlugged Effects- Random Colors... a
36
Selections- Deselect All
60. Effects- 3D Effects- Drop Shadow with these settings : Color #faf6d1
-ATTENTION !!!!! Activate the fifth layer from the bottom of the layer-palette = Group-Raster 2 (Glaseffect)– Layers- Arrange- Bring to Top
-Move it in the right place as shown in the example below
- Stay on Top in the Layer Palette
61. Activate the tube "DECOS"
- Activate the layer ‘’pere_Noel ‘’of the tube
- Edit/ Copy-Back to your work -Edit - Paste as new layer on your working image
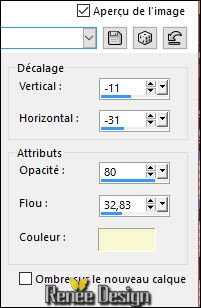
62. Effects- Image Effects- Offset with these settings: H = 28 and V = 204
63. Layers- New Raster Layer
64.
Selections –load/save selection –load selection from disc and select my selection:’’
Noel2016_8’’
65. Effects
–Plugins - Xero - Sparkles use settings below ( Color #ffffff )
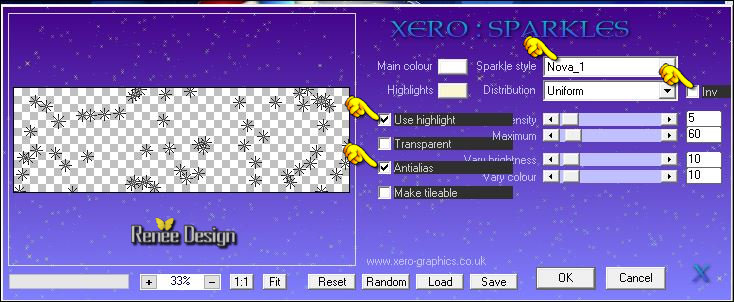
Selections- Deselect All
- Layers- Arrange- Move Down
- To replace the top of the layers palette
66. Layers- New Raster Layer
67.
Selections –load/save selection –load selection from disc and select my selection:’’ Noel2016_9’’
68. Color Palette- Set your foreground color to #ffffff-Activate Flood Fill Tool and fill the selection with the foreground color
Selections- Deselect All
69.
Adjust- Blur- Gaussian Blur: Radius 5
70. Effects- 3D Effects- Drop Shadow with these settings : - 11/ 8 /80 /45 black
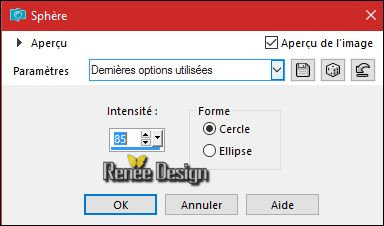
71. Effects
– Geometric Effects-Spherize
72. Back on tube "DECOS"
- Activate the layer ‘’terre_effet’’ of the tube
- Edit/ Copy-Back to your work -Edit - Paste as new layer on your working image
- With the Move Tool, move it in the right place /on the moon (see finished image)
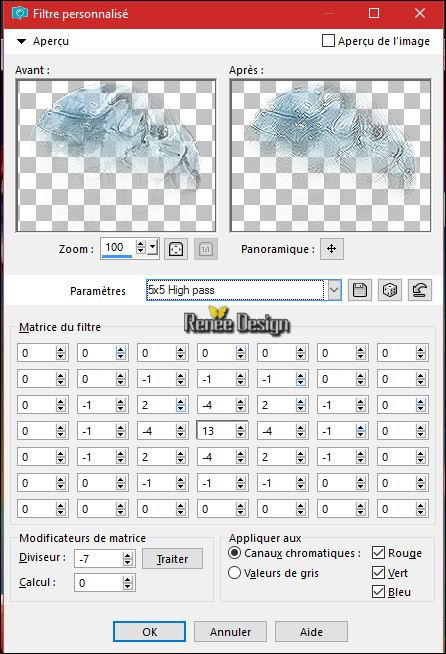
73. Effects
–User Defined Filter 5x5 Hight pass ( ››C:\Users\YourName\Documents\My PSP-files\ Preset )
- Layers- Merge -Merge Visible
74. Back on the tube "DECOS"
- Activate the layer « arcs’ of the tube
-
Edit/ Copy-Back to your work -Edit - Paste as new layer on your working image
75.Effects- Image Effects- Offset with these settings: H = - 300 and V =
204
- Color Palette- Set your foreground color to #7b0709- Set your background color to #000000
76. Layers- New Raster Layer
77.
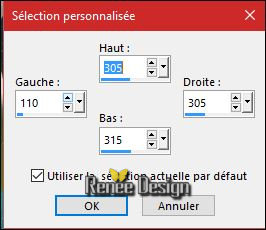
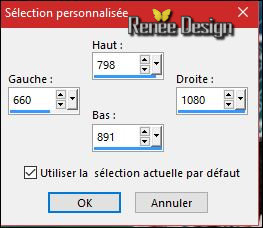
Activate Selection Tool -Custom Selection (S) -Rectangle with these settings
78. Activate Flood Fill Tool and fill the selection with the background color #000000
Selections- Deselect All
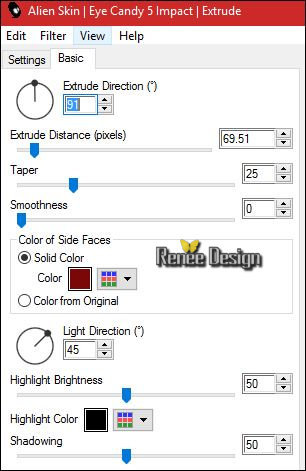
79. Effects
– Plugins – EyeCandy5 Impact-Extrude - tab Settings/User settings choose my Preset
‘’Noel_2016_extrude’’
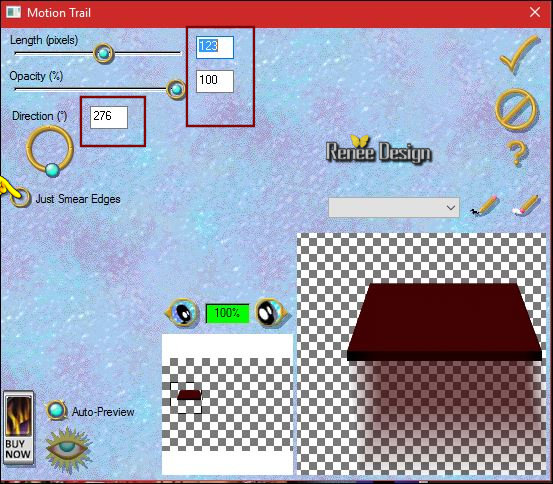
80. Effects
–Plugins – EyeCandy 3 – Motion Trail use settings below (attention
unchecked "Just smear Edges" )
if you receive an error message
.jpg) Click> OK and the filter opens Click> OK and the filter opens
81. Back on the tube "DECOS"
- Activate the layer ‘’ Mon_noel-2016’’of the tube
- Edit/ Copy-Back to your work -Edit - Paste as new layer on your working image
-Move what you like
82. Activate the layer ‘’fillette ‘’of the tube
- Edit/ Copy-Back to your work -Edit - Paste as new layer on your working image
- and move to the right place
83. Activate the layer ‘’Boules de neige’’of the tube
Edit/ Copy-Back to your work -Edit - Paste as new layer on your working image
-
Move to the right place
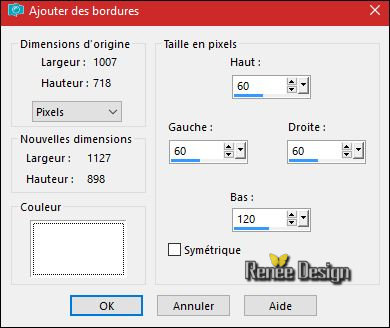
84. Image - Add borders-Symmetric checked: 1 pixel black
-Selections- Select All
85. Image - Add borders-Symmetric NOT checked with these settings-Color #ffffff
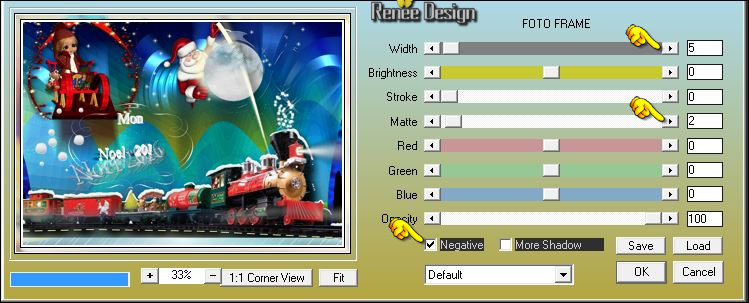
86. Effects
– Plugins AAA Frame - Foto frame use settings below
87. Effects
–3D Effects-Drop Shadow using the default settings
Repeat Drop Shadow negative -10/-10
Selections- Deselect All
88. Layers- New Raster Layer
89.
Activate Selection Tool -Custom Selection (S) -Rectangle with these settings
90. Pot of Paint: Change the opacity of the color at 65% - Activate Flood Fill Tool and fill the selection with the background color #000000
91.
Selections –Modify -Contract 2 pixels
- Pot of Paint:Opacity of the color at 65% –Color Palette- Set your foreground color to #cee8ec-Activate Flood Fill Tool and fill the selection with the foreground color#cee8ec
Selections- Deselect All
92. Effects>Distortion Effects >Wind direction - From left - Wind strength 100
93. Layers- Duplicate–Image Mirror(CTRL+B)
94. Layers- Merge- Merge Down
95. Back on the tube " DECOS"
- Activate the layer ‘’titre final ‘’of the tube
Edit/ Copy-Back to your work -Edit - Paste as new layer on your working image
-Move Tool / place your tube to the bottom of your image
96. Layers- Merge- Merge All (flatten)
97. Image
Resize to 90%
Save as JPG

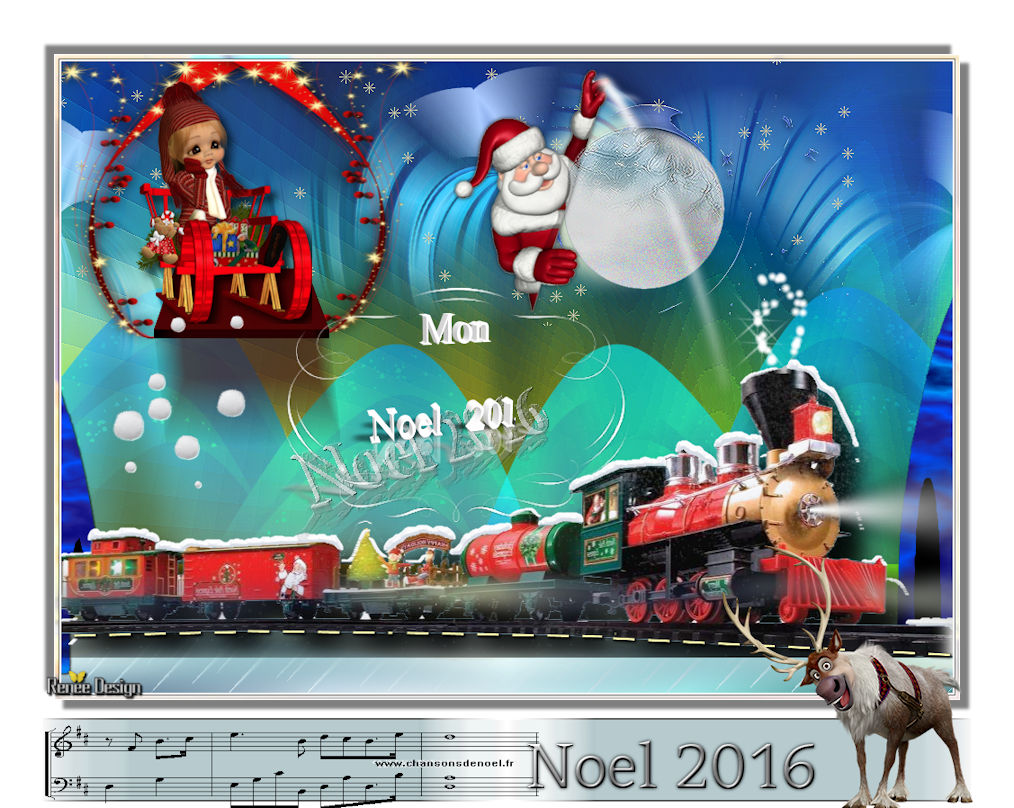
Merry Christmas to everyone
I hope you enjoyed this lesson
Renée
This lesson was written by Renée 10/09/2016
Edited and Update
2016
Any resemblance with an existing lesson is a coincidence
* Do not forget to thank the people who work with us and for us I have appointed the tubeurs and translators
Thanks Renée *
*
| 
 Translations


 If a plugin supplied appears with this icon it must necessarily be imported into Unlimited
*
If a plugin supplied appears with this icon it must necessarily be imported into Unlimited
* 

 All rights reserved