|
Let's
get started with the lesson.
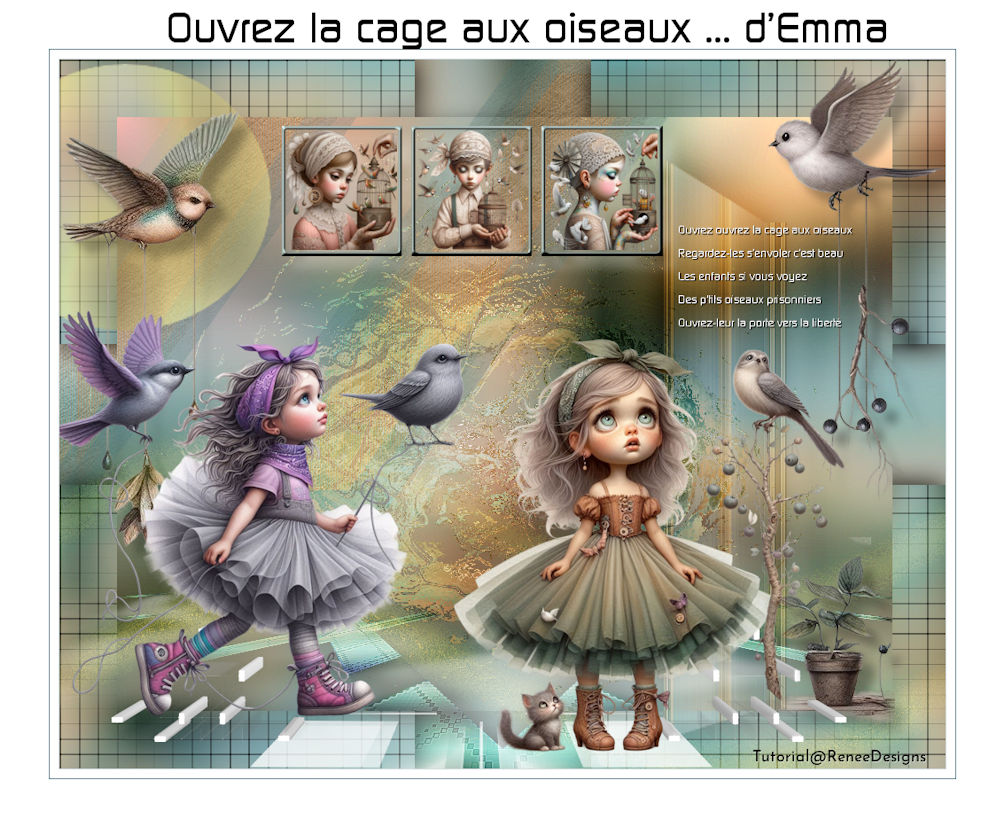
Ouvrez la cage aux oiseaux
… d’Emma
Let's help Emma out by
unlocking her birdcage!
- Preparation
-Material Properties: Set your Foreground color to color
1 – Set your Background color to color 2

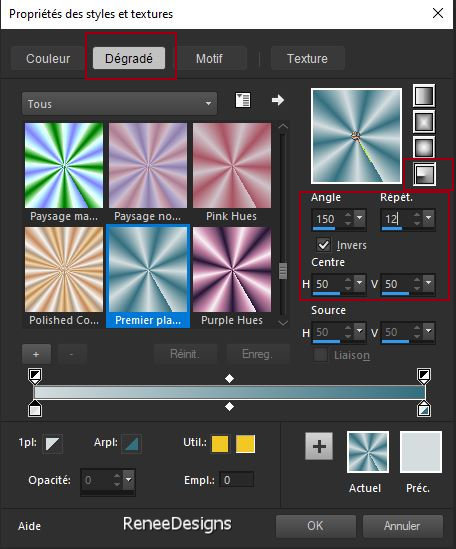
- Replace your
foreground color with a foreground/background radial
gradient configured like this.
1. Open a new transparent
image in this size: 1000 x 800 Pixels
2. Flood Fill Tool
 –
Fill the layer with the gradient. –
Fill the layer with the gradient.
3. Selections-Select All
4. Open the tube
‘’Renee-Tubes
- Cage-aux-oiseaux-Image1’’
-Edit- Copy- Activate your work-Edit-Paste into
selection

5. Effects- Image Effects-
Seamless Tiling using the default settings
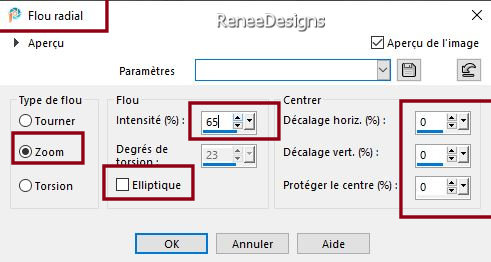
6. Adjust-Blur-Radial Blur
use the settings below
7. Adjust- Blur-Gaussian
Blur-Radius 30%
8. Layers-Duplicate
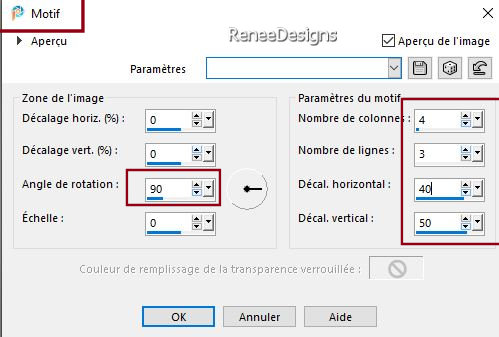
9. Effects-Reflection
Effects-Pattern use the settings below
10. Layers-Properties-Set
the Blend Mode to " Burn " -Reduce the opacity of this
layer to 65%
11. Layers-Merge-Merge Down
12. Adjust-One Step Photo
Fix
13. Layers-Duplicate
14. Image - Resize by 80% -
Uncheck - Resize all layers
15. Effects- Image Effects-
Seamless Tiling using the default settings
16. Effects- 3D- Effects-
Drop Shadow with these settings: 0/0/100/45 Color black
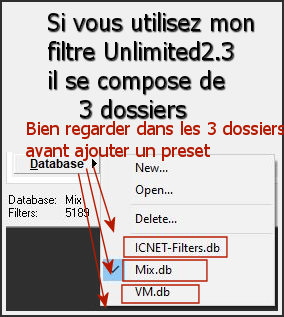
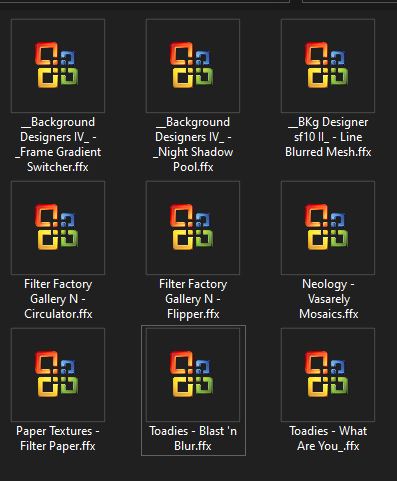
17. Effects - Plugins - Filters
in Unlimited 2.0 - &<BKg Designer sf10
II> - Line Blurred Mesh : 119 /20
18. Selections –load/save
selection –load selection from disc and select my
selection: ‘’cage-oiseaux-1’’

- Activate raster 1 in the
layers palette
19. Selections –
Promote selection tot layer
20. Effects - Plugins - Filters
in Unlimited 2.0 - Filter Factory
Gallery N – Flipper : 33/42/21
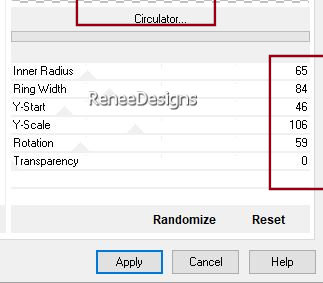
21. Effects - Plugins - Filters
in Unlimited 2.0 - Filter Factory
Gallery N – Circulator use the settings below
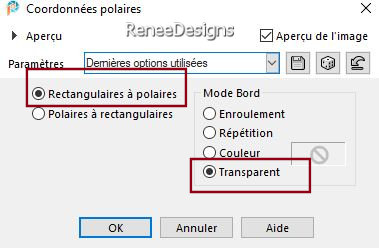
22. Effects–Distortion
Effects– Polar Coordinates- Rectangular to polar checked
23. Image - Resize by 65% -
Uncheck - Resize all layers
24. Layers-Duplicate
25. Image-Mirror/Mirror
vertical(Image/Flip in older versions of PSP)
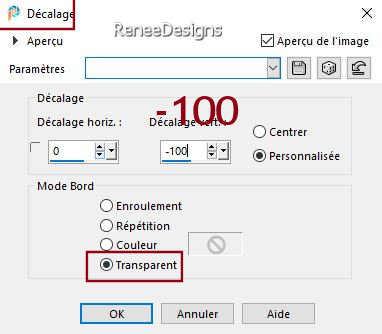
26. Effects – Image Effects
– Offset use the settings below
27.Layers-Merge-Merge Down
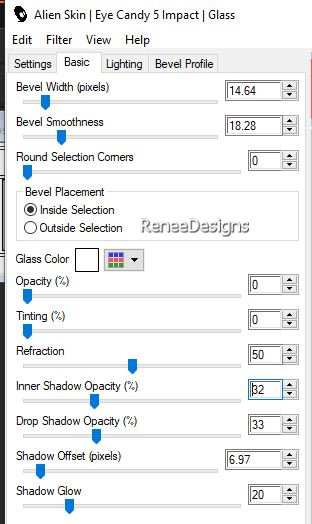
28. Effects - Plugins - Alien Skin EyeCandy 5 – Impact – Glass
use the settings below
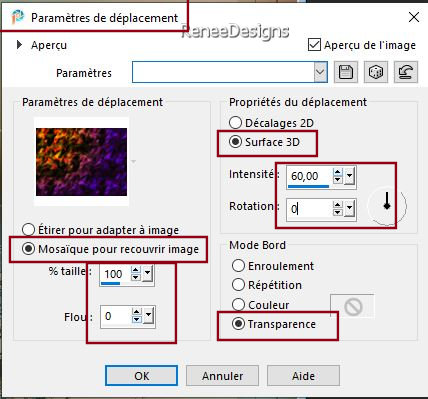
29.
Effects – Distortion Effects –
Displacement Map -Corel_04_002
( You will also find it
under the name ‘’ Plasmaflame ‘’ Put it in the
displacement folder on your PSP.
Tilemap to
cover image /3D surface/Transparent checked
30. Layers-Properties-Set
the Blend Mode to " Overlay "
- Activate the top of the
layer palette (Copy of Raster 1)
31. Layers-Duplicate
32. Effects – Plugins – Simple – Diamonds
33. Layers- Arrange-Move
Down-and place above Raster 1.
34. Layers-Properties-Set
the Blend Mode to "Overlay " -Reduce the opacity of this
layer to 51%
35. Effects - Plugins - Filters Unlimited 2.0 - Neology - Vasarely
Mosaics at 8
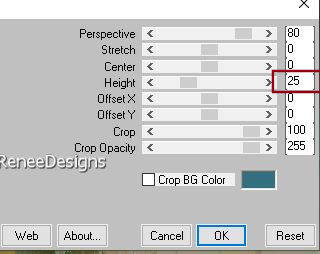
36. Effects – Plugins – Mura’s Meister – Perspective Tiling
use the settings below
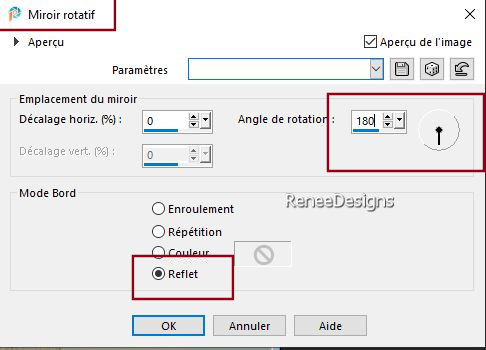
37. Effects – Reflection
Effects – Rotating Mirror use the settings below
38. Effects – Edge
Effects-Enhance More
39. Layers- Duplicate
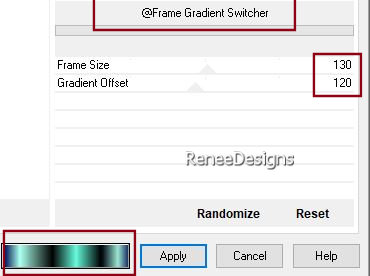
40. Effects - Plugins - Filters
in Unlimited 2.0 -&<Background Designers
IV> @Frame Gradient Switcher
- Select number 19 with
these settings
41. Layers-Properties-Set
the Blend Mode to " Hard Light " -Reduce the opacity of
this layer to 51%
42. Effects- 3D- Effects-
Drop Shadow with the same settings
- Activate Raster 1 in the
layers palette
43. Selections –load/save
selection –load selection from disc and select my
selection: ‘’cage-oiseaux-2’’
44. Selections – Promote
selection to layer
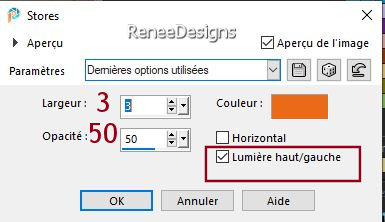
45. Effects – Texture Effects –
Blinds use the settings below -Color number 3
46. Effects – Plugins – Toadies – What are you
: 10/10
47. Effects - Plugins - Filters
in Unlimited 2.0 - ICNET-Filters –
Paper Textures – Filter Paper : 69/74
- Activate the top of the
layers palette
48. Layers-New Raster layer
49. Selections –load/save
selection –load selection from disc and select my
selection: ‘’cage-oiseaux-3’’
- Foreground properties -
Set your Foreground color to color 4
50. Flood Fill Tool
–
Opacity at 50% –
Fill the selection with foreground color number 4
51.
Effects - Plugins - Filters in Unlimited 2.0 -
&<Background
Designers IV>- @Night Shadow Pool use the settings
below

52. Open the tube ‘’ Renee-Tubes -
Cage-aux-oiseaux-Image2.’’ -Edit - Copy- Activate your
work -Edit - Paste as new layer
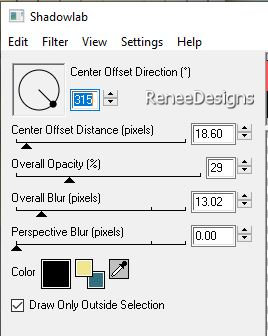
53. Effects – Plugins – EyeCandy 4000 -Shadowlab
use the settings below
54. Pick Tool: (K) on your
keyboard - Enter the following parameters on the toolbar
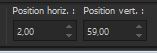 2/ 59
2/ 59
Press the ( M ) button to
close the tool
Foreground properties- the
foreground color is set to number 4 (if you change
the color, use a light color)
55. Layers-New raster layer
56. Selections –load/save
selection –load selection from disc and select my
selection: ‘’cage-oiseaux-4’’
57. Flood Fill Tool
–
Opacity at 100% –
Fill the selection with the foreground color
58. Effects - Plugins -Filters
in Unlimited 2.0 – Toadies - What are
you?- Overdose at 11
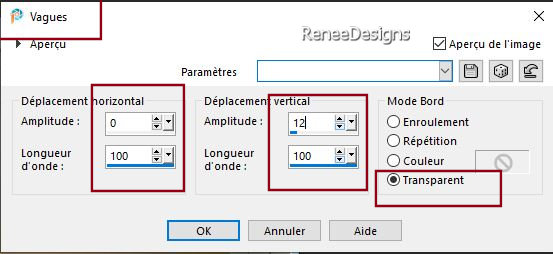
59. Effects – Distortion
Effects– Wave use the settings below
60. Effects -Plugins -Filters Unlimited 2.0 – Toadies - Blast 'n
Blur : 5/17
61. Layers-Properties-Set
the Blend Mode to " Hard Light " -Reduce the opacity of
this layer to 77%
- Activate raster 1 in the
layers palette
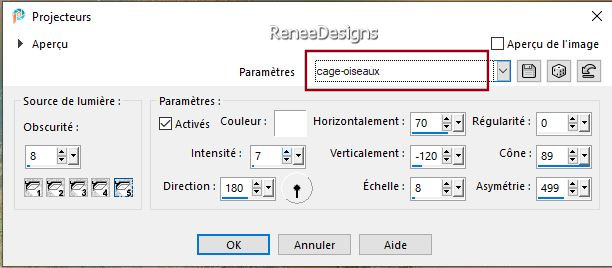
62. Effects – Illumination
Effects– Lights –select my file-Preset ‘’cage-oiseaux’’
(Place it in the Presets folder of your PSP.)
Verify that the settings
are correct
-Activate the top of the
layers palette
63. Open the tube ’’ Renee-Tubes -
Cage-aux-oiseaux-Image 3.’’ -Edit - Copy- Activate your
work -Edit - Paste as new layer
64. Pick Tool: (K) on your
keyboard - Enter the following parameters on the toolbar
 790 /0
Press the ( M ) button to
close the tool
65. Effects-Plugins- Eyecandy 4000 - Shadowlab
with the same settings
66.
Open the tube ‘’Renee-Tubes -
Cage-aux-oiseaux-Image4’’ -Edit - Copy- Activate your
work -Edit - Paste as new layer
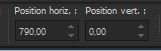
67. Pick Tool: (K) on your
keyboard - Enter the following parameters on the toolbar
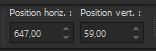 647
/59 647
/59
Press the ( M ) button to
close the tool
- Layers-Properties-Set the
Blend Mode to "Soft Light "
68.Layers-New raster layer
69. Selections –load/save
selection –load selection from disc and select my
selection: ‘’cage-oiseaux-5’’
70.Material Properties:Set
the color of your foreground to color 6
Flood Fill Tool
–
Opacity at 80% –
Fill the selection with color 6 (white)
71. Layers-New raster layer
72. Selections –load/save
selection –load selection from disc and select my
selection: ‘’cage-oiseaux-6’’
73. Flood Fill Tool
–
Opacity at 100% –
Fill the selection with color 6 (white)
(mouse click 2 or 3 times)
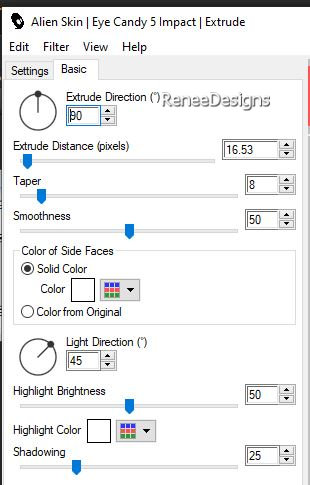
74. Effects - Plugins - Alien Skin EyeCandy 5 – Impact – Extrude
use the settings below
75. Layers-New raster
layer
76. Selections –load/save
selection –load selection from disc and select my
selection: ‘’cage-oiseaux-7’’
77. Material Properties:Set
the color of your foreground to color 5
Flood Fill Tool
–
Opacity at 100% –
Fill the selection with color 5
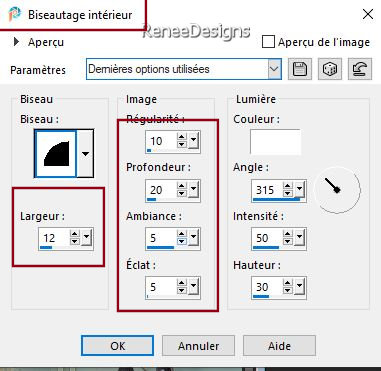
78. Effects – 3D-Effects –
Inner Bevel use the settings below
79. Activate your Magic
Wand – Tolerance at 0 and Feather at 0

- Use your magic wand to
select the first square
I have not added a new
layer
80. Choose Image and Edit-
Copy - Edit- Paste in Selection
- Do the same thing with
the other 2 squares
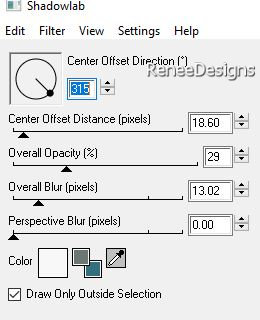
81. Effects – Plugins – Eye Candy 4000 - Shadowlab
use the settings below -Please note, the color is white
82.
For
decoration choose 2 tube and paste as a new layer on
your work. Renée reduced the tube to 48
See what works best for you
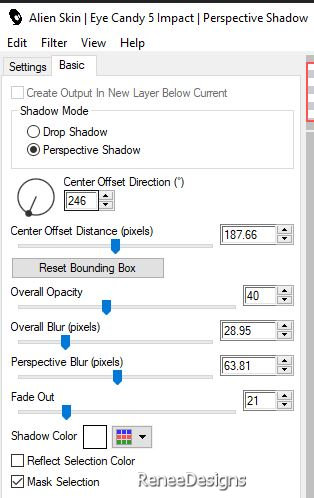
83. For the shadow on these
tubes, Renée chose the following:
Effects-Plugins – Alien
Skin Eyecandy 5 Impact –Shadowuse the settings below
84. Open the tube with the ‘’Texte ‘’
Paste as a new layer -place to your liking
85. Image - Add
Borders-Symmetric checked: 1 Pixel -Color number 1
Image - Add
Borders-Symmetric checked: 10 Pixels-Color white
Image - Add
Borders-Symmetric checked: 1 Pixel -Color number 2
Image - Add
Borders-Symmetric checked: 55 Pixels
-Color
white
86. Text Tool-Use the
provided font to write your title.
87. Add the author's
watermark to your work and your own watermark.
88. Layers-Merge-Merge All
(flatten)
89. Resize the image to
1005 pixels in width. Resize all layers.
Save as JPG
I appreciate your attention
and engagement with this lesson.
Renée
Renée has written this
lesson. 04/08/2024
I have edited and updated
it.
in 2024
*
Any resemblance to an
existing lesson is purely coincidental.
Do not forget to thank the people who work with us and
for us.
I have appointed the
tubeurs and translators.
Thank you
*
|
 Translations