|
Let's start the lesson
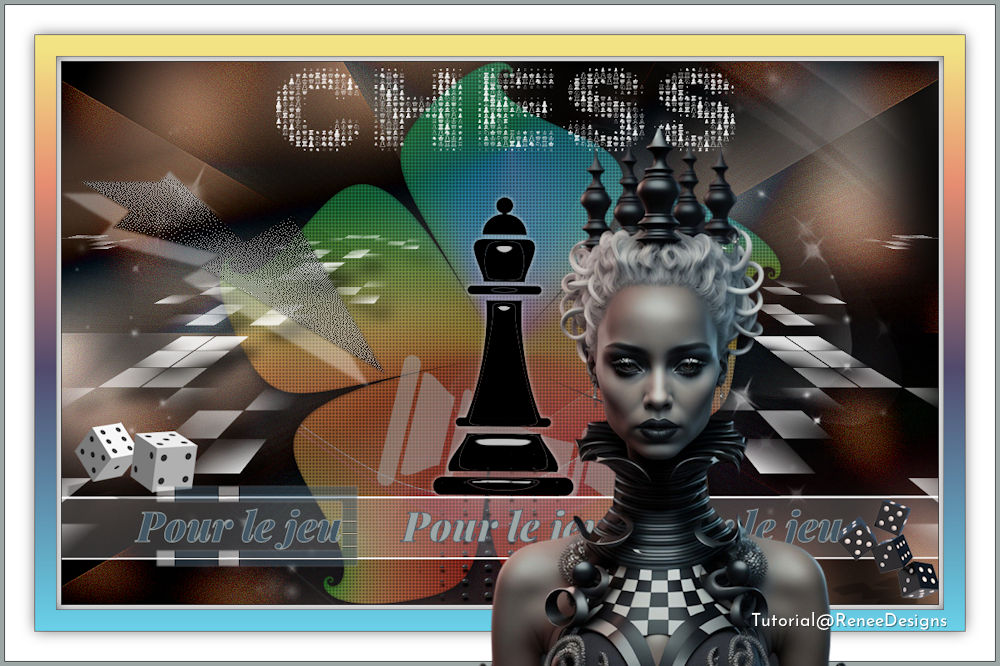
Pour le jeu/For the game

- Preparation
-Material Properties:
Set your Foreground color to color #435664=color 4 – Set your Background color to color #bbb5b3=color 2

1. File: Open a transparent image in this size: 1050 x
650 Pixels
2. Flood Fill Tool -
Fill the layer with the Background color #bbb5b3=color 2
3. Effects – Plugins – Medhi – Vibrations 1.1 use the settings below
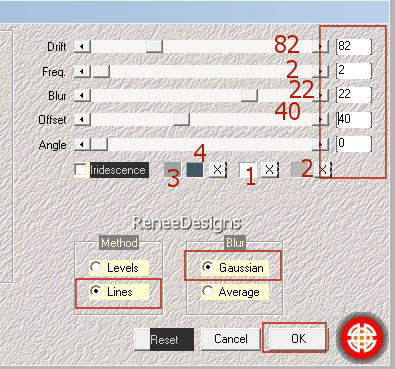
4. Layers- New Raster Layer
5. Selections –load/save selection –load selection from disc and select my selection: ‘’pour-jeu-1’’
Material Properties: Set your Foreground color to Gradient and select ’’bkgr65’" Style Linear with these settings
6. Flood Fill Tool  -
Fill the selection with the gradient -
Fill the selection with the gradient
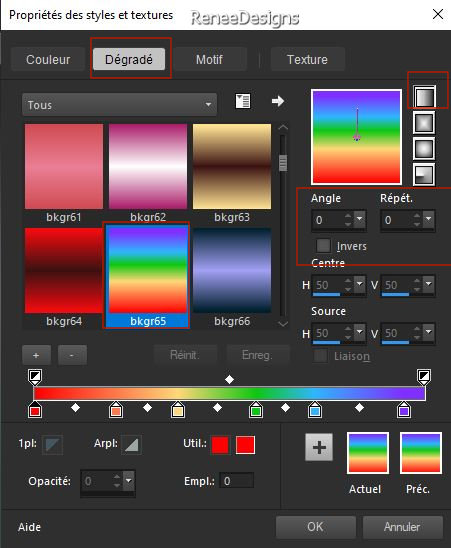

7. Effects – Plugins – Flaming Pear – Flexify 2 use the settings below
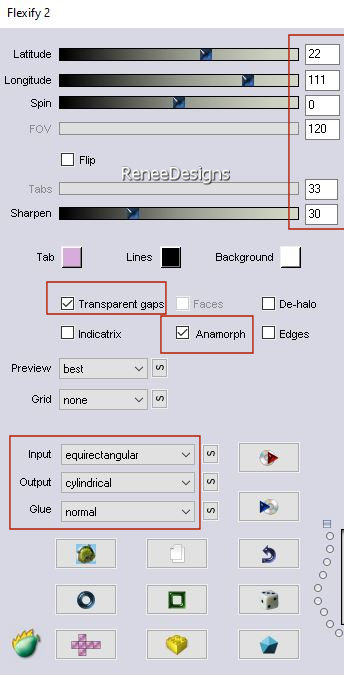
8. Layers-Properties-Set the Blend Mode to
"Normal"- Reduce the opacity of this layer to 59%
9. Effects – Plugins - Filters in Unlimited 2.0 - RCS Filter
Pak 1.0 - RCS Triple Exposure : 255
- Repeat this effect twice (3 times in total)
10. Effects – Edge Effects – Enhance More
11. Effects – Plugins– Flaming Pear – Flexify 2 use the settings below
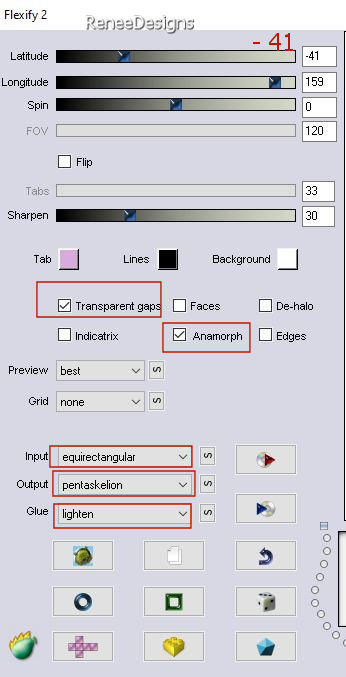
12. Effects- 3D-Effects –
Drop Shadow with these settings: 4/3/65/25 color black
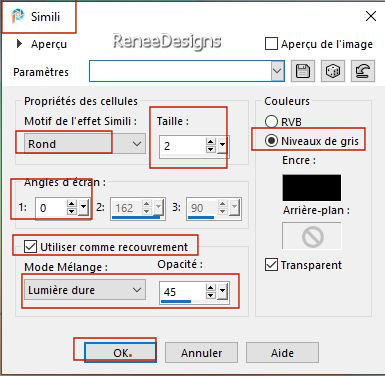
13. Effects – Artistic Effects- Halfton use the settings below / color black
- Activate the bottom of the Layer-Palette=Raster 1
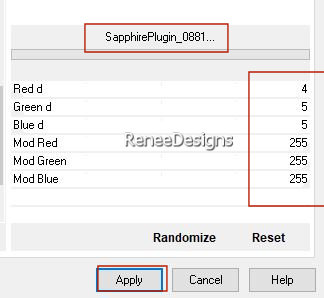
14. Effects -Plugins - Filters in Unlimited 2.0 -Sapphire Filters 09 -
SapphirePlugin_0881..use the settings below.
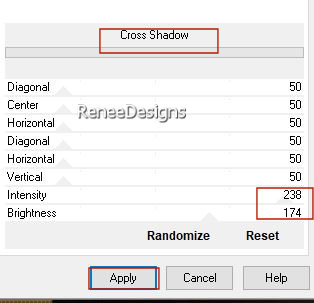
15. Effects -Plugins- Filters in Unlimited 2.0- Graphic Plus – Cross
Shadow use the settings below
- To replace the top of the layer-palette
16. Layers- New Raster Layer
17. Selections –load/save selection –load selection from disc and select my selection: ‘’pour-jeu-2’’
18.Properties Foreground-Set the Foreground color to color # 000000
Flood Fill Tool  -
Fill the selection with the Foreground color # 000000 -
Fill the selection with the Foreground color # 000000
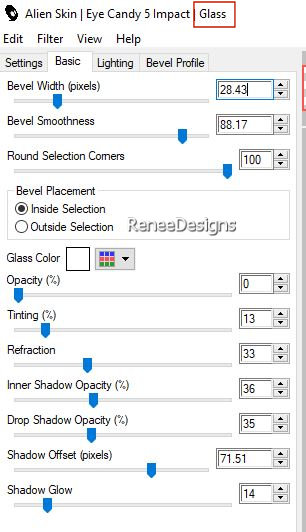
19. Effects - Plugins - Alien Skin EyeCandy 5 - Impact - Glass use the settings below

20. Effects – 3D-Effects –
Drop Shadow with these settings: 0/0/81/8 Color white
21. Layers- New Raster Layer
22. Selections –load/save selection –load selection from disc and select my selection: ‘’pour-jeu-3’’
23.Properties Foreground-Set the Foreground color to color #9ba5a4=Color 3
Flood Fill Tool- Opacity 50 %–
Fill the selection with the Foreground color #9ba5a4=Color 3

24. Layers- Arrange- Move Down
- To replace the top of the layer-palette
25. Layers- New Raster Layer
26. Selections –load/save selection –load selection from disc and select my selection: ‘’pour-jeu-4’’
27. Properties Foreground-Set the Foreground color to color #ffffff=1
Flood Fill Tool
 -
Opacity 50%–
Fill the selection with the Foreground color #ffffff=1 (2 to 3 clicks) -
Opacity 50%–
Fill the selection with the Foreground color #ffffff=1 (2 to 3 clicks)

28. Layers-Properties-Set the Blend Mode to " Screen "
29. Effects – 3D -Effects –Drop Shadow with these settings: 1/1/100/1 color black
30. Open the Tube ‘’Pour-jeu-Image1’’ -Edit - Copy- Activate your work -Edit - Paste as a new layer
31. Pick Tool: (K) on your keyboard -Enter these parameters on the toolbar
 5
/117 5
/117
-Press ( M ) to close the Pick Tool
32. Effects – Plugins – Mura’s Meister – Perspective Tiling use the settings below
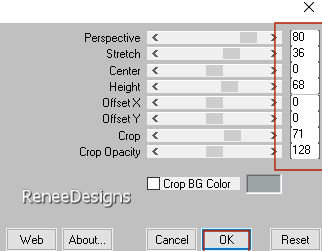
33. Effects- Plugins
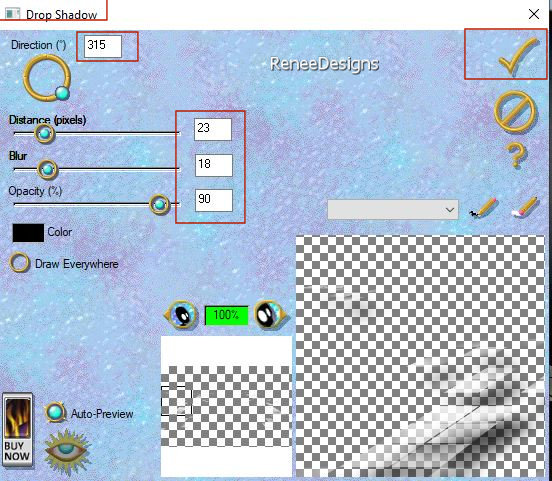
– Eyecandi 3.1- Drop Shadow use the settings below
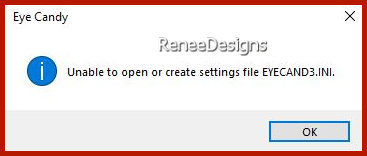
Do you get this message? Press Ok and the filter is opened
- Activate the bottom of the Layer-Palette=Raster 1
34. Layers- New Raster Layer
35. Flood Fill Tool  – Opacity 100% -
Fill the layer with the Foreground color #ffffff=1
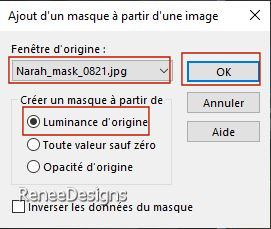
36. Layers- New Mask Layer- From Image and select Mask ‘’
Narah_mask_0821’’
- Layers- Duplicate
- Layers- Merge- Merge Group
37. Selections –load/save selection –load selection from disc and select my selection: ‘’pour-jeu-5’’


- Activate the bottom of the Layer-Palette=Raster 1
38. Layers- Duplicate
39. Effects - Plugins- Medhi- Kaleidoscope 2.1 use the settings below
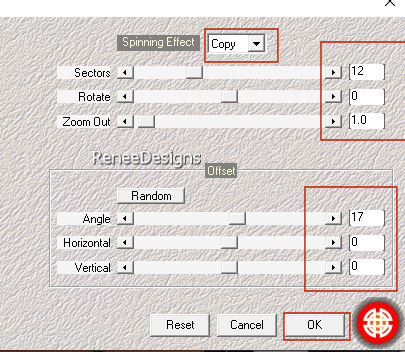
40. Effects – Edge Effects - Enhance
41. Layers-Properties-Set the Blend Mode to "Hard Light" - Reduce the Opacity of this layer to 61%
- To replace the top of the layer-palette
- Properties Foreground-Set the Foreground color to color # 9ba5a4=Color 3
42. Layers- New Raster Layer
43. Flood Fill Tool
 –
Fill the layer with the Foreground color # 9ba5a4=Color 3 –
Fill the layer with the Foreground color # 9ba5a4=Color 3
44. Layers- New Mask Layer- From Image and select Mask- Narah_Mask_1153’’
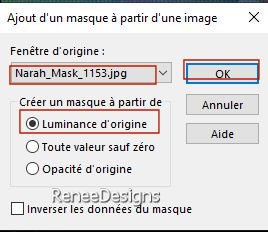
- Layers- Merge- Merge Group
45. Effects - Plugins - Alien Skin EyeCandy 5 - Impact – Chrome-Tab-Settings- User Settings and select my file -
Preset-‘’Pour-jeu-chrome’’
46. Effects – 3D-Effects –
Drop Shadow with these settings: 5/1/100/3 Color black
47. Open the Tube ‘’Pour-jeu-Image2’’ - Edit - Copy- Activate your work -Edit - Paste as a new layer
Pick Tool: (K) on your keyboard -Enter these parameters on the toolbar  0/
520 0/
520
- Press ( M ) to close the Pick Tool
48. Activate your Text Tool-Renée chose the font ‘’PlayfairDisplay-BlackItalic’’ Size 48 or choose your own font
-Material Properties: Set your Foreground color to color #9ba5a4=Color 3 – Set the Background color to color #435664= Color 4
- Write this text ‘’ Pour
le jeu ‘’(for the second text I alternated the colors) your choice.

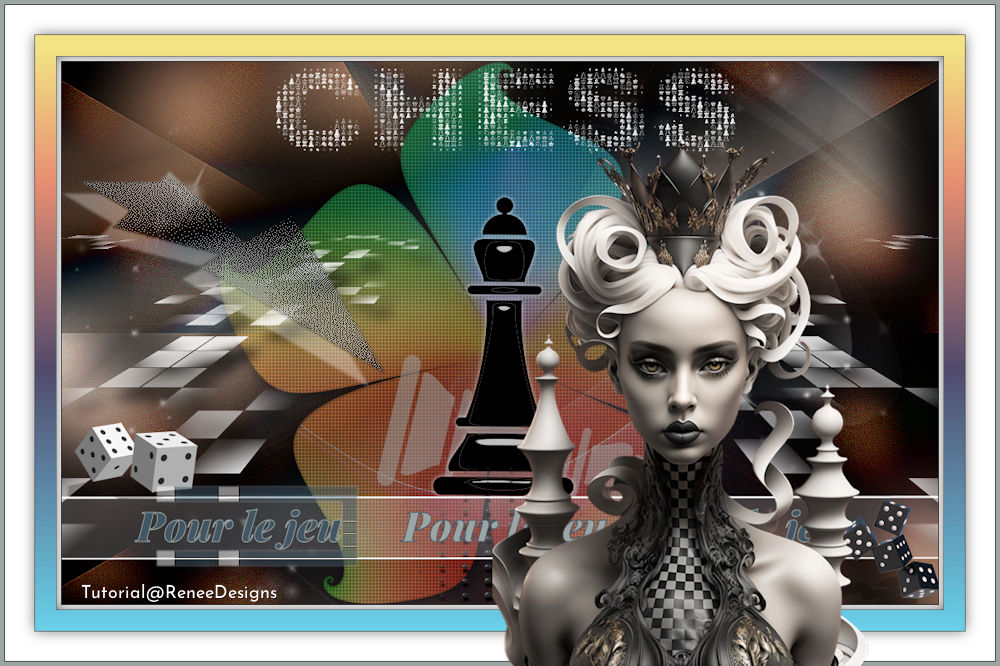
- Place in the middle of the previous tube/Total 3 texts (see finished image)
49. Open the Tube ‘’
Pour-jeu-Image3’’ -Take 2 chess pieces of your choice -Edit - Copy- Activate your work -Edit - Paste as a new layer
and place them to your liking
If you want the same drop shadow as me you have these tubes with shadows
- Material Properties: Set your Foreground color to color #ffffff=color 1 –the Background color remains on #435664=Color 4
50. Layers- New Raster Layer
51. Selections –load/save selection –load selection from disc and select my selection: ‘’pour-jeu-6’’
52. Flood Fill Tool
 –
Opacity 50% –
Fill the selection with the Foreground color #ffffff=1 –
Opacity 50% –
Fill the selection with the Foreground color #ffffff=1
53. Effects – Plugins – L & K’s – Mayra with these settings: 2/ 46 /15 /2
54. Effects –Edge Effects – Enhance

- Activate the bottom of the Layer-Palette=Raster 1
55. Selections –load/save selection –load selection from disc and select my selection: ‘’pour-jeu-7’’
56. Selections- Promote selection to layer
57. Layers- Arrange- Bring to Top
58. Effects – Plugins – Flaming Pear – Indian Ink use the settings below ( the code of this filter is 36478740)
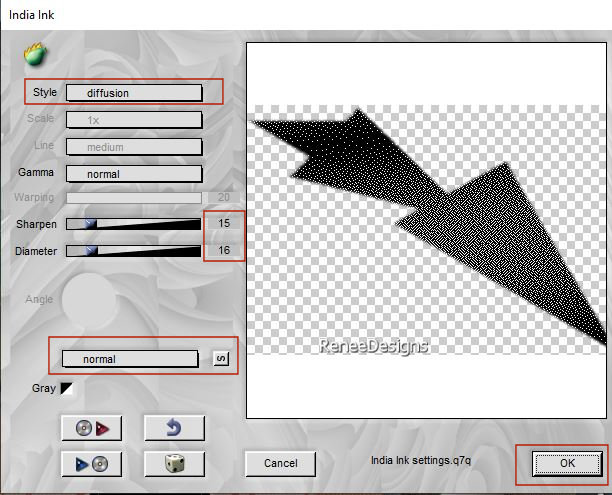

59.Layers- Properties-Reduce the Opacity of this layer to 61 %
60. Effects – 3D-Effects–
Drop Shadow with these settings: 15 / -20
/ 55 /3 Color white
61. Image - Add Borders-Symmetric checked: 1 Pixel -Color #222126=Color 6
Edit- copy
62. Open the Tube "
cadre"/Frame
63.
Edit paste as new layer
64. Now for the embellishment of our work.
Open a tube of your choice - add it as a new layer on your work/ resize it if necessary/ place it as you like
Drop Shadow to your own choice
65. Paste the author's watermark on your work and your own watermark
66. Layers- Merge- Merge All (flatten)
67. Image - Resize by 1000 Pixels width
67. Effects – Plugins – AAA FILTERS – Custom – Landscape (facultatif)
I hope you enjoyed this lesson
Renée
This lesson was written by Renée
19/03/2023
Edited and Update
in 2023
*
*
Any resemblance with an existing lesson is a coincidence * Do not forget to thank the people who work with us and for us
-I have appointed the tubeurs and translators
Thanks
|
 Translations


