|
Let's start the lesson
Printemps/Spring-2025
Preparation
-Material Properties: Set the foreground color to color number 1-Set the background color to color number 2

- Replace your foreground color with a foreground/background radial gradient, configured as follows

1. Open the background image
‘’Fond-Printemps-2025’’ – Promote background layer = Raster 1
2. Selections- Select All
3. Selections-Modify-Contract 70 Pixels
Do not add a new layer
4. Activate Flood Fill Tool-Flood fill the selection with the gradient
5. Adjust- Blur-Gaussian Blur-Radius 30 Pixels
6. Selections-Promote Selection to Layer
7. Effects – Plugins – Mura’s Meister – Tones use the settings below

8. Effects – Plugins – Mura’s Meister – Perspective Tiling use the settings below

9. Effects-Distortion Effects-Warp use the settings below


10. Image - Mirror - Mirror vertical ( Image - Flip in older versions of PSP)
11. Layers-Properties-Set the Blend Mode to Multiply -Reduce the opacity of this layer to 48%
- Properties Foreground – Color
=White
12. Layers-New Raster Layer
13. Selections –load/save selection –load selection from disc and select my selection: ‘’ Printemps-2025-1’’
14. Activate Flood Fill Tool-Flood fill the selection with color White
15. Effects - Plugins - Filters in Unlimited 2.0 - It@lian Editors
Effect - Effetto Fantasma – 0/16
16. Effects - Plugins - Filters in Unlimited 2.0 - &<BKg Designer
sf10 II> - Line Side Line -Using the default settings
17. Layers-Properties-Set the Blend Mode to Overlay
18. Layers-New Raster Layer
19. Selections –load/save selection –load selection from disc and select my selection: ‘’ Printemps-2025-2’’
20. Activate Flood Fill Tool - Flood fill the selection with color White
21. Effects - Texture effects - Blinds / Background color (No. 2)

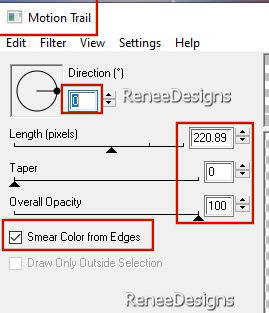
22. Effects – Plugins – Eye Candy 4000 – Motion Trail with these settings
(Don't worry about the color given by the effect - it has no effect on the result.)
23. Effects – Distortion Effects – Twirl – Degrees : 295
24. Objects – Align –
Right
25. Selections –load/save selection –load selection from disc and select my selection: ‘’ Printemps-2025-3’’

26. Layers-Properties-Set the Blend Mode to Soft Light
Effects – Plugins –
FM Tile Tools – Saturation Emboss- Using the default settings
27. Layers-New Raster Layer
28. Selections –load/save selection –load selection from disc and select my selection: ‘’ Printemps-2025-4’’
29. Open the tube
‘Renee-TUBES-Printemps-2025-Image 1’’ - Edit - Copy - Activate your work - Edit - Paste into selection
30. Layers-New Raster Layer
31. Effects - 3D-Effects - Cutout - Color : #004d65

32. Effects – 3D-Effects-Drop Shadow with these settings: 1/1/89/12 Color black
33. Layers- Merge- Merge Down
-Material Properties: Set the foreground color to color number 4-Set the background color to color number 5
- Replace your foreground color with a foreground/background radial gradient, configured as follows

34. Layers-New Raster Layer
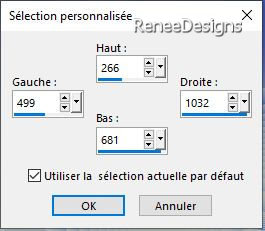
35. Activate Selection Tool -Custom Selection (S) -Rectangle with these settings
36. Flood Fill Tool –
Opacity 65% -
Flood fill the selection with the gradient
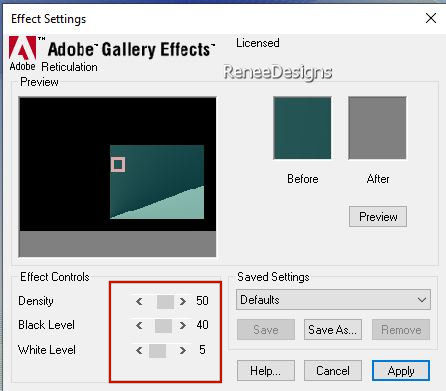
37. Effects – Plugins – Gallery Effects – Classic Arts 3- GE
Reticulation use the settings below
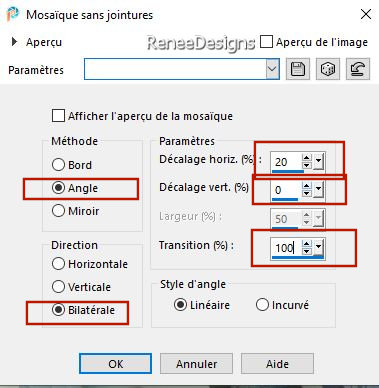
38. Effects – Image Effects- Seamless Tiling use the settings below
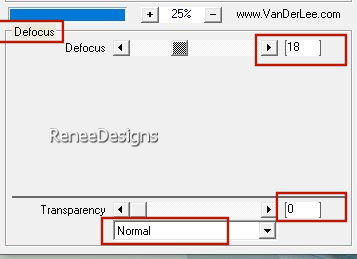
39. Effects - Plugins – VanDerLee – Unplugged X- Defocus-18
40. Image - Mirror - Mirror Horizontal (Image - Mirror in older versions of PSP)
41. Effects – Edge Effects – Enhance More
42. Layers-Properties-Set the Blend Mode to Exclusion
43. View-Palettes-Instant Effects ( Shift + F2)
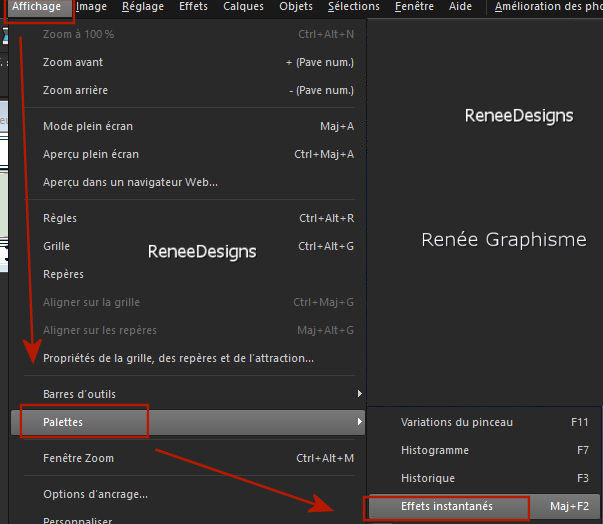
- Once you have done this, you will be able to see your photo and other small images on the right hand side of your PSP.
- Below the small window at the top you will see (Filmstyle) and a triangle. Click on it and the window will open.
Film Styles search for Portrait and then Bright color.
The foreground color is set to color number 4.
Double click on Bright Color and you will see the effect.
- Material of the foreground: change material of the foreground into gradient select " Fading white" (Corel-06_028)
Prepare a sunburst gradient configured like this

44. Layers-New Raster Layer
45. Selections –load/save selection –load selection from disc and select my selection: ‘’ Printemps-2025-5’’
46. Activate Flood Fill Tool –Opacity 100% -
Flood fill the selection with the gradient (2 clicks)
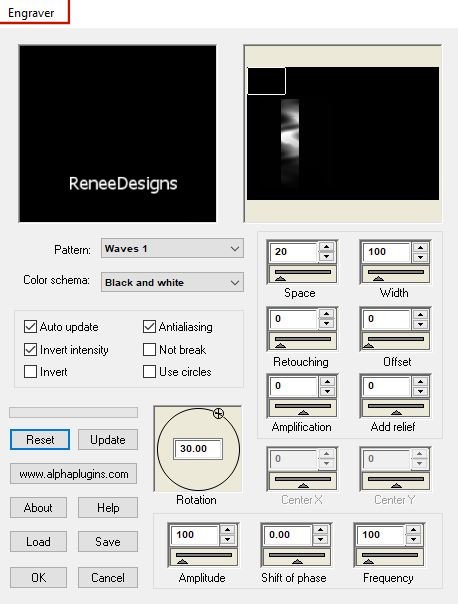
47. Effects – Plugins – Panopticum - Engraver use the settings below
48. Effects – 3D-Effects-Drop Shadow with these settings: 1/1/50/20 Color black
49. Open the tube ’’Renee-TUBES-Printemps-2025-Image 2’’ - Edit - Copy- Activate your work -Edit - Paste as new layer
If you want to change the image, you have the empty frame
50. Pick Tool: (K) on your keyboard -Enter these parameters on the toolbar
 131/116 131/116
- Press the ( M ) button to close the tool.
51. Layers-Duplicate
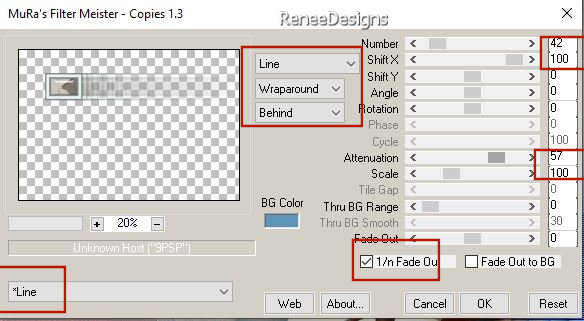
52. Effects – Plugins – Muras’ Meister – Copies use the settings below
53. Layers-Arrange-Move Down
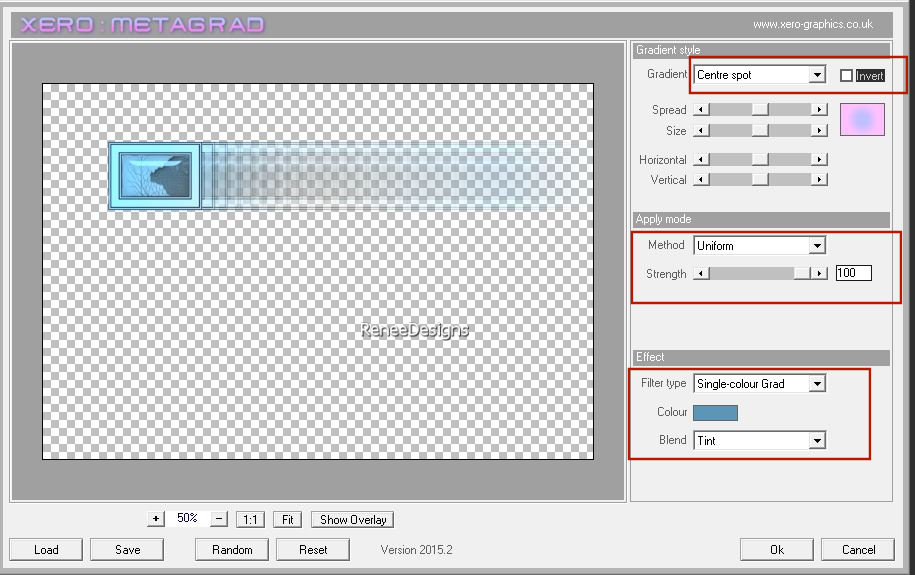
54. Effects – Plugins – Xero – Metagrad use the settings below /Color #5d95b8
55. Layers-Properties-Set the Blend Mode to Hard Light-Reduce the opacity of this layer to 67%
- Activate the top of the layer palette
56.Open the tube ’’Renee-TUBES-Printemps-2025-Image 3’’ - Edit - Copy- Activate your work -Edit - Paste as new layer
-Do not move
57. Effects-Distortion Effects-Warp use the settings below

58. Effects – Image Effects-Offset use the settings below

59. Layers-Properties-Set the Blend Mode to Screen
60. Layers-New Raster Layer
61. Selections –load/save selection –load selection from disc and select my selection: ‘’ Printemps-2025-6’’
62. Set your foreground to white
Activate Flood Fill Tool –
Flood fill the selection with color white (just a few clicks)
63. Effects – 3D-Effects-Drop Shadow with these settings: 1/1/100/1 Color black
64.Open the tube ’’Renee-TUBES-Printemps-2025-Image 4’’ - Edit - Copy- Activate your work -Edit - Paste as new layer
- Move the tube up (see finished image)
65. Activate the tube ‘’Renee-TUBES-Printemps-2025-100’’
- Activate the layer
‘’pour le tuto printemps 2025’’
- Edit - Copy- Activate your work -Edit - Paste as new layer
-Place to your liking
66. Effects - Plugins - Alien Skin EyeCandy 5 – Impact – Perspective
Shadow use the settings below

67. Image - Add Borders-Symmetric checked: 1 Pixel -Color black
- Image - Add Borders-Symmetric checked: 1 Pixel-Color number 1
- Image - Add Borders-Symmetric checked: 20 Pixels-Color white
- Image - Add Borders-Symmetric checked: 1 Pixel -Color black
- Image - Add Borders-Symmetric checked: 35 Pixels -Color white
68. Activate the tube ‘’Renee-TUBES-Printemps-2025-112’’
- Image – Resize 58%
69. Edit - Copy- Activate your work -Edit - Paste as new layer
- Place to your liking
70. Effects - Plugins - Alien Skin EyeCandy 5 – Impact – Perspective
Shadow (with the same settings)
71. Write the title in a font of your choice (the font used is in the folder).
72. Add the author's watermark to your work and your own watermark
73. Layers- Merge- Merge All ( flatten)
74. Image – Resize 1005 Pixels- resize all layers checked
Save as JPG

Thanks for your time and enjoyment of this lesson.
Renée
This lesson was written by Renée 16/01/2025
Edited and Update
in 2025
***
* Any resemblance to an existing lesson is purely coincidental.
* Don't forget to thank the people who work with us and for us - the testers and translators
Thanks
*
|


 Translations


