|
Let's start the lesson
Puzzles
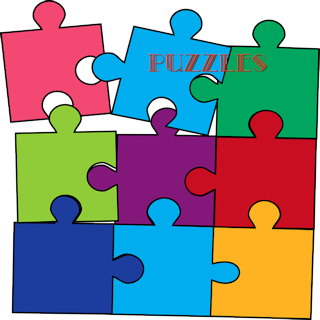
- Material Properties: Set the foreground color to color number 1 -Set the background color to color number 4

1. File - Open a new transparent image in this size : 1050
x 850 Pixels
2. Activate your Flood Fill Tool
 -
Flood fill the layer with the foreground color ( No 1) -
Flood fill the layer with the foreground color ( No 1)
3. Effects - Plugins– VDL Adrenaline – Camouflage use the settings below (Please note that this filter must be patched.)
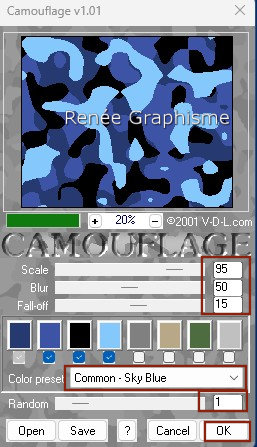
4. Layers - Duplicate
5. Effects - Plugins – Alien Skin Xenofex 2 – Puzzle – Preset :
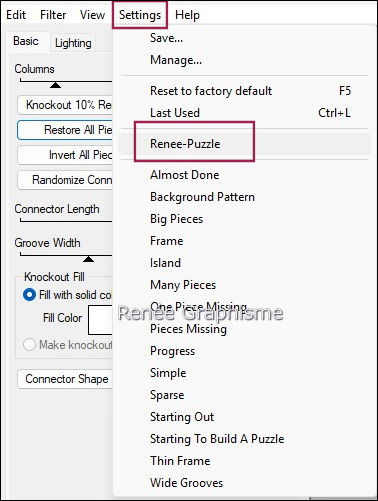
Renee-Puzzle’’
(This preset must be placed in your Filter – Alien Skin Xenofex2 – Settings – Puzzle.
Go to the filter, open it, and you will see “Puzzle” under Settings. Open the folder and paste it in.)
Click on the preset to apply it.
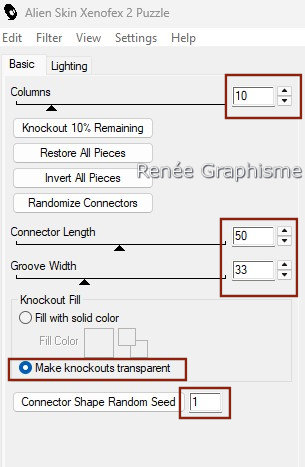 
- If you create a custom effect for this filter, you will find it on your computer. The folder location is as follows:
C/Users/AppData/Roaming/Alien
skin/Xenofex2/Puzzle
6. Effects - 3D Effects - Drop Shadow with these settings:10/10 / 65 /32 Color black
7. Effects - Plugins– FM Tile Tools – Blend Emboss using the default settings
In the layer palette - Activate the layer underneath
8. Effects - Plugins - Filters in Unlimited 2.0 – Toadies - Picasso's
Another Word... 24 / 39/ 126
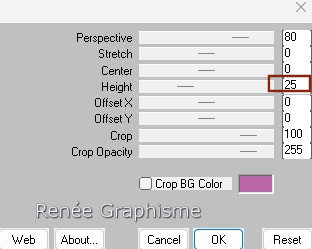
9. Effects - Plugins – Mura’s Meister – Perspective Tiling use the settings below
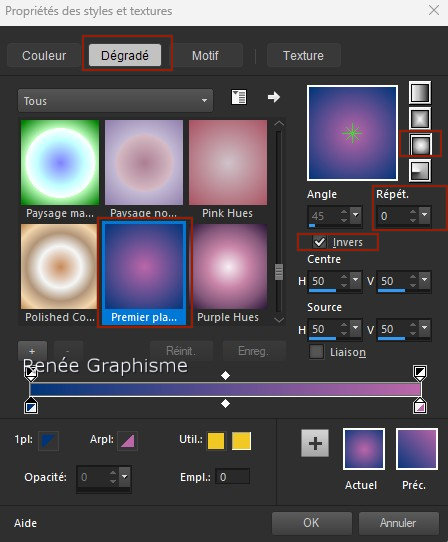
Material Properties: Set your foreground color with a foreground/background sunburst gradient configured like this
10. Layers - New Raster Layer
11. Activate Flood Fill Tool
 –
Flood fill the layer with the gradient –
Flood fill the layer with the gradient
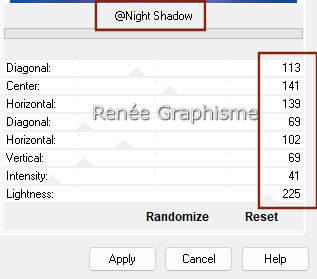
12. Effects - Plugins - Filters in Unlimited 2.0 - &<Background
Designers IV> - @Night Shadow use the settings below
13. Layers - Arrange - Move Down
- Activate Raster 1 in the layer palette (sol/floor from point 9)
14. Layers - New Raster Layer
16. Selections –load/save selection –load selection from disc and select my selection: ‘’Puzzles-1’’
17. Activate Flood Fill Tool
 –
Flood fill the selection with the background color (No. 4) –
Flood fill the selection with the background color (No. 4)
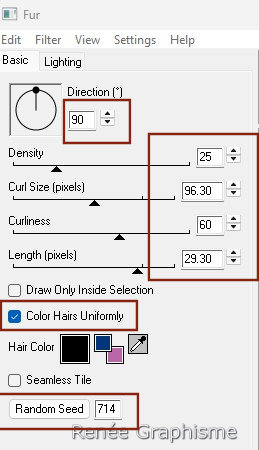
18. Effects - Plugins – Eye Candy 4000 - Fur use the settings below
19. Effects - Edge Effects - Enhance
20. Reduce the opacity of this layer to 40%
- Activate the top of the layer palette
21. Layers - New Raster Layer
22. Selections –load/save selection –load selection from disc and select my selection: ‘’Puzzles - 2’’ (she will cancel the previous one)
23. Activate Flood Fill Tool
 –
Flood fill the selection with color black –
Flood fill the selection with color black
24. Selections - Modify - Contract 5 Pixels
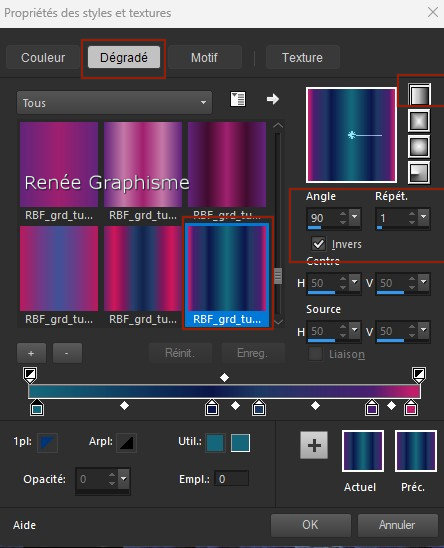
Color Palette: Set your foreground color to gradient and select ‘’ RBF_grd_tut_1.13_009’’
Prepare a linear gradient configured like this
25. Activate Flood Fill Tool
 –
Flood fill the layer with the gradient –
Flood fill the layer with the gradient
26. Effects - Plugins - Alien Skin EyeCandy 5 – Impact – Bevel – Preset :
Concave Edge, Exaggerated using the default settings
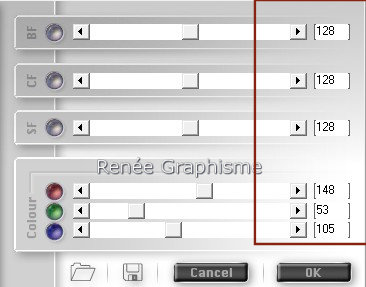
27. Effects - Plugins– Fotomatic – Fastfix use the settings below (Here, you can change the settings to match your color preferences.)

28. Activate your Magic Wand – Tolerance at 0 and Feather at 0

- Select the 4 empty parts of the window
29. Activate the tube ‘’ Renee-Puzzles-
Pluie’’ - Edit - Copy - Activate your work -Edit - Paste as new layer
Place to your liking
SELECTIONS – INVERT

SELECTIONS – INVERT
30. Effects - 3D Effects - Drop Shadow with these settings: 2 /2 / 100 /12 Color black
31. Layers - New Raster Layer
32. Selections –load/save selection –load selection from disc and select my selection: ‘’Puzzles-3’’
33. Activate the tube ‘’
Renee-TUBES-Puzzles -100’’ -
- Edit - Copy- Activate your work -Edit - Paste into Selection

34. Layers - Arrange - Move Down
35. Reduce the opacity of this layer to 65%
Activate the top of the layer palette
36. Layers - New Raster Layer
37. Selections – load/save selection –load selection from disc and select my selection: ‘’Puzzles-4’’
38. Activate Flood Fill Tool
 –
Flood fill the selection with color No. 3 –
Flood fill the selection with color No. 3
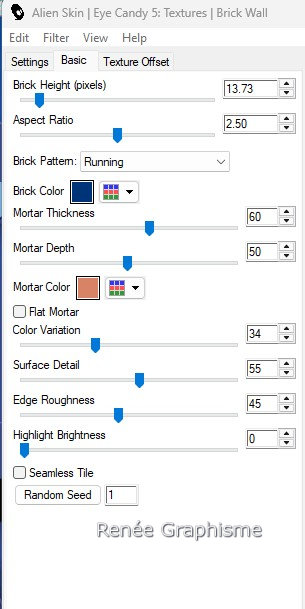
39. Effects - Plugins- Alien Skin EyeCandy 5 –Textures-Brick Wall use the settings below -
color No. 1 and No. 2
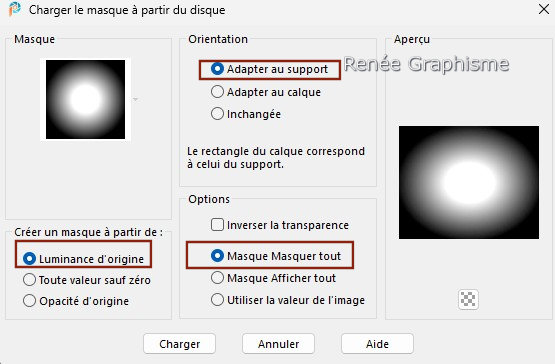
40. Layers - Load/save mask - Load mask from disk ‘’20/20’’ with these settings
- Layers - Duplicate 2
twice
- Layers - Merge - Merge Group
Selections remains activated
41. Layers - Duplicate
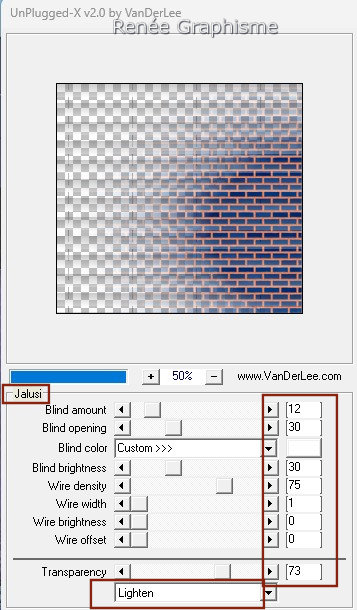
42. Effects - Plugins – Vanderlee – Unplugged X – Jalusi use the settings below –
Color : White

43. Effects - 3D Effects - Drop Shadow with these settings: 2/1/100/19 Color black
44. Layers - Properties - Change the blend mode of this layer to Overlay
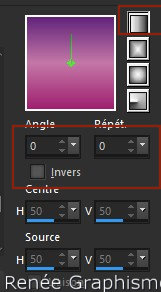
Color Palette: Set your foreground color to gradient and select ‘’ RBF_grd_tut_1.13_005’’-
Prepare a linear gradient configured like this
45. Layers - New Raster Layer
46. Selections –load/save selection –load selection from disc and select my selection: ‘’Puzzles-5’’
47. Activate Flood Fill Tool
 –
Flood fill the layer with the gradient –
Flood fill the layer with the gradient
48. Effects - Plugins - Filters in Unlimited 2.0 - Andrew's Filters 42
- Blue Glow... using the default settings
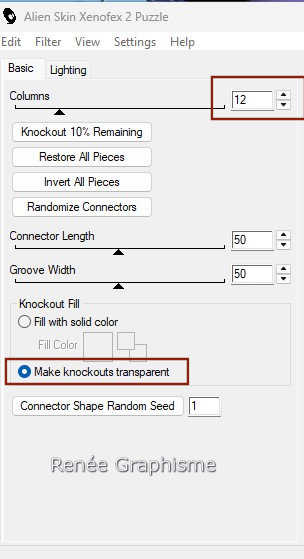
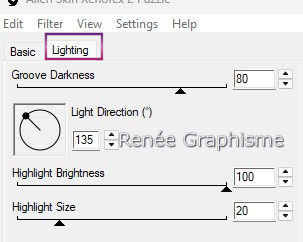
49. Effects - Plugins– Alien Skin Xenofex 2- Puzzle use the settings below
50. Effects - Plugins - Alien Skin EyeCandy 5 - Impact - Extrude use the settings below
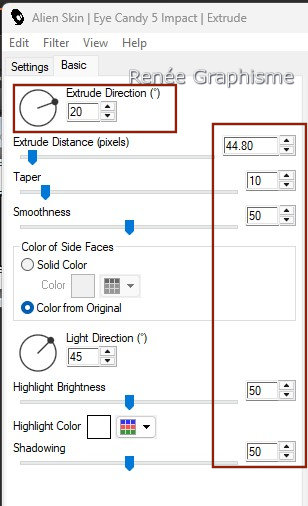

51. Effects - Plugins- Alien Skin EyeCandy 5 - Impact - Perspective
Shadow – Preset : Reflect in front –Faint
52. Layers - Duplicate
53. Image - Mirror - Mirror Horizontal (Image - Mirror in older versions of PSP)
54. Image - Resize by 58% - Resize all layers not checked
55. Pick Tool: (K) on your keyboard -Enter these parameters on the toolbar
 698
/ 641 698
/ 641
Press the ( M ) button to close the tool.
56. Activate the tube – ‘’Renee-Puzzles-
ampoule.’’ Edit - Copy - Activate your work -Edit - Paste as new layer
Move the tube to the left block ( see finished image)
57. Activate the tube – ‘’Renee-Puzzles-
papillon.’’ - Edit - Copy - Activate your work -Edit - Paste as new layer
Move the tube to the right block ( see finished image)
58. Image - Add Borders - Symmetric checked: 2 Pixels – Color No 2
Image - Add Borders - Symmetric checked: 10 Pixels – Color No 1
Image - Add Borders - Symmetric checked: 25 Pixels – White
Image - Add Borders - Symmetric checked: 2 Pixels – Color No 4
Image - Add Borders - Symmetric checked: 60 Pixels – White
59. Use the magic wand to select the 60 pixel border.
60. Activate the tube ''Renee-Puzzles-Cadre
'' -Edit - Copy - Activate your work -Edit - Paste into Selection
61.
Selections - Invert
62. Effects - Plugins – AAA Frame –Texture Frame using the default settings

63. Image – Resize 1005 Pixels width - Resize all layers checked
- Add the author's watermark to your work and your own watermark
Save as JPG
*******
I hope you enjoyed this lesson
Renée
This lesson was written by Renée 30/05/2025
Edited and Update
2025
***
Any resemblance with an existing lesson is a coincidence
* Do not forget to thank the people who work with us and for us - I have appointed the tubeurs and translators
Thanks
*
|


