|
Let's start the lesson
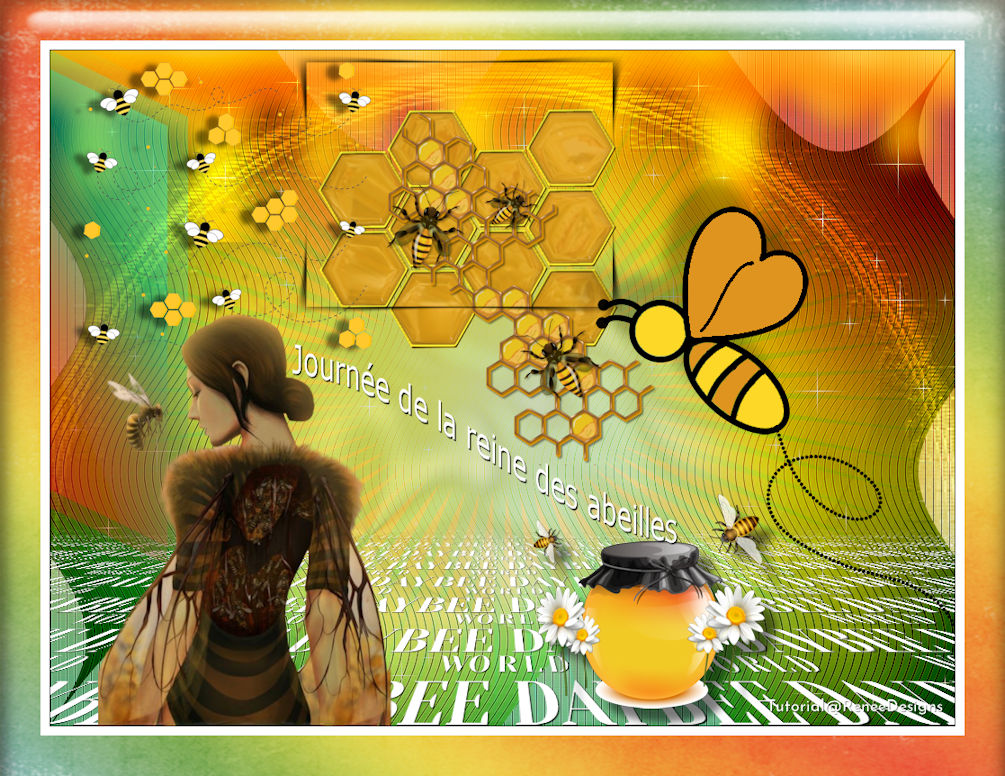
Queen Bee Day-
Journée de la reine des abeilles


1. Open the background image ‘’Fond–Queen-Bee-Day’’-
Promote Background Layer =Raster 1
2. Effects - Plugins - Filters Unlimited 2.0 -Two Moon-VerticalRipplie...
191/207
3. Effects – Edge Effects – Enhance More
4. Layers- Duplicate
5. Effects - Distortion Effects– Wave use the settings below
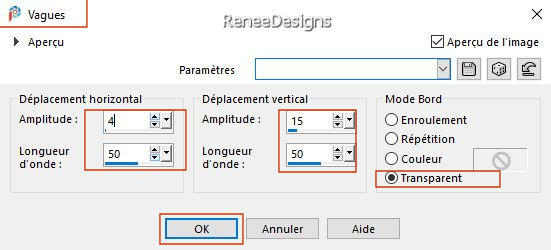
6. Effects - Plugins- Filters Unlimited 2.0 -Two Moon -FadeSpot... 179/209/106
-Material Properties-Set your foreground color to color #54b26b=color 3-Set your Background color to color #df941f= color 2
-Prepare a foreground/background-sunburst gradient configured like this
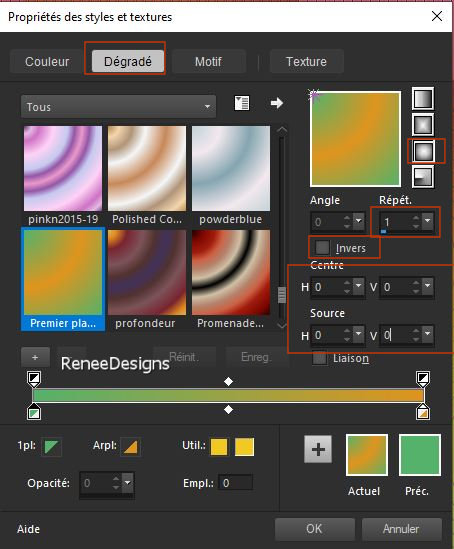
7. Layers- New Raster Layer
8. Flood Fill Tool
 –
Fill the layer with the gradient –
Fill the layer with the gradient
9. Effects – Plugins – Almathera Puddle use the settings below
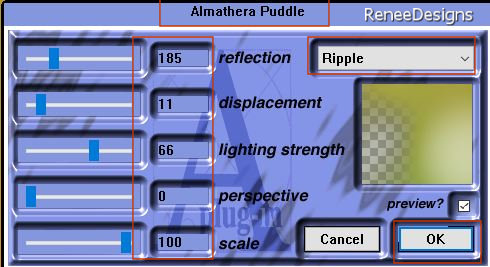
10. Effects – Plugins– Flaming Pear – Flexify 2 use the settings below
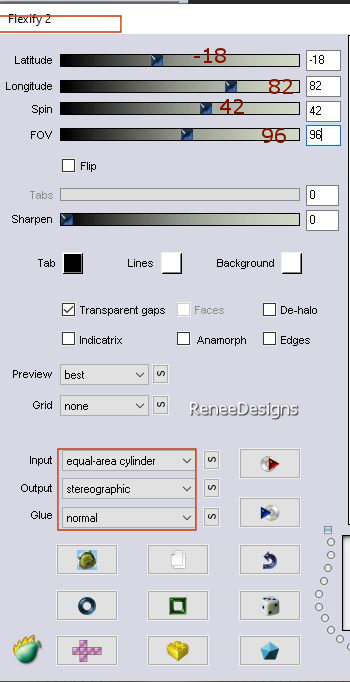
11. Effects –Plugins - FM Tile Tools –Metallic Emboss using the default settings
12. Effects – plugins – Almathera Shape Cutter use the settings below
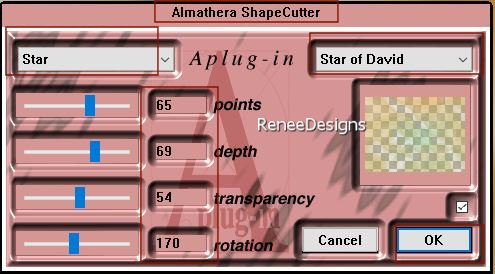
13. Layers-Properties-Change the Blend Mode to " Multiply " and Lower the Opacity to 77%
14. Layers- New Raster Layer
15. Selections –load/save selection –load selection from disc and select my selection: ‘’Queen- Bee -Day 1’’
16. Material Properties-Close the gradient-put the foreground color on color # ffffff= Color 5
Flood Fill Tool -fill the selection with # fffffff=Color 5

17. Effects - 3D-Effects - Drop Shadow with these settings: 1/1/100/1 Color black
18. Effects – Plugins – Mura’s Meister – Perspective Tiling use the settings below
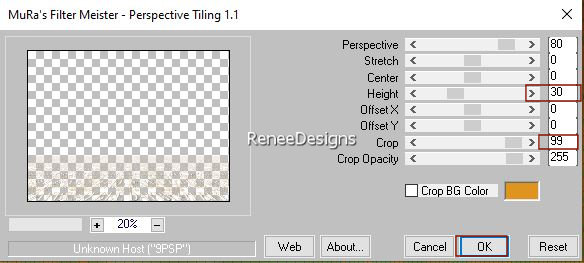
19. Activate the magic wand – Feather 30
-Select with your magic wand the upper part
- 5 or 6 times

20. Layers- New Raster Layer
21. Flood Fill Tool
 –
Fill the layer with the foreground color= color 5 –
Fill the layer with the foreground color= color 5
22. Effects - Plugins - Filter- Unlimited 2.0 -Special Effects 2 –
Rainbow using the default settings
23. Effects – Plugins – Transparency – Eliminate White
24. Layers- Duplicate
25. Layers- Merge- Merge Down
26. Layers-Properties-Set the Blend Mode to " Overlay "
27. Effects- User Defined Filter - Brighten grave (this preset is in the folder//place in the presets folder of your psp )
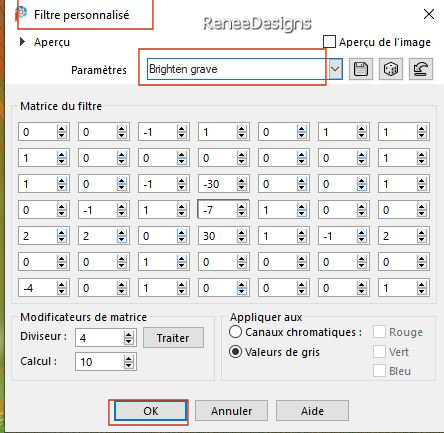
28. Open the Tube ‘’Queen-Bee-Day-
Image 1’’ -Edit - Copy- Activate your work -Edit - Paste as a new layer
29. Objects - Align
– Top
30. Adjust- Blur- Gaussian Blur-Radius 15
31. Layers-Properties-Set the Blend Mode to " Hard Light "
- Material Properties: Set your Foreground color to color #fdd826=color 1- Set your Background color to color #df941f=color 2
32. Layers- New Raster Layer
33. Selections –load/save selection –load selection from disc and select my selection: ‘’Queen- Bee -Day 2’’
34. Flood Fill Tool  – Fill the selection with the foreground color #fdd826=color 1
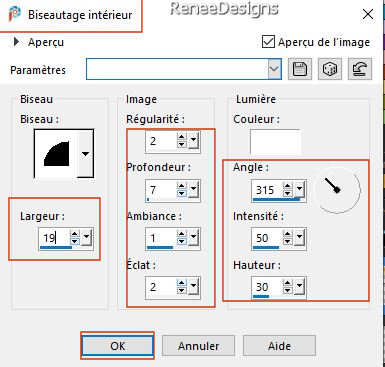
35. Effects – 3 D-Effects– Inner Bevel use the settings below
36. Layers- New Raster Layer
37. Selections –load/save selection –load selection from disc and select my selection: ‘’Queen- Bee -Day 3’’
38. Flood Fill Tool
 –
Fill the selection with the background color #df941f=color 2 –
Fill the selection with the background color #df941f=color 2
39. Effects - Plugins - Alien Skin EyeCandy 5 - Impact – Glass –Tab- Settings-User Settings -choose my
Preset : Queen Bee Day-Glass

40. Layers- Merge- Merge Down
41. Image -
Resize 65% - (Resize all layers NOT checked)
42. Pick Tool: (K) on your keyboard -Enter these parameters on the toolbar
 296/62 296/62
Press ( M ) to close the Pick Tool
43. Open the Tube ‘’ Quee-
Bee-Day-Image2’’ -Edit - Copy- Activate your work -Edit - Paste as a new layer
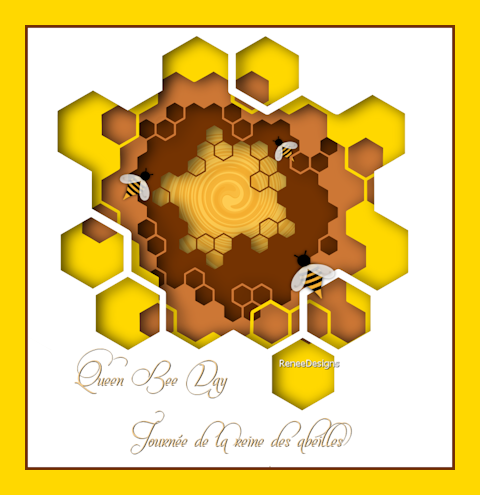
- Place to your liking on the previous tube ( see finished image)
44. Layers- New Raster Layer
45. Selections –load/save selection –load selection from disc and select my selection: ‘’Queen- Bee -Day 4’’
46. Material Properties: Set your Foreground color to color #000000=Color 4
Flood Fill Tool  – Fill the selection with #000000=Color 4 – Fill the selection with #000000=Color 4

47. Layers- New Raster Layer
48. Selections –load/save selection –load selection from disc and select my selection: ‘’Queen- Bee -Day 5’’
49. Flood Fill Tool  –Fill the selection with #000000=Color 4

50. Activate the magic wand - configured like this

- Select the parts of the bee's body and color to your taste ( if necessary enlarge the selection by 1 pixel)

51. Effects- 3 D-Effects- Drop Shadow with these settings: – 29/ - 20
/30/22 Color white
- In the Layer Palette-activate Copy of Raster 1
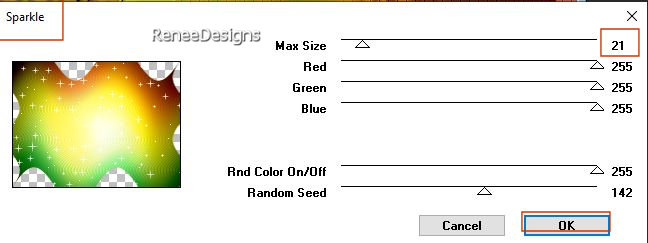
52. Effects – Plugins – VM Natural – Sparkle use the settings below
- Activate the top of the layer palette
53. Layers- New Raster Layer
54. Selections –load/save selection –load selection from disc and select my selection: ‘’Queen- Bee -Day 6’’
55.Material Properties-Set your foreground color on color # ffffff= Color 5
Flood Fill Tool
 –
Fill the selection with #ffffff=Color 5 –
Fill the selection with #ffffff=Color 5

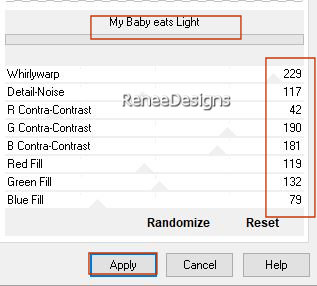
56. Effects - Plugins- Filter- Unlimited 2.0 - Kang 3- My Baby eats
Light use the settings below
57. Effects- 3 D-Effects- Drop Shadow with these settings: 7 / -7
/30 /18 Color black
58. Open the Tube ‘’Queen-
Bee-Day-Image3’’-Edit - Copy- Activate your work -Edit - Paste as a new layer
- Place at the top left of the work
59. Layers- New Raster Layer
60. Selections –load/save selection –load selection from disc and select my selection: ‘’Queen- Bee -Day 7’’
61. Material Properties: Set your Foreground color to color #000000=Color 4
Flood Fill Tool  –Fill the selection with #000000=Color 4
( click 1 or 2 times in the selection) –Fill the selection with #000000=Color 4
( click 1 or 2 times in the selection)

62. We are going to decorate ( you have a folder with a choice of tubes )Paste the tubes to your liking to decorate the work
63. Is everything in the right place? Layers- Merge- Merge Visible
Edit-Copy !!!
64. Open the Tube ‘’ Cadre’’ in your Psp
65. Edit - Paste into selection (Image is still in your PSP memory)
66. Layers- Merge- Merge- Visible
- Paste the author's watermark on your work and your own watermark
- Image
-Resize 1005 Pixels width (Resize all layers checked)
Layers- Merge- Merge All (flatten)
Save as JPG

That's it - Thank you / I hope you enjoyed this lesson
Renée
This lesson was written by Renée 28/04/2022
Edited and Update
in 2022
*
*
Any resemblance with an existing lesson is a coincidence
* Do not forget to thank the people who work with us and for us -I have appointed the tubeurs and translators
Thanks
|
 Translations


