|
Let's start the lesson
1.
File: Open Image ''fond_rue_obscure" Promote to background layer Raster 1
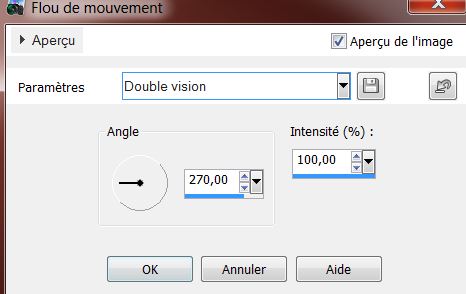
2. Adjust- Blur-Motion Blur
3.
Layers- Duplicate
4.
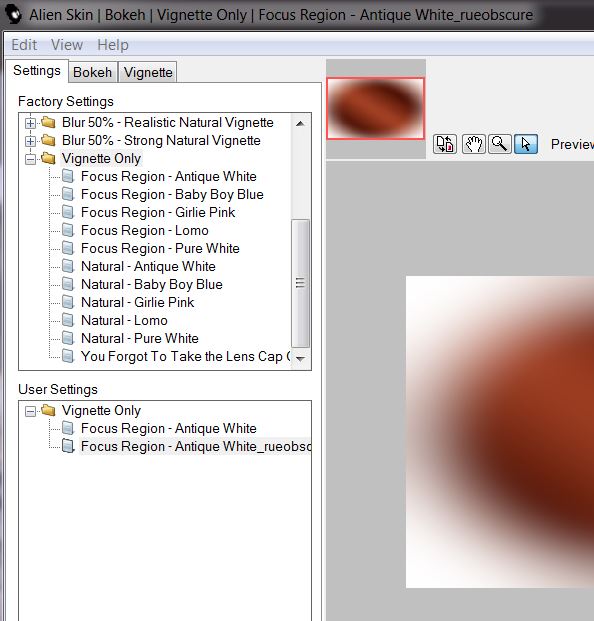
Effects-Plugins Alien Skin Bokeh - Bokeh-Vignette
Only-Tab-Settings-User Settings and select my file Preset '' -Focus region-Antique_rueobscure''
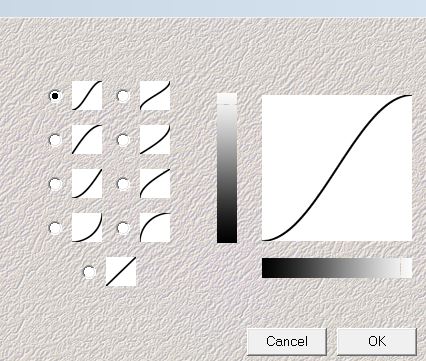
5. Effects-Plugins - Medhi - Curves
6.
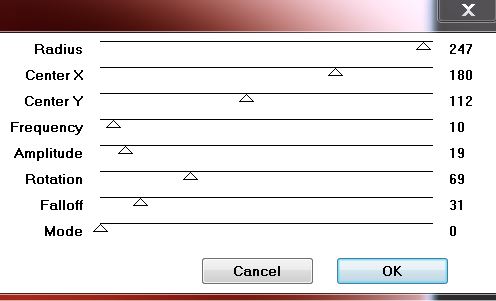
Effects- Plugins VM Natural /
Raygun
(Not in Plugins Unlimited)
7.
Layers- Duplicate /Image Mirror/ Opacity down to : 50%
8.
Layers- Merge-Merge-Down
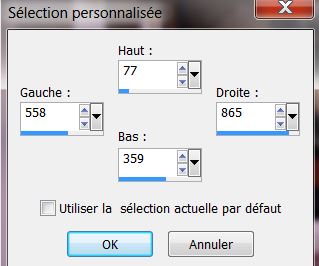
9.
Effects-Plugins &<BkgDesigner sf10I> - Circus Maximum / Circles /
170
10.
Effects-Edge Effects-Enhance More
11. Layers- Merge-Merge Visible
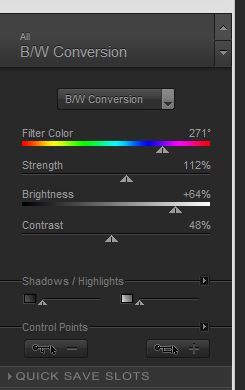
12.
Effects-Plugins Nick Color effex Pro3.0 / BW Conversion
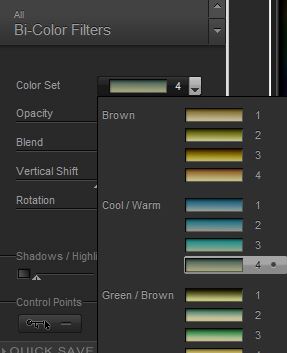
13 .Effects-Plugins
Nick Color Effex Pro.3.0- Bi Colors - Cool Warm /4
Layers- Duplicate
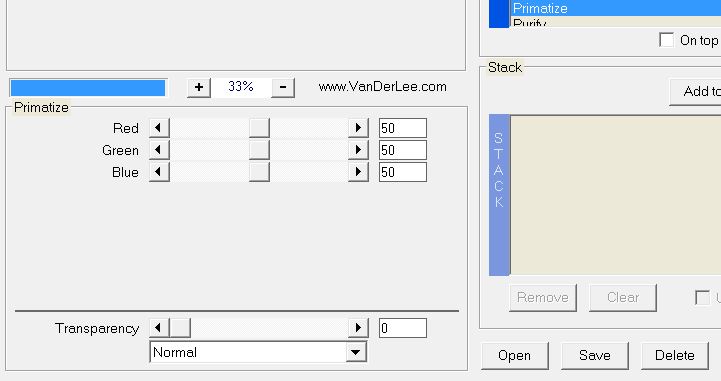
14.
Effects-Plugins Vanderlee Unplugged X / Primatize
15. Open the tube
"arikhs2011-88 '' Edit-Copy-Edit Paste as a new layer
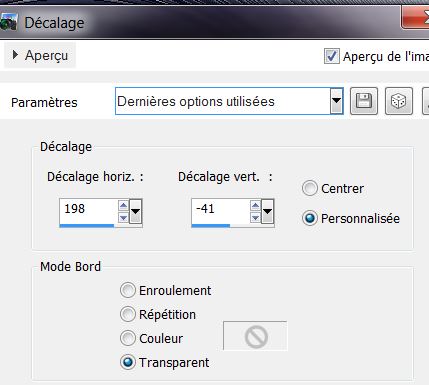
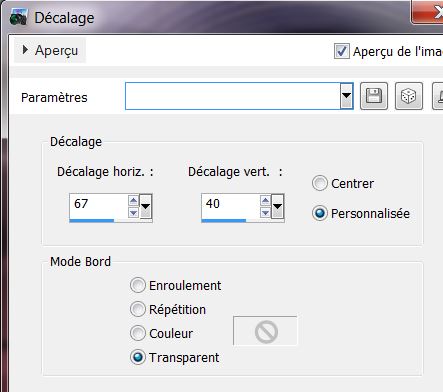
16. Effects-Image Effects-Offset
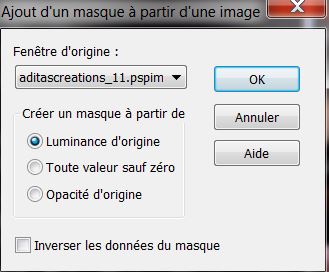
17. Effects-User Defined Filter-Emboss 3 /Layer Properties: change the Blend Mode to "Hard Light"
18. Layers- New Raster layer
19. Activate Selection Tool - Custom Selection with these settings:
20. Open the tube
''MicheleMikesell_bea_tubes_divers_07_2013'' Edit-Copy-Edit-Paste into selection
21. Layers- New Raster layer Activate Flood Fill Tool and fill selection with this color:
#b53006
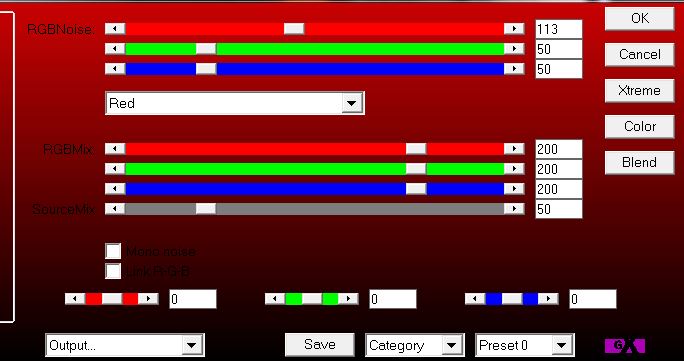
22.Effects-3D Effects-Cutout with these settings
Selections-Deselect All
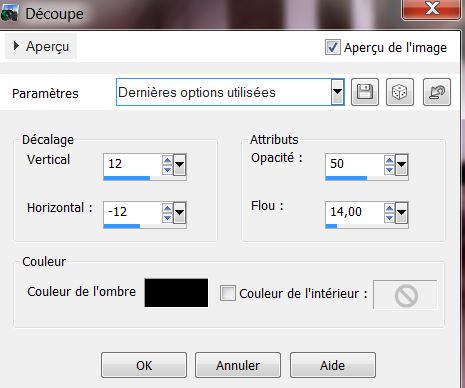
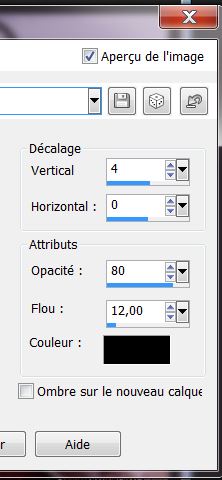
23 . Effects - 3D Effects - Drop shadow/black
24. Open the tube ''obscure_gauche''
Edit-Copy-Edit Paste as a new layer
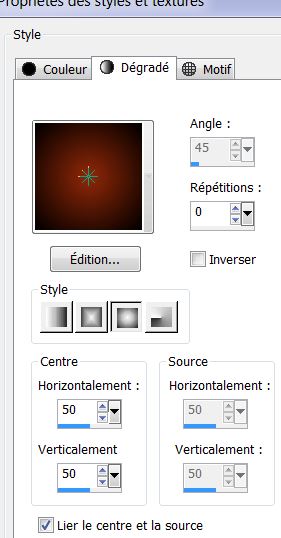
25. Activate Pick-Tool; move to the left (see screen at 390 pixels)
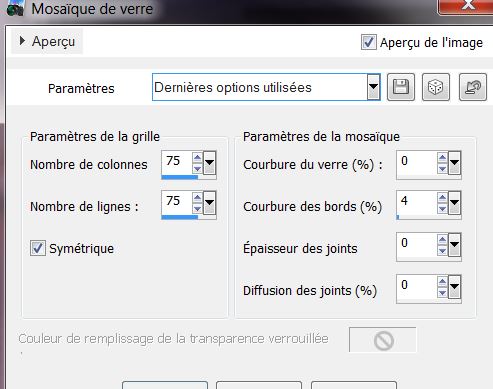
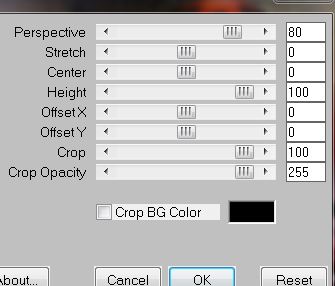
26. Effects- Textur Effects-Mosaic Glass
27..Layer Properties: change the Blend Mode to "Luminance-Legacy" and lower the opacity down to 51%
28. Open the tube "obscure_echelle''
Edit-Copy-Edit Paste as a new layer and place/Layer Properties: change the Blend Mode to "Luminance-Legacy"
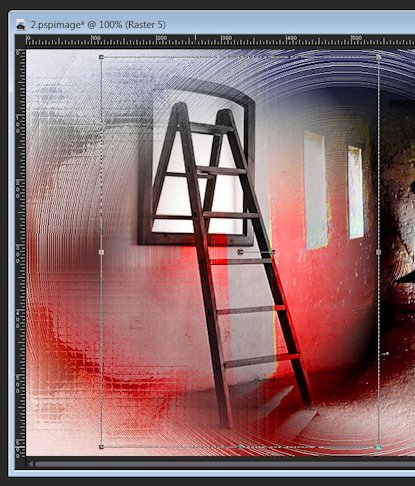
29. Open the tube
''obscures_lignes.png '' Edit-Copy-Edit-Paste as a new layer.With your move tool place it on the right place like this
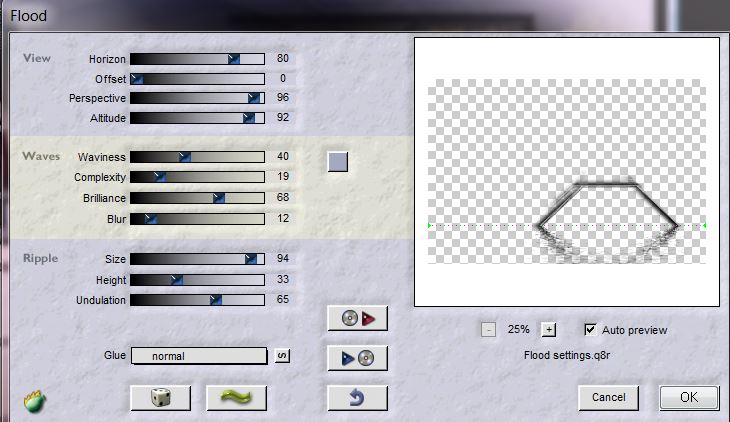
30.
Effects -Plugins Flaming Pear Flood /Color: #a5a8c3
Your work look like this now
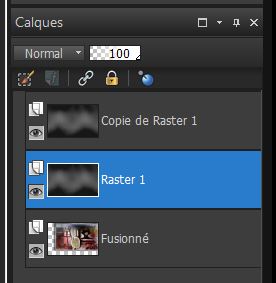
31.Layer Palette:
Activate the second layer from the bottom(Copie de Fusionné)
32. Repeat: Effects-Plugins
/ Flaming Pear Flood with the same settings
33. Layer-Palette: activate Raster 1
34. Layers- New Raster layer - Flood Fill Tool: fill the layer with color black
35. Layers-New Mask layer from Image
''aditascreations_11.jpg''
36. Layers- Merge-Merge Group
37. Layer Properties: change the Blend Mode to "Hard Light" and lower the opacity down to 42%
38. Layers- Merge-Merge Visible
39. Selections - load/save selection - load selection from disk and choose''obscures_1''
40. Promote selection to layer
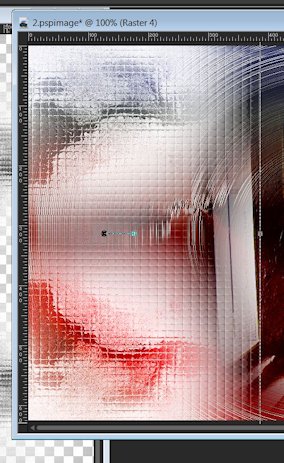
41. Adjust-Blur-Gaussian Blur: Radius: 15%
42. Effects-Plugins
-AP01(Innovations )- Noise Random Times
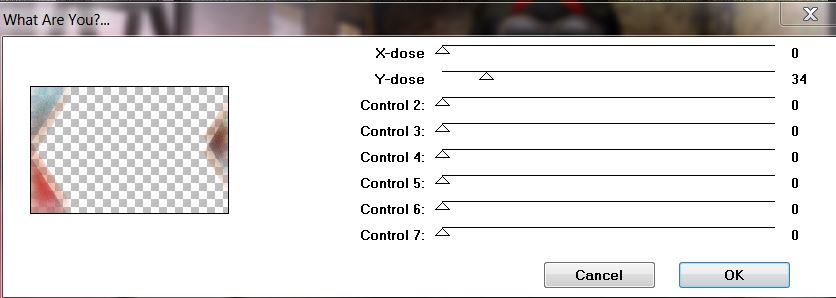
43. Effects-Plugins - Toadies
/ What are you
44. Selections-Deselect All
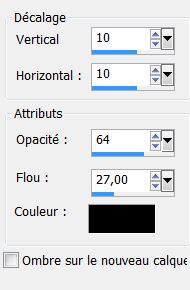
45. Effects - 3D Effects - Drop shadow 0/5/80/42 black
46. Material Properties: FG-Color tot color: #912809 BG-Color to color Black
47. Prepare a Sunburst Gradient as configured
48. Layers- New Raster layer
49. Selections - load/save selection - load selection from disk and choose''obscures_2'' Flood Fill Tool: fill the selections with the gradient
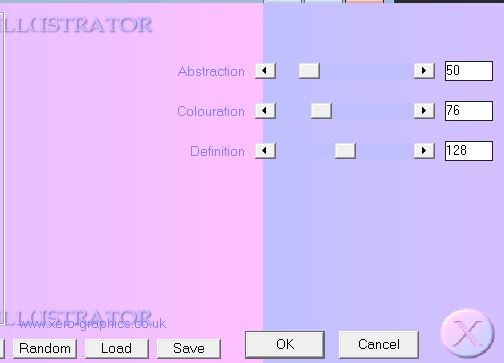
50. Effects-Plugins - Xero -
Illustrator
51. Effects-Plugins Penta Com
- Color dot

52. Selections-Deselect All
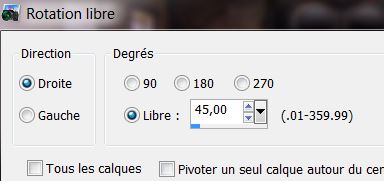
53. Layers- Duplicate
54. Image Free Rotate -Right /45°
55. Effects-Image Effects-Seamless Tiling-/Side by Side
56 Layers- New Raster layer
57. Selections - load/save selection - load selection from disk and choose'' obscures_3'' Flood Fill Tool: fill the selection with this color(FG-Color)
#912809
58.
Effects-Plugins - Unlimited 2.0 / &<Bkg
Kaleidoscope- Kaleidoscope 8

59. Selections-Deselect All
60.
Effects-Plugins - Eyecandy 5/Impact –Glass
-Preset - Clear
61. Layers- New Raster layer
62. Selections - load/save selection - load selection from disk and choose''obscures_4'' Flood Fill Tool: fill the selection with color Black noir
(it is clear is normal)
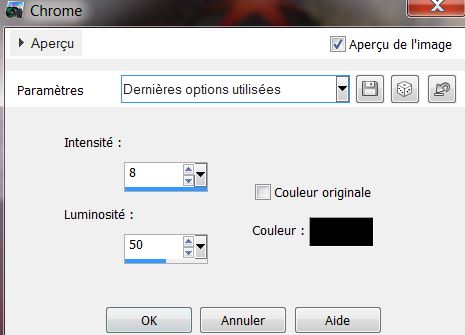
63. Effects--Artistic Effects- Chrome
64. Selections-Deselect All
Effects-3D Effects-Drop Shadow (both to apply)
65.Open the tube
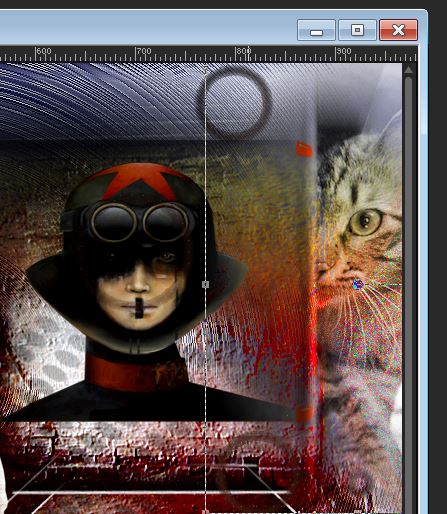
''obscures_barbellés.png'' Edit/copy-Edit paste as a new layer . With your move tool move to the right
66. Open the tube ''1181-misted-cat-LB
TUBES'' / Image Mirror éditer copier /Edit/copy-Edit paste as a new layer . With your move tool move to the right
Layer Palette: change your Blend Mode to "Luminance -Legacy " .Reduce the opacity of this layer to 69%
67. Open the
tube ''rat.png'' Edit/copy-Edit paste as a new layer . With your move tool move to the left
68. Open the tube ''lut
tube 65 -11102009'' /Image-Resize 60%. Edit/copy-Edit paste as a new layer and place
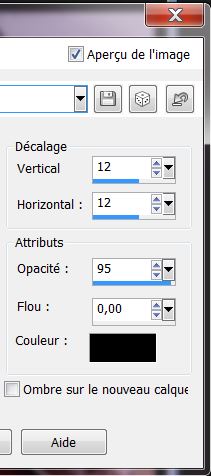
69.Effects-3D Effects-Drop Shadow 10/32/ 50/5 black
70. Layers- Merge-Merge Visible
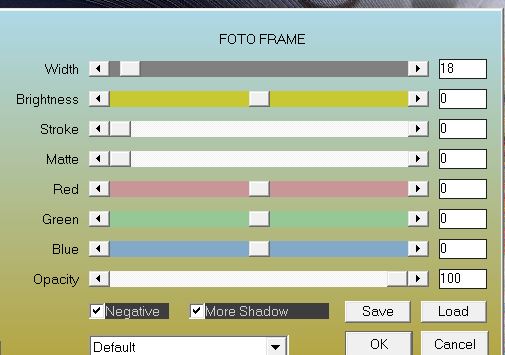
71. Effects -Plugins AAA Frame -
Foto Frame
72. Image Resize 85 % (All layers not checked)
73 .Effects-3D Effects-Drop Shadow 10/32/ 50/5 black /repeat -10/-32
74. Effects-Image Effects-Offset
75. Layers- New Raster layer
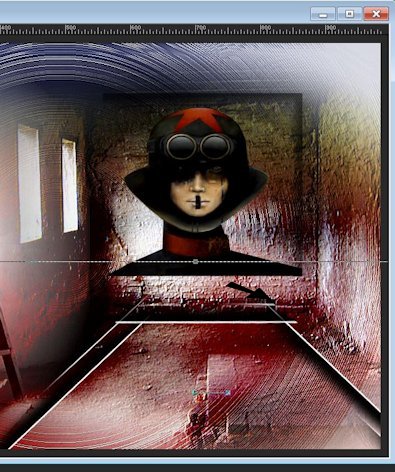
76. Selections- Select All/Open the tube ''obscures_tuile'' Edit-Copy- Edit Paste into selection
77. Selections-Deselect All
78. Layers- Duplicate
Your work look like this now
79. Layer Palette: activate (Raster 1)
80. Effects-Plugins - Neology -
Digital Weaver 99/ 238
Close the top layer in the layer palette (activate raster 1)
81. Effects-Plugins - Muras's
Meister -Perpsective Tilling
82. Activate your Pick Tool: (K) down a 500 pixels
83. Layers- Arrange-Move Down
84.Activate the top of the layer palette=raster 1 Layers-Arrange-Sent to Bottom
(Open the bottom layer)
85 Activate the top of the layer palette
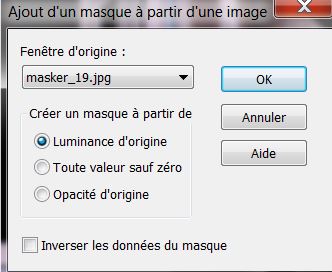
86. Layers- New raster layer /Flood Fill Tool: fill the layer with color white !! Pot of Paint-Opacity 60 %( like this )

87 Layers-New Mask layer from Image and choose: ''masker_19''
88. Layers-Merge-Merge Group
89. Selections - load/save selection - load selection from disk and choose''obscures_5'' / Delete /Selections-Deselect All
90. Open the tube
''Alies1VR637-woman-19082013''Image Resize 85% Edit/copy-Edit paste as a new layer. With your move tool place it to the left
91.Open the tube
''rat_2 Edit/copy-Edit paste as a new layer. With your move tool move to the right
92.Image - Add Borders - Symmetric 2 pixels color black
93.Image - Add Borders - Symmetric 30 pixels color white
94.Image - Add Borders - Symmetric 2 pixels color black
95. Activate Text Tool: Font ''
Macedo regular'' Size 32 /FG-Color to color red-/BG-Color to color black .Write your text and place /Effects-3D Effects-Drop Shadow : -10/-32/50/5 black
*
That's it !! You've done it !
Thanks
This lesson was written by Renée 24/08/2013

|


 Translations