|
Let's start the lesson.
Russian Butcher
- Preparation
- Material Properties: Set your foreground color to color #d8d9f5= 1 – Set your background color to color #10334f=2

1. File:Open a new transparent Image of 1015 x 675
2. Set your Foregroundcolor to foreground-background Radial gradient configured like this
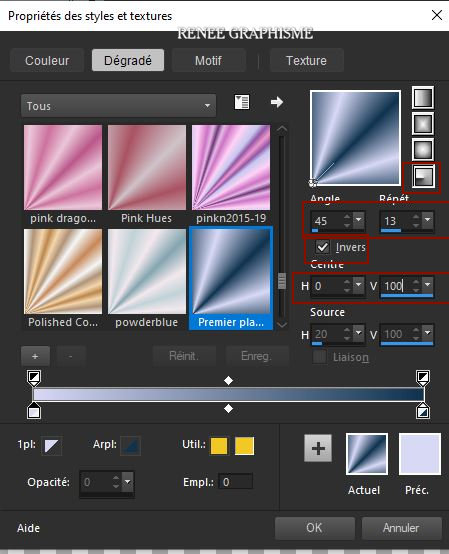
3. Flood Fill Tool
 –Fill the layer with the gradient –Fill the layer with the gradient
4. Adjust- Blur- Gaussian Blur- Radius 20
5. Effects- Plugins – Tramage – Wire Mesh 15/144/144/144
6. Effects- Plugins – Simple – 4 Way Average
7. Adjust- Sharpness- Sharpen
8. Effects- Plugins – Simple – Blintz
9. Effects- Plugins – Simple – Quick Tile
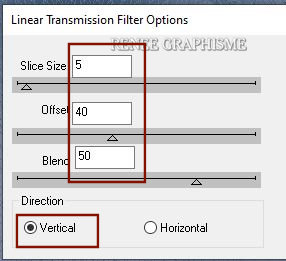
10.Effects- Plugins – dsb flux – Linear Transmission use the settings below
11.
Image - Mirror - Mirror vertical ( Image - Flip in older versions of PSP)
12. Effects -Plugins - Plugins
Unlimited 2.0 - &<Bkg Kaleidoscope>- 4 QFlip UpperR
13. Selections –load/save selection –load selection from disc and select my selection:‘’Russian Butcher – 1’’
14. Selections- Promote selection tot layer
Selections-Deselect All
15. Effects -Plugins -
Unlimited 2.0 -Toadies - Plain Mosaic Blur... 15/23/18
16. Layers- Duplicate
17. Effects -Plugins -
Unlimited 2.0 -Toadies - Plain Mosaic Blur... 9/83/246
18. Layers-Properties-Change the Blend Mode to " Hard Light "
- Your work and Layer Palette look like this now-You should have this result
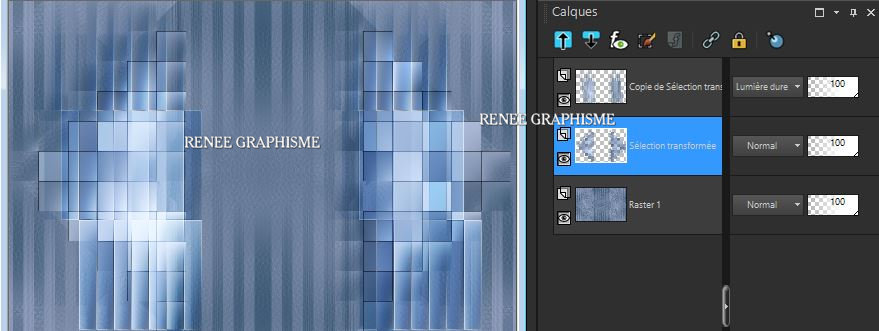
Layer Palette- Click on the middle layer (Promoted selection)
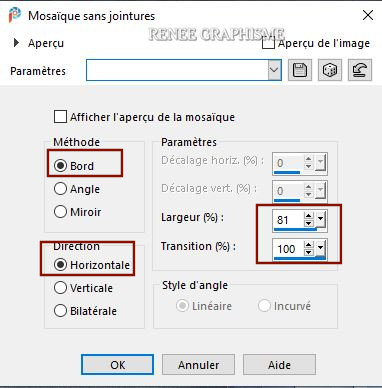
19. Effects- Image Effects- Seamless Tiling use the settings below
20. Layers- Duplicate
21.Image - Mirror - Mirror Horizontal (Image - Mirror in older versions of PSP)
22. Layers- Merge- Merge Down
23. Layers- Arrange- Bring to Top
24. Effects- Plugins – Mura’s Meister – Perspective Tiling use the settings below
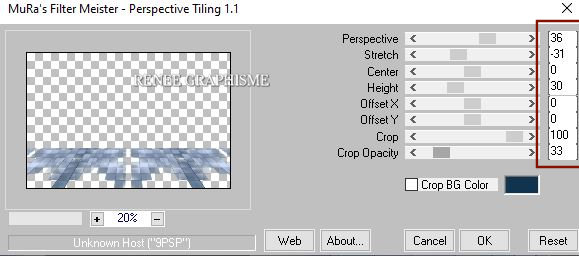
25. Effects-3 D Effects- Drop Shadow with these settings: BG-Color= 2 ( Shadow on new Layer checked )
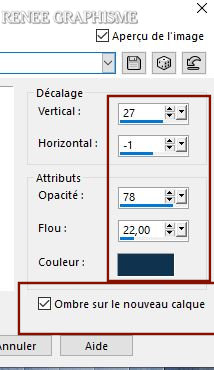
-Stay on the shadow layer
26. Effects-3 D Effects- Drop Shadow with these settings: Color White (Attention- Shadow on new Layer not checked )
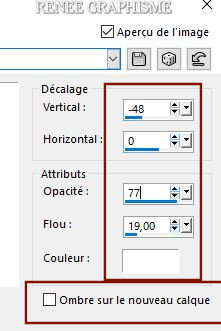
- Activate the bottom layer in the layer palette= Raster 1
27. Selections –load/save selection –load selection from disc and select my selection: ‘’Russian Butcher – 1’’
28. Selections –
Invert
29.Effects- Plugins –AIM – Usm use the settings below
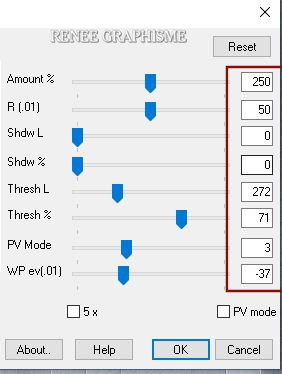
30. Effects-3 D Effects- Drop Shadow with these settings: 25/ 6/ 50 / 30 Color Black
Selections-Deselect All
-On this Layer= Raster 1
31. Activate Selection Tool -Custom Selection (S) -Rectangle with these settings 
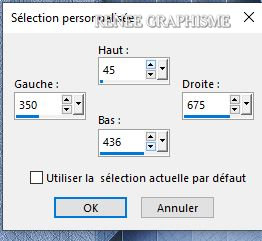
32. Selections- Promote selection to layer
33. Layers- Arrange- Bring to Top
34. Effects- Plugins – AAA Frame – Foto Frame use the settings below
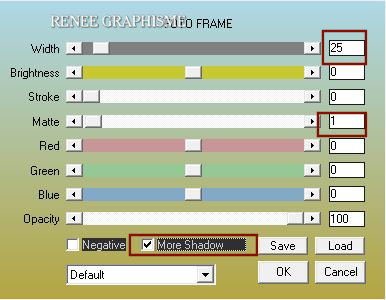
35. Selections -
Modify - Expand with 2 pixels
36. Layers- New Raster Layer
37. Flood Fill Tool
 –
Fill the selection with the FG-Color =1 –
Fill the selection with the FG-Color =1
38. Selections –
Modify - Contract with 2 Pixels
DELETE
Selections-Deselect All
39. Layers- Merge- Merge Down
40. Effects-3 D Effects- Drop Shadow with these settings: 0/0/60/40 Color Black
41. Activate Selection Tool -Custom Selection (S) -Rectangle with these settings
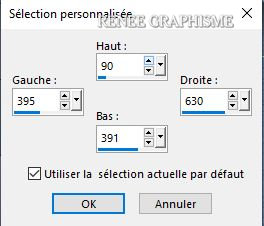
42. Effects –Plugins-
Unlimited 2.0 - Toadies – Plan Mosaic Blur 55/65/18
43. Effects-3 D Effects- Drop Shadow with the same settings
44. Layers- New Raster Layer
45. Open the tube ‘’Renee_TUBES_Israélien--Butchers.pspimage’’ -Edit - Copy- Activate your work -Edit - Paste into selection
Selections-Deselect All
46. Layers- New Raster Layer
-
Color Palette-Change the Foreground color to color #ffffff =3
47. Selections –load/save selection –load selection from disc and select my selection: ‘’Russian Butcher – 3’’
48. Flood Fill Tool
 –
Fill the selections with color #ffffff –
Fill the selections with color #ffffff
Selections-Deselect All
49.Layers-Properties-Change the Blend Mode to " Hard Light "
50. Open the tube "Butcher-renee-tube-image 1.pspimage " -Edit - Copy- Activate your work -Edit - Paste as a new layer
51. Pick Tool: (K) on your keyboard -Enter these parameters for the X:679,00 and Y: 0,00 positions on the Toolbar
 679/0 679/0
- Press ( M ) to close the Pick Tool
52. Open the tube "Butcher –titre -" -Edit - Copy- Activate your work -Edit - Paste as a new layer and move in the right place
53. Open the tube "Butcher-renee-tube-image 3.pspimage"- Edit - Copy- Activate your work -Edit - Paste as a new layer
54. Pick Tool: (K) on your keyboard -Enter these parameters for the X:670,00 and Y: 383,00 positions on the Toolbar
 670
/383 670
/383
-Press ( M ) to close the Pick Tool
55. Open the tube "Butcher-renee-tube-image 2.pspimage " -Edit - Copy- Activate your work -Edit - Paste as a new layer
56. Pick Tool: (K) on your keyboard -Enter these parameters for the X:732,00 and Y: -140,00 positions on the Toolbar
 732/
-140 732/
-140
- Press ( M ) to close the Pick Tool
57. Layers- New Raster Layer
58. Selections –load/save selection –load selection from disc and select my selection:‘’Russian Butcher – 2’’
59. Flood Fill Tool
 –
Fill the selection with #ffffff=3 (2 clicks) –
Fill the selection with #ffffff=3 (2 clicks)
Selections-Deselect All
60. Effects- Plugins – Cybia –Screenworks- Boxed Dot
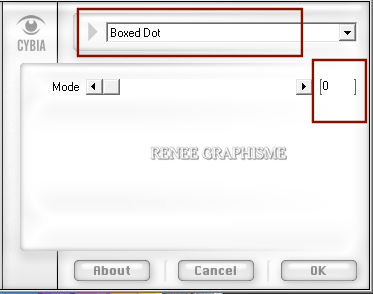
- Activate the bottom layer in the layer palette= Raster 1
61. Layers- New Raster Layer
62. Color Palette-Change the Foreground color to color Black
Flood Fill Tool  -Fill the layer with Black -Fill the layer with Black
63. Effects - Plugins – Flaming Pear – Glitterato
 clicking on the red arrow and search your file- ''Preset ‘’Butcher -Glitterato settings’’
- Or manual settings as shown in the example below
Colors Number 4 / Number 2
Number 6/
Number 7
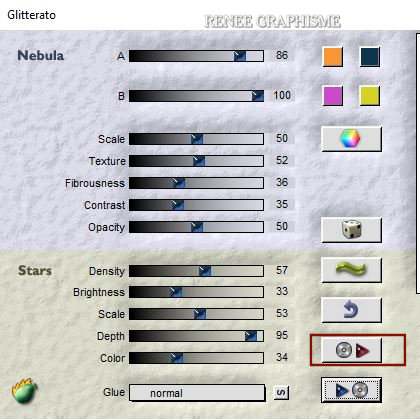
64. Effects- Plugins -Transparency – Eliminate black
65. Layers- Duplicate
66.
Image - Mirror - Mirror vertical ( Image - Flip in older versions of PSP)
- To replace the top of the layer-palette
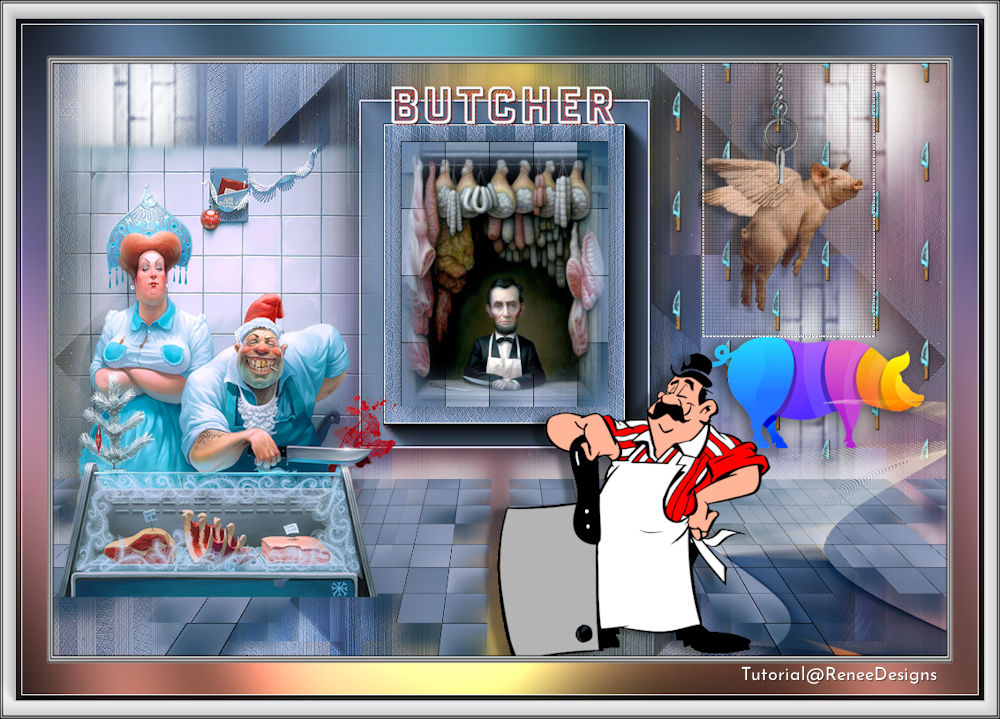
67. Open the tube "Renee_TUBES_Russian-Butchers " -Edit - Copy- Activate your work -Edit - Paste as a new layer
68. Image
-Resize to 70 % (Resize all layers - not checked)
– Move to the left side (see finished image )
69. Open the tube "Renee_TUBES_Boucher" -Edit - Copy- Activate your work -Edit - Paste as a new layer -and place the tube according to your taste
70. Layers- Merge- Merge All
71. Image- Picture Frame –select my Frame
‘’cadre-renee-crazy’’
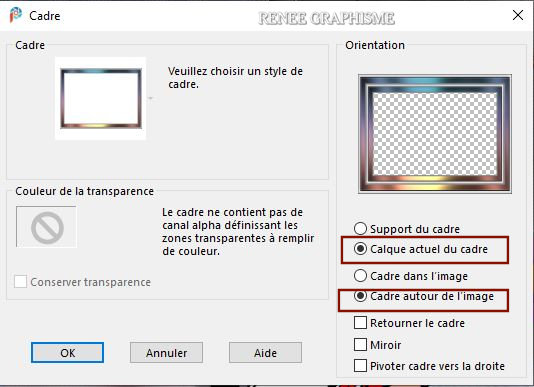
72. Image -Resize to 1000 Pixels width.
Save as JPG file and you're done!
I hope you enjoyed this lesson
Renée
This lesson was written by Renée 06-06-2020
Edited and Update
in 2020
*
Any resemblance with an existing lesson is a coincidence *
Do not forget to thank the people who work with us and for us
I have appointed the tubeurs and translators
Thanks
*
|
 Translations


