|
Let's start the lesson.

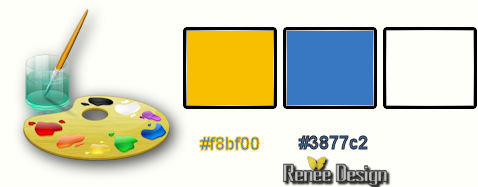
- Color Palette- Set your foreground color to color #f8bf00 - Set your background color to color #3877c2
1. File: Open New Transparent Image 985 x 650 pixels
2. Activate Flood Fill Tool and fill the layer with the foreground color
3. Layers - New Raster Layer
- Activate Flood Fill Tool and fill the layer with the background color
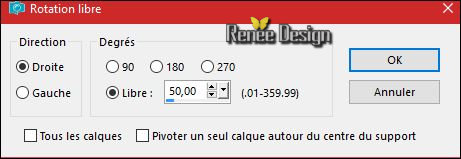
4. Image –
Free Rotate
5. Effects- Distortion Effects- Twirl 300
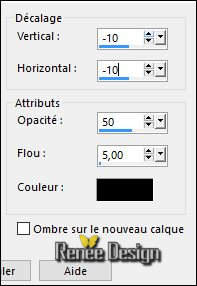
6. Effects –3D Effects – Drop Shadow using the default settings
7. Layers- Merge- Merge Down
8. Effects –Plugins – Simple – 4 Way Average
9.
Selections- Select All
10.Image - Crop to Selection
11. Image- Rotate Right
12. Image
Resize to 995 pixels width
- Your image is 995 x 960 pixels
13.Layers- New Raster Layer
- Color Palette- Set your Foregroundcolor to #ffffff -Activate Flood Fill Tool and fill the layer with the foreground color #ffffff
14. Layers- Arrange- Move Down
- To replace the top of the layers palette
15.
Effects –Plugins- Unlimited 2.0- Filter Factory Gallery G / Bevel
1.5 133/0/255
16. Layers- Duplicate
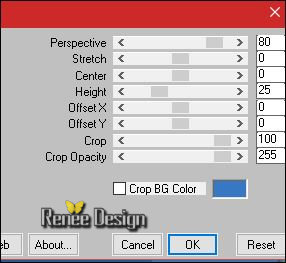
17. Effects
–Plugins – Mura’s Meister – Perspective
Tilling use settings below
18. Effects –3D Effects – Drop Shadow using the default settings
- Repeat- Drop Shadow -negative
19. Open the tube « Lize-AO-259.pspimage »
- Image
Resize to 60 %
- Edit/ Copy-Back to your work-Edit - Paste as new layer on your working image
- Move tool / place your tube on the right side of your image
20. Open the tube ‘’ image_1_RC’’
- Place at the top center of the image
21. Open the tube ‘’ Lize-AO-256.pspimage’’
-Image
Resize to 50%
- Edit/ Copy-Back to your work-Edit - Paste as new layer on your working image
Move tool / place your tube on the left side of your image
-Your Layer Palette look like this now-You should have this result
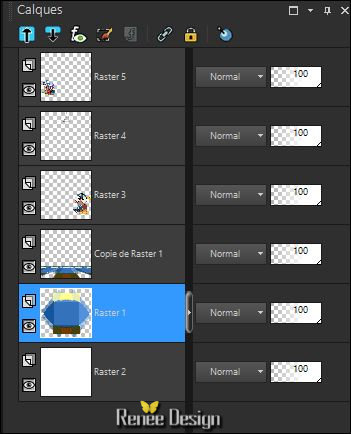
- Activate the second layer from the bottom of the Layer Palette =
Raster 1
22.
Activate Selection Tool -Custom Selection (S) -Rectangle with these settings 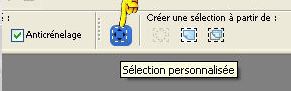
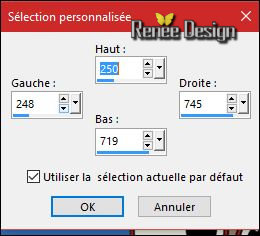
23.
Selections- Promote selection to Layer
24.
Effects –Plugins-Unlimited 2.0 - Filter Factory Gallery G-Bevel
2… 75/22/67
25.
Effects –Plugins-Unlimited 2.0 - Filter Factory Gallery J- Drink To
Me... 15
Selections- Deselect All
26.
Effects –Plugins-Unlimited 2.0 - Filter Factory Gallery J- Drink To
Me... 15
27. Effects- Distortion Effects- Twirl 110
28. Effects
–Plugins - EyeCandy 5 Impact – Perspective
shadow use settings below
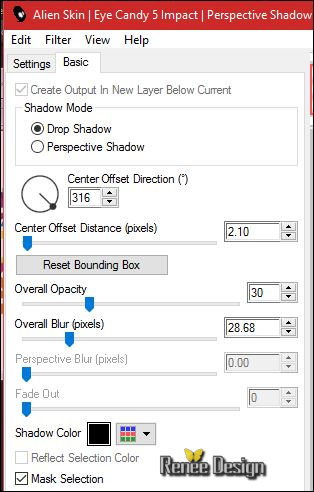
- Stay on this layer(Promoted Selection)
29. Open the tube ‘’ image_2_RC.pspimage’’
- Edit/ Copy-Back to your work -Edit - Paste as new layer on your working image ( do not move !)
-Leave the Blend Mode to "Screen" and Opacity to 61 %
30. Effects- Edge Effects- Enhance
- Foreground color #ffffff -Set your Foregroundcolor to foreground-background radial gradient,configured like this.
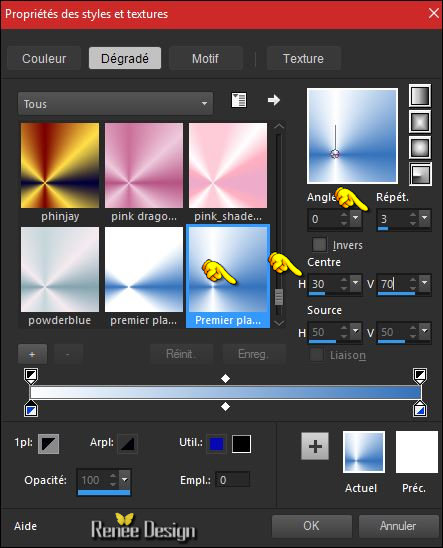
- To replace the top of the layers palette
31. Layers- New Raster Layer
32. Activate Flood Fill Tool and fill the layer with the gradient
33.
Effects –Plugins - Unlimited 2.0 - Filter Factory Gallery J - Drink To
Me 45
34. Effects
–Plugins – Simple – Center Tile
-Open the mask '' Monaiekje mask 33 ''in your PSP and minimize it
35. Layers - New Mask Layer - From Image and choose my file : « Monaiekje
mask 33.pspimage »

- Layers- Merge- Merge Group
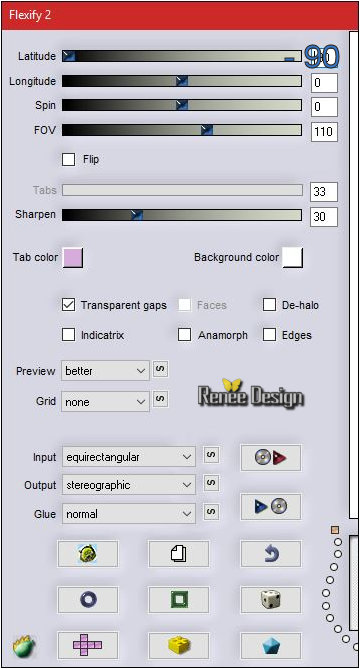
36. Effects
–Plugins – Flaming pear – Flexify 2 use settings below
37. Image
Resize to 50% Resize all the layers not checked (Do not move !!)
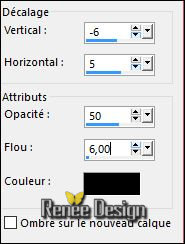
38. Effects –3D Effects – Drop Shadow use settings below
39. Open the tube ‘’ Boutons_RC.png’’
Edit/ Copy-Back to your work-Edit - Paste as new layer on your working image
- Move Tool / place your tube to the left side ( see finished image )
40. Open the tube ‘’ image_3_RC.pspimage’’
-
Move tool / place your tube in the middle of your image
41. Layers- Duplicate
- Image
-Flip (CTRL+I) (Layers- Arrange- Move Down (and move it in the right place)
42. Double click on this Layer and set the Blend Mode to " Dodge " -Set the layer Opacity of this layer to 55%
43. Image - Add borders-Symmetric checked: 1 pixel #3877c2
44. Image - Add borders-Symmetric checked: 50 pixels #ffffff
45. Open the tube ‘’ image_4_RC.pspimage’’ or ’’
image_4b_RC’’
- Activate the select part of the tube and paste as a new layer on your working image and move
46.
Apply a Drop Shadow to your taste
47. Open the tube-folder of Liz to decorate your work
-
Apply a Drop Shadow to your taste
48. Image - Add borders-Symmetric checked: 1 pixel #3877c2
49. Open the tube ‘’ image_5_RC.pspimage’’
- Move Tool / place your tube to the bottom left side of your image
50. Layers- Merge- Merge All (flatten)
51. Image
Resize to 824 pixels width
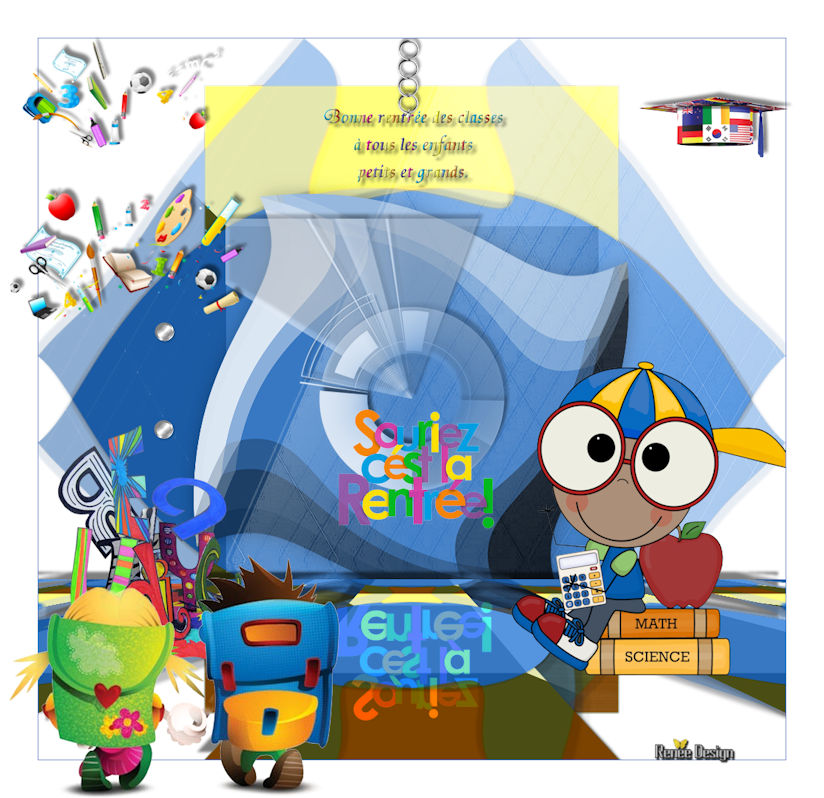
Save as JPG
I hope you enjoyed this lesson
Renée
This lesson was written by Renée 20-08/2016
Edited and Update
01/09/2016
*
Any resemblance with an existing lesson is a coincidence
* Do not forget to thank the people who work with us and for us I have appointed the tubeurs and translators
Thanks Renée *
*
| 


 Translations


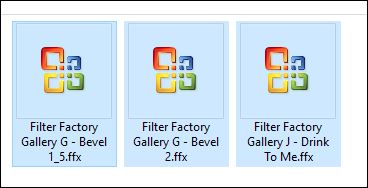


 If a plugin supplied appears with this icon it must necessarily be imported into Unlimited

 All rights reserved