|
Let's start the lesson

Steampunk-53

- Preparation
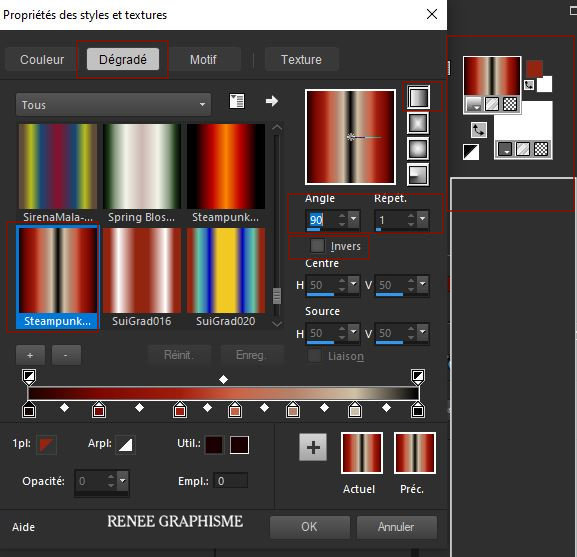
- Material Properties: Set your foreground color to color #932511= 1 – Set your background color to color #ffffff=3
- Change Foreground color into a foreground/background gradient and choose gradient ‘’Steampunk-52’’ use the settings below - Style
Linear
Your Material palette looks like this
1. Open a new transparent image of – 1050 x 610 Pixels
2. Flood Fill Tool
 –
Fill the layer with the gradient –
Fill the layer with the gradient
3. Effects –Plugins -
Unlimited 2.0 – Toadies – Weaver with these settings: 39/ 26/ 130
4. Effects – Edge Effects– Enhance
5. Effects –Plugins-
Unlimited 2.0 - Filter Factory Gallery S - itsa Edge
thing... with these settings: 87/ 255
6. Layers- Duplicate
7. Image - Mirror - Mirror Horizontal (Image - Mirror in older versions of PSP)
8. Layers-Properties-Change the Blend Mode to " Overlay "
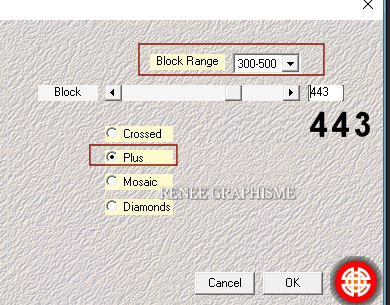
9. Effects –Plugins – Medhi – Sorting Tile use the settings below
10. Effects –Plugins-
Unlimited 2.0 - Simple – Pizza Slice Mirror
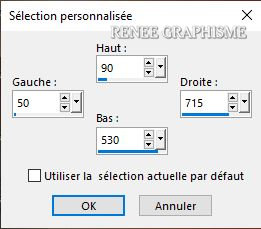
11. Activate Selection Tool -Custom Selection (S) -Rectangle with these settings

12. Selections- Promote selection to layer
13. Effects –
Plugins -Unlimited 2.0 – Mock- Windo with these settings: 96/124/160/76/0/0
Selections- Deselect All
- Stay on this layer
14.
Selections –load/save selection –load selection from disc and select my selection: ‘’steampunk-53-1’’
(it takes up an empty part on the left, this is normal)
15. Selections- Promote selection to layer
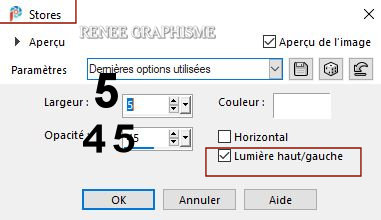
16 .Effects- Texture-Effects - Blind use the settings below/ Color White
Selections- Deselect All
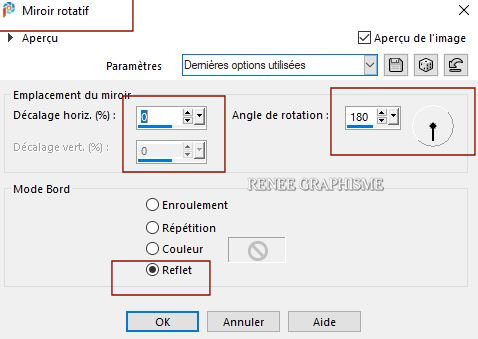
17. Effects- Reflection Effects- Rotating Mirror us the settings below
-Activate Copy of Raster 1 in the Layer palette
18. Layers- Duplicate
19. Layers- Merge- Merge Down
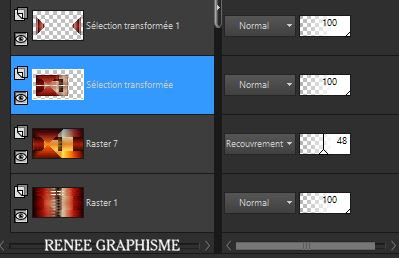
20. Layers-Properties :Reduce the Opacity of this layer to 48
- Your work and Layer Palette look like this now-You should have this result

- Activate the promoted selection layer in the layer palette
21. Activate Selection Tool -Custom Selection (S) -Rectangle with the same settings
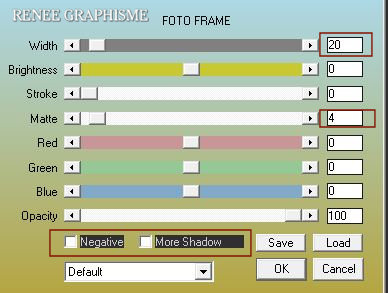
22. Effects – Plugins- AAA Frame – Foto Frame use the setting below
23. Effects- 3 D-Effects-Drop Shadow with these settings: 0/0/70/20 Color Black
Selections- Deselect All
- Activate the top of the layer palette
Material Properties: Set your foreground color to color #932511= 1 – Set your background color to color #151713=5
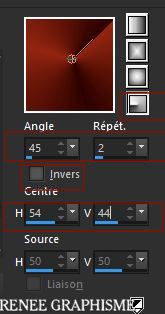
- Change the Foreground Material to a Foreground-Background Gradient - Radial - with these settings
24. Layers- New Raster Layer
25.
Selections –load/save selection –load selection from disc and select my selection: ‘’steampunk-53-2’’
26. Flood Fill Tool
 –
Fill the selection with the gradient –
Fill the selection with the gradient
Selections- Deselect All
27. Layers- Duplicate
28. Image - Mirror - Mirror vertical ( Image - Flip in older versions of PSP)
29. Layers-Properties-Change the Blend Mode to " Overlay " – Lower the Opacity to 50
30. Layers- Merge- Merge Down
31. Effects –Plugins-
Unlimited 2.0 - &<Bkg Kaleidoscope> - 4 QFlip UpperL
32. Effects- Plugins– Toadies – What are you with these settings: 85/ 61
33. Effects –Plugins- AFS[sqborder] -
sqborder2 with these settings: 147/34/215
34. Effects- 3 D-Effects-Drop Shadow with these settings: 0/0/65/25 Color #e6b4e0 = 4
35. Layers-Properties-Change the Blend Mode to " Darken "
36.
Layers- New Raster Layer
37.
Selections –load/save selection –load selection from disc and select my selection: ‘’steampunk-53-3’’
38. Flood Fill Tool
 –
Fill the selection with the gradient –
Fill the selection with the gradient
39. Effects –Plugins-
Unlimited 2.0 – Kang 3- Mercedes Jellybean use the settings below
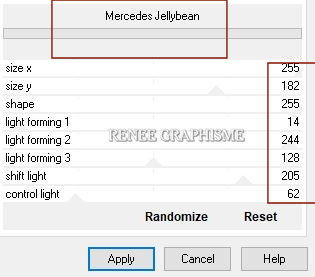
40. Effects – Plugins – Alien Skin EyeCandy 5 Impact – Glass- Preset :
Clear -using the default settings
Selections- Deselect All
41. Layers- Duplicate
42. Image - Mirror - Mirror Horizontal (Image - Mirror in older versions of PSP)
43. Layers- Merge- Merge Down
44. Layers-Properties-Change the Blend Mode to " Hard Light "
- Activate the promoted selection layer in the layer palette
45. Activate Selection Tool -Custom Selection (S) -Rectangle with these settings
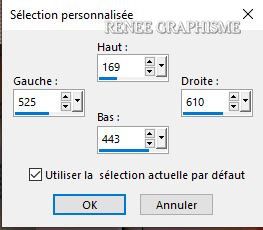
46. Edit - Copy-Edit - Paste as a new layer !!!
Selections- Deselect All
47. Effects –Plugins-
Unlimited 2.0 - kang 1-we make Headlights with these settings:
198/146/20/255
48. Effects – Distortion Effects – Polar Coordinates /Polar to Rectangular
49. Effects –Plugins- Transparency – Eliminate Black
50. Effects – Edge Effects – Enhance
51. Layers-Properties-Change the Blend Mode to " Overlay "
52. Effects- 3 D-Effects-Drop Shadow with these settings: 2/2/65/25 Color Black
-
Layer Palette- Activate the Top layer
53. Layers- New Raster Layer
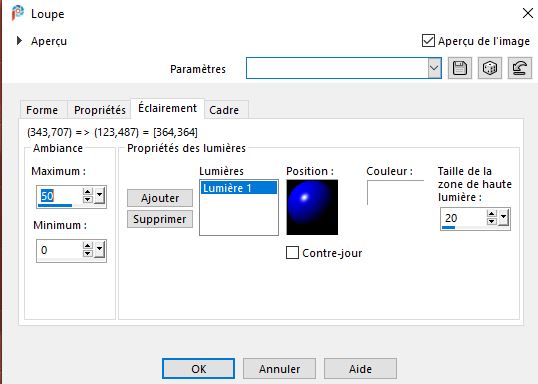
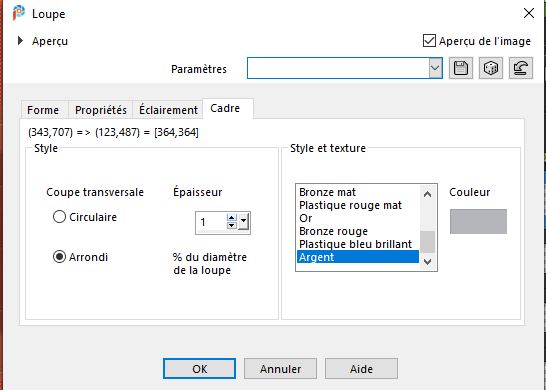
54. Effects – Artistic Effects - Magnifying Lens with these settings
Properties Material Color #2d0300
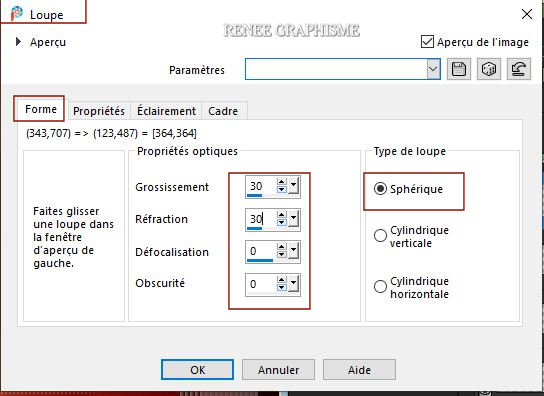 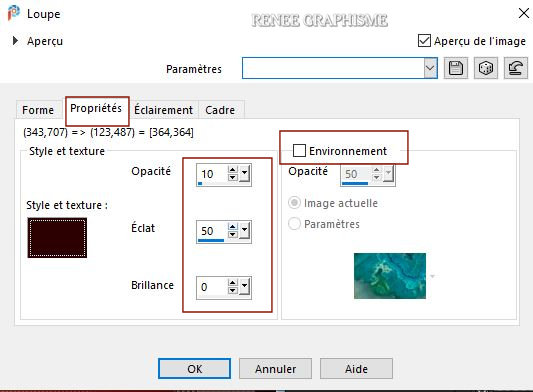
   
55.Preset Shape Tool- Select Shape ‘’Essence of being’’ -Make a shape like this-(is included with the material) ( FG-Color #77705b- Close the background color)The color to draw this shape does not matter the shape is drawn in neutral gray background
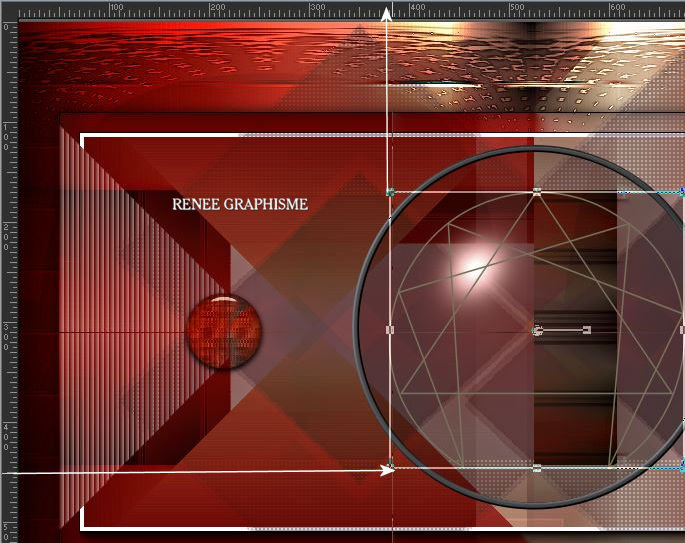
- Convert to Raster Layer
(Use the Selection Tool (K) to correct your shape and get a result that is similar to my shape)
Do you have problems with this- there is an image in the folder and paste it as a new layer
56. Effects –Plugins-
Unlimited 2.0- Sabercat- Sabers Navaho... 10/26
57. Effects- 3 D-Effects-Drop Shadow with these settings: 5/5/70/2 Color Black
- Activate Copy of Raster 1 in the Layer palette
58. Open the tube‘’ STP-53-Image 1’’ Edit - Copy- Activate your work -Edit - Paste as a new layer
59. Objects – Align-Bottom
60. Effects –Plugins – Mura’s Meister – Perspective Tiling use the settings below
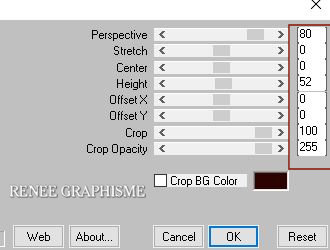
61.
Selections –load/save selection –load selection from disc and select my selection: ‘’steampunk-53-4’’
DELETE
Selections- Deselect All
62. Effects– 3D-Effects - Drop Shadow with the same settings
- Activate the bottom layer in the layer palette = Raster 1
63. Effects – Plugins -Nick Software Color Effex Pro 3.0 –Choose- Bi - Color – Filters -
Set : Cool Warm 1use the settings below
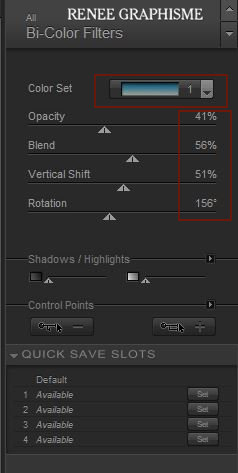
- Activate the top of the Layer-Palette
64. Layers- New Raster Layer
65.
Selections –load/save selection –load selection from disc and select my selection: ‘’steampunk-53-6’’
(selection order is correct, selection 5 comes next)
66. Color palette - Change the foreground to #ffffff=3
Flood Fill Tool  –
Fill the selection with #ffffff=3 (4 or 5 clicks) –
Fill the selection with #ffffff=3 (4 or 5 clicks)
Selections- Deselect All
67. Effects – Plugins– Alien Skin EyeCandy 5 Impact - Extrude -use the settings below-Color
#4c538b
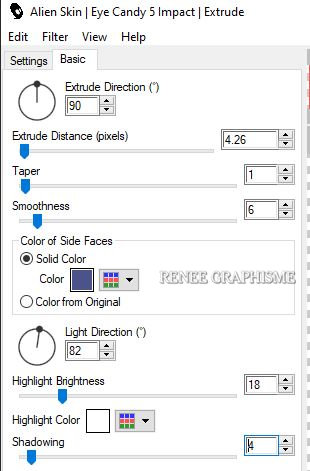
68. Effects –Plugins-
Unlimited 2.0 - Sabercat - Sabers Mitoisis.use the settings below.
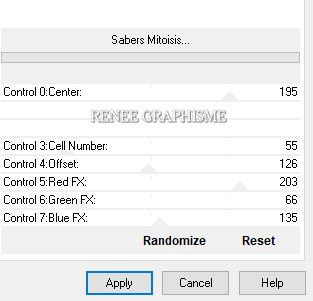
69. Effects– 3D-Effects - Drop Shadow with these settings: 5/5/70/2 Color Black
70. Effects- Distortion Effects-Polar Coordinates-Rectangular to Polar-Transparent
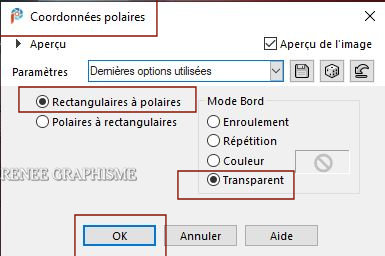
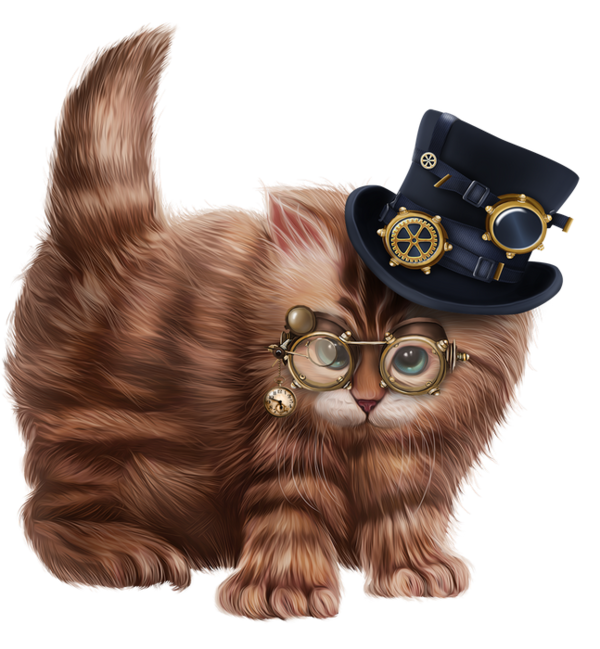
71.Open the tube ‘’Renee_TUBES_Steampunk-DEC-8–‘’
- Image
–Resize 50 %
-Edit - Copy- Activate your work -Edit - Paste as a new layer
72.
Pick Tool: (K) on your keyboard -Enter these parameters on the toolbar
 400 / 226
Press ( M ) to close the Pick Tool
73. Effects –Plugins– Alien Skin Ey Candy 5 Impact- Perspective
Shadow--Tab Settings/User settings select my file- Preset : ‘’STP-53- PerspShadow’’
74. Layers- New Raster Layer
75.
Selections –load/save selection –load selection from disc and select my selection: ‘’steampunk-53-5’’
76. Flood Fill Tool
 –
Fill the selection with the Foreground-color #ffffff=3 (4 or 5 clicks) –
Fill the selection with the Foreground-color #ffffff=3 (4 or 5 clicks)
77. Layers-Properties-Change the Blend Mode to " Screen "
78. Layers- Arrange-Move Down and repeat once
Selections- Deselect All
79. Effects –Plugins-
Unlimited 2.0 - Sabercat -Sabers Navaho..use the settings below
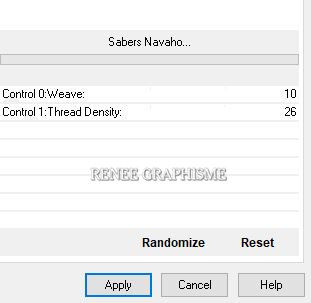
80. Adjust-Sharpness-Sharpen More
- Repeat -Adjust-Sharpness-Sharpen More
81. Layers- New Raster Layer
82. Activate Selection Tool -Custom Selection (S) -Rectangle with these settings

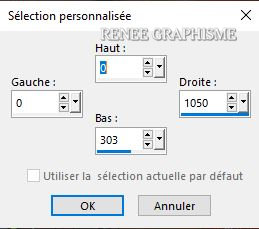
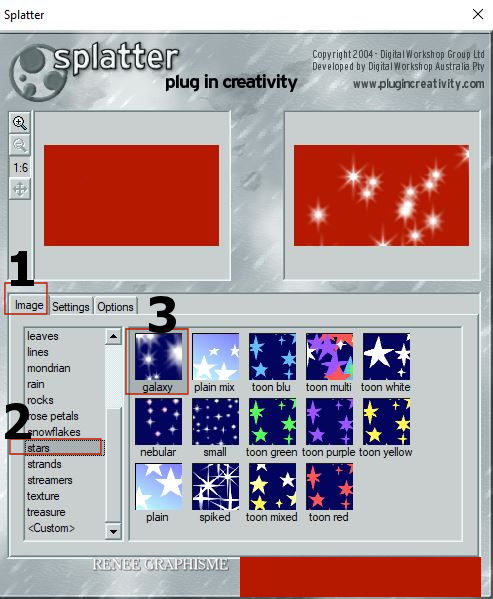
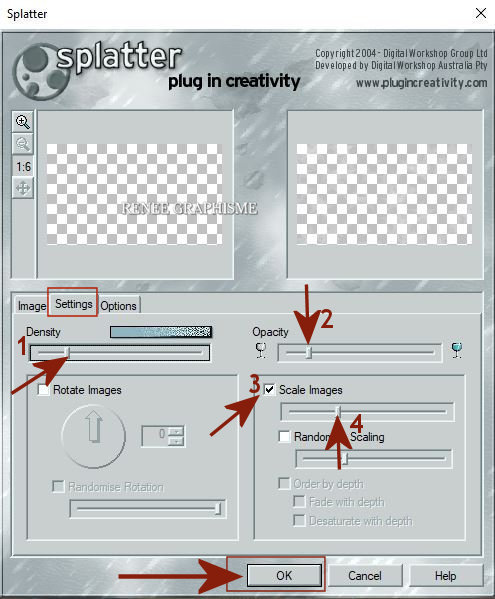
83. Effects – Plugins – Creativity – Splatter ( In Options we don't change anything )
84. Selections –load/save selection –load selection from disc and select my selection: ‘’steampunk-53-7’’
DELETE
Selections- Deselect All
85. Layers-Properties-Change the Blend Mode to " Screen "
86. Open the tube ‘’Renee_TUBES_Steampunk-52-tutoriel’’ -Edit - Copy- Activate your work -Edit - Paste as a new layer
87. Objects – Align
– Bottom
88. Image - Add borders-Symmetric checked:1 Pixel Color Black
- Image - Add borders-Symmetric checked: 35 Pixels Color White
- Image - Add borders-Symmetric checked:1 Pixel Color Black
- Image - Add borders-Symmetric checked: 20 Pixels Color White
89. Selections -
Select All
90. Selections -
Modify-Contract 35 Pixels
91. Effects- 3 D-Effects-Drop Shadow with these settings: 0/0/70/45 Color Black
Selections- Deselect All
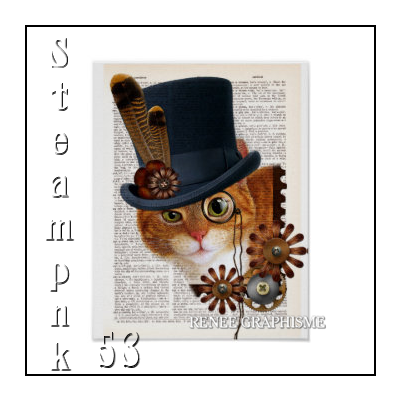
92. Activate Text Tool -With attached font write the title -Renée have used the font ''FhaCondensedFrenchShadeNc-3W0z'' Renée have used the colors White/Black -Or take my two texts and put it in the right place
93. Paste the author's watermark on your work and your own watermark
Layers- Merge- Merge All (flatten)
Save as JPG
I hope you enjoyed this lesson
Renée
This lesson was written by Renée 07/02/ 2021
Edited and Update
2021
*
Any resemblance with an existing lesson is a coincidence *
Do not forget to thank the people who work with us and for us I have appointed the tubeurs and translators
Thanks
*
|
 Translations


