|
Let's start the lesson
Steampunk-58
- Preparation
-Material Properties:
Set your Foreground color to color #7f230e =color 4 – Set your Background color to color #45323b =color 2

- Properties Foreground- Prepare a Foreground/Background linear Gradient configured like this
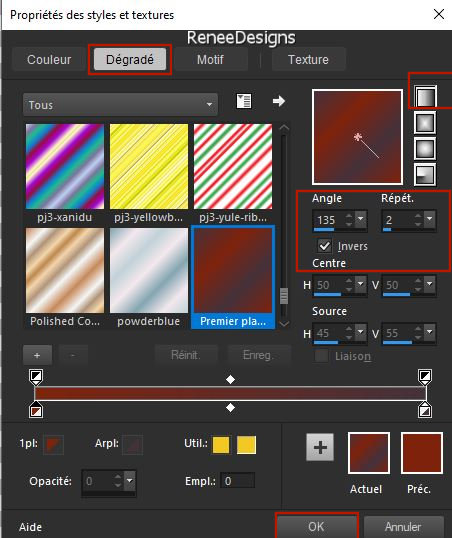
1. File: Open a transparent image in this size : 1100
x 800 Pixels
2. Flood Fill Tool
 –Fill the layer with the gradient –Fill the layer with the gradient
3. Effects - Plugins - Filters in Unlimited 2.0 - &<Background
Designers IV> - @Night Shadow use the settings below
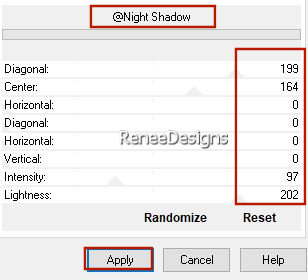
4. Adjust- Blur-Gaussian Blur-Radius 38%
5. Effects -Plugins- Filters in Unlimited 2.0 – Toadies – Weaver with these settings:
98/53/222
6. Effects – Edge Effects – Enhance
7. Effects - Plugins- Filters in Unlimited 2.- Toadies - *Sucking Toad*
Bevel II.2...with these settings: 100/62/43
8. Effects – Plugins – Simple – Quick Tile
9. Effects – Edge Effects – Enhance More
10. Layers – Duplicate
11. Layers-Properties-Set the Blend Mode to "Screen" - Reduce the Opacity of this layer to 55%
12. Layers – Merge- Merge Down
13. Layers – Duplicate
14. Adjust- Blur-Gaussian Blur-Radius 100%
15. Effects – Geometric Effects – Perspective Vertical use the settings below
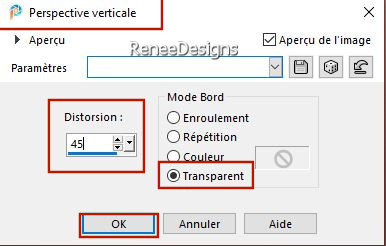
16. Effects – 3D-Effects – Drop Shadow with these settings: 12/12/100 /55 Color black
- Repeat: Effects – 3D-Effects – Drop Shadow with these settings:
– 12/ -12
17. Effects – Plugins- AP[Utility] –
Reflections use the settings below
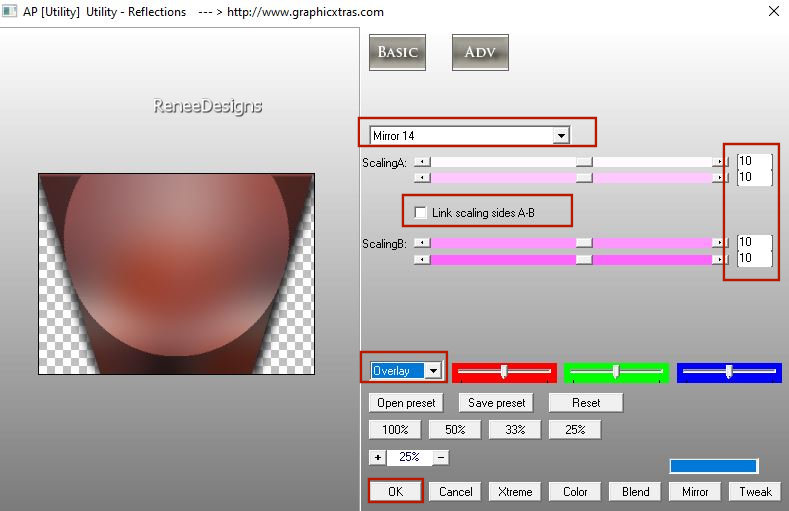
18. Effects- Image Effects- Seamless Tiling use the settings below
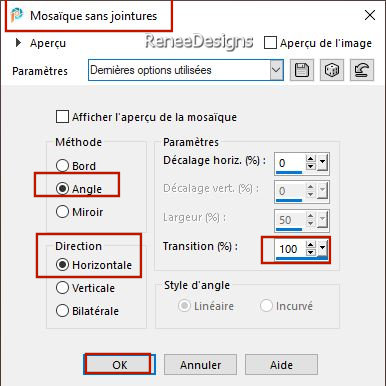
19. Layers-Properties-Set the B lend Mode to " Hard Light "
20. Layers – Duplicate
21. Layers – Merge- Merge Down
-Layers-Properties-Reduce the Opacity of this layer to 59 %
22. Effects – Art Media Effects –
Brush Strokes use the settings below – Color #7f230e= 4
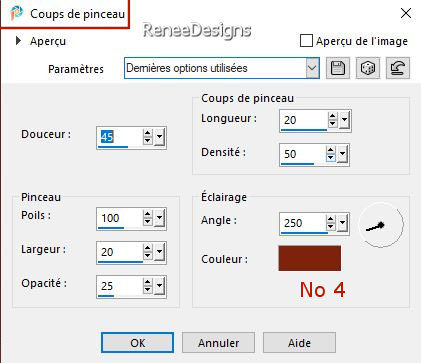
23. Effects - Edge Effects –Enhance
- Properties Foreground-Set your Foreground color to color #7ec2b9 =1
24. Layers- New Raster Layer
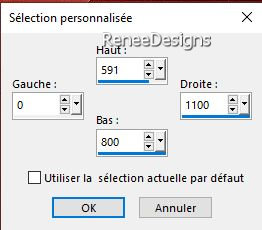
25. Activate Selection Tool -Custom Selection (S) -Rectangle with the same settings
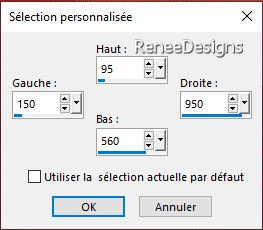
26. Effects – Plugins – Medhi – Wavy Lab 1.1use the settings below
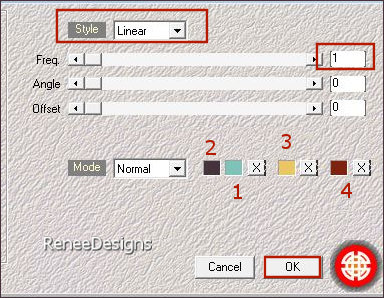
27. Effects - Plugins - Filters in Unlimited 2.0 – Graphic Plus – Cross
Shadow using the default settings
28. Effects - Plugins - Filters in Unlimited 2.0 - Filter Factory
Gallery P - Frame 21 Seamless..use the settings below.
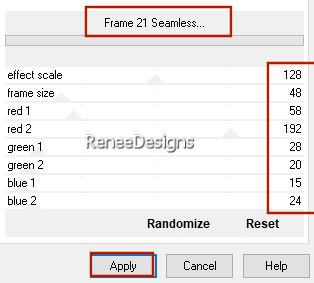
29. Selections – Modify –
Contract-45 Pixels
30. Effects - Plugins- Filters in Unlimited 2.0 -Filter Factory
Gallery D – Mirror It use the settings below
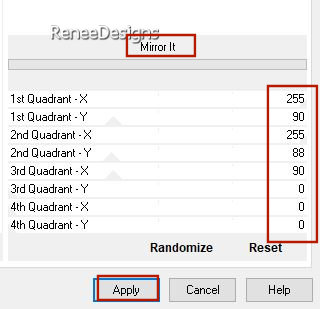
31. Effects - Plugins - Filters in Unlimited 2.0 - Filter Factory
Gallery R - Countdown: 70/213
32. Effects – Plugins – Transparency- Eliminate White

33. Effects – 3D-Effects – Drop Shadow with these settings: 10/18/100/55 Color Black
34. Effects –Plugins – Mura’s Meister – Perspective Tiling use the settings below
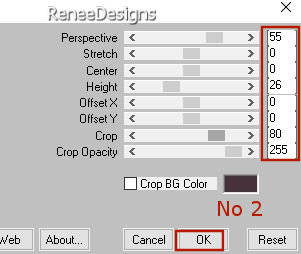
35. Effects -Plugins - Alien Skin EyeCandy 5 - Impact - Gradient
Glow-Tab- Settings-User Settings -choose my file- Preset ‘’STP-58- Glow’’ ( or manually see below)
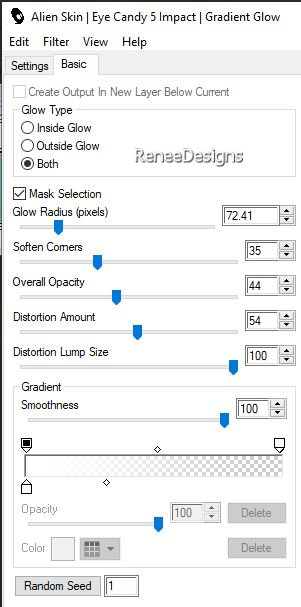
36. Open the Tube ‘’ STP-58-Image 1’’ -Edit - Copy- Activate your work -Edit - Paste as a new layer
37. Pick Tool: (K) on your keyboard -Enter these parameters on the toolbar
 - 42 / 451
- Press ( M ) to close the Pick Tool
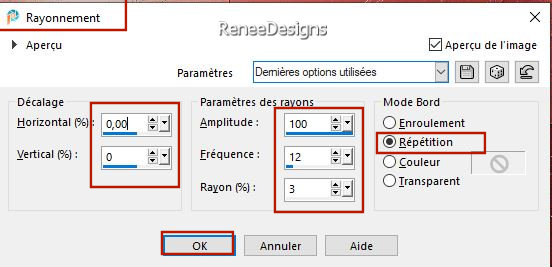
38. Effects– Distortion Effects– Spiky Halo use the settings below
39. Activate Selection Tool -Custom Selection (S) -Rectangle with the same settings


40.Open the Tube ‘’ STP-58-Image 2’’ -Edit - Copy- Activate your work -Edit - Paste as a new layer
- Pick Tool: (K) on your keyboard -Enter these parameters on the toolbar  292/52 292/52
41. Layers-Properties-Set the B lend Mode to " Multiply " - Reduce the Opacity of this layer to 57%
42. Layers– New Raster Layer
43. Selections –load/save selection –load selection from disc and select my selection:–‘’ STP-58-1’’
44. Flood Fill Tool  – Opacity 100 %–
Fill the selection with the Foreground color #7ec2b9 =1 (click 4 or 5 times in the selection)

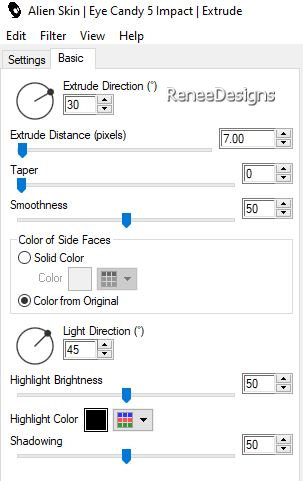
45. Effects - Plugins - Alien Skin EyeCandy 5 - Impact – Extrude use the settings below
46. Effects –Distortion Effects- Wind - Winddirection from right - Wind Strenght 100
Repeat : Effects –Distortion Effects- Wind - Winddirection from left - Wind Strenght 100
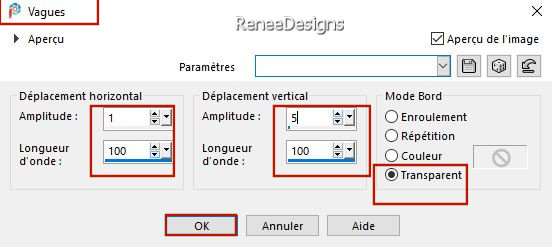
47. Effects– Distotion Effects– Wave use the settings below
- Pick Tool: (K) on your keyboard -Enter these parameters on the toolbar  -11
/556 -11
/556
48. Activer le tube ‘’Renee-TUBES-Steampunk-2023-35.’’
– Image - Resize - 48%
- Edit - Copy- Activate your work -Edit - Paste as a new layer
- Move it in the right place
49. Effects – Plugins – Alien Skin Eye Candy 5 Impact – Perspective
Shadow use the settings below
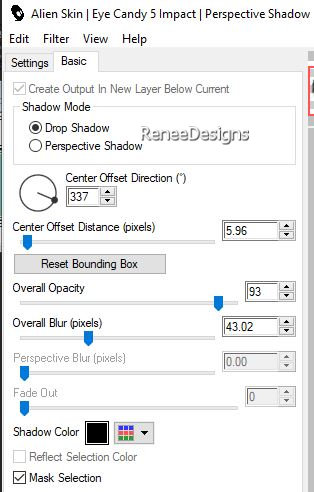
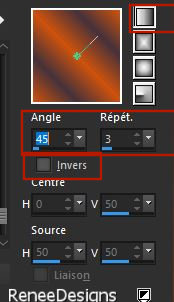
-Material Properties: Set your Foreground color to color #cf520e =color 5 – Set your Background color to color
#45323b=color 2
- Properties Foreground- Prepare a Foreground/Background linear Gradient configured like this
50.Layers- New Raster Layer
51. Selections –load/save selection –load selection from disc and select my selection:‘’STP-58-2’’
52. Flood Fill Tool - Fill the selection with the gradient
53.Adjust- Blur-Gaussian Blur-Radius 54%
- Properties Foreground -
Set your Foreground color to color #ffffff=6
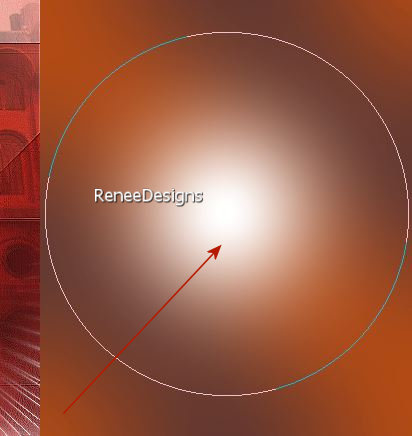
54. Activate the Paint Brush (B) -Shape Round with these settings

- Click 2 times with the foreground color #ffffff in the selection
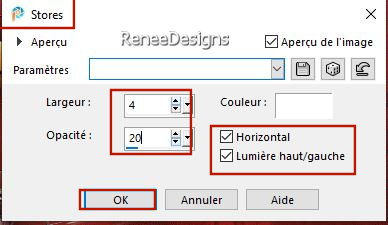
55. Effects – Texture Effects - Blinds use the setings below- Color White

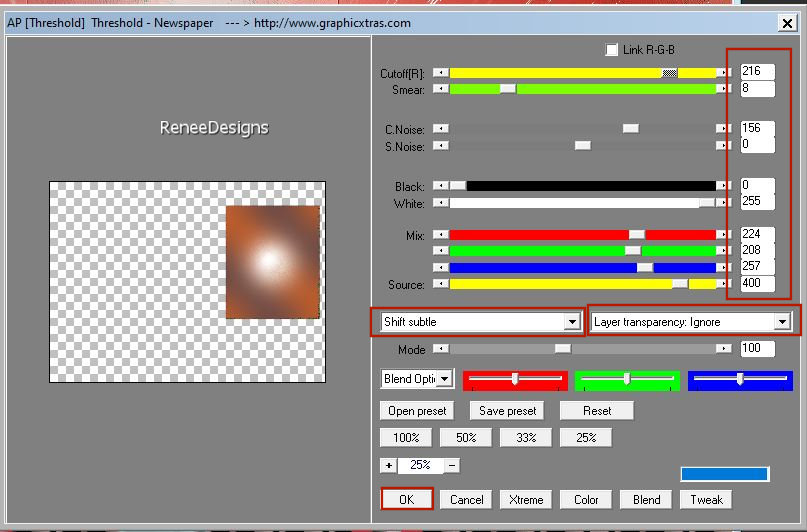
56. Effects -Plugins - AP[Threshold] - Newspaper use the settings below
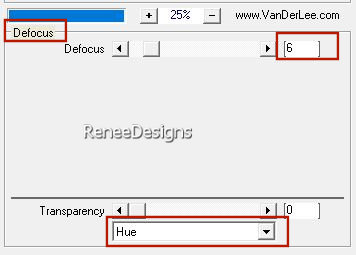
57. Effects – Plugins– Vanderlee - Unplugged X– Defocus use the settinge below
58. Image -Resize to 80 % -Resize all layers NOT checked
59. Pick Tool: (K) on your keyboard -Enter these parameters on the toolbar 740
/ 69 740
/ 69
60. Effects – 3D-Effects – Drop Shadow with these settings: 0/0/80/31 Color Black
61. Layers-Properties-Reduce the Opacity of this layer to 75%
62. Layers- New Raster Layer
63. Selections –load/save selection –load selection from disc and select my selection:‘’STP-58-3’’
64. Open the Tube ‘’Renee-TUBES-Steampunk-2023-52’’ --Edit - Copy- Activate your work -Edit - Paste into Selection
65. Effects-Plugins– Alien Skin Eye Candy 5 Impact – Perspective Shadow with the same settings ( at point 49)

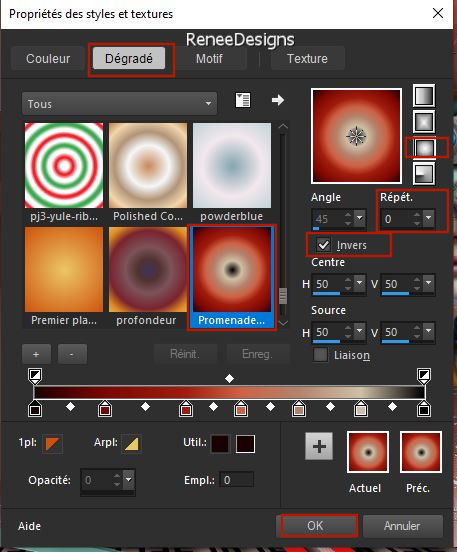
- Material Properties: Set your Foreground color to Gradient and select ‘’Promenade-Insolite ‘’- Style Sunburst with these settings
66. Layers- New Raster Layer
67. Flood Fill Tool
 –
Fill the layer with the gradient –
Fill the layer with the gradient
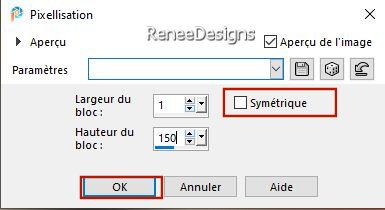
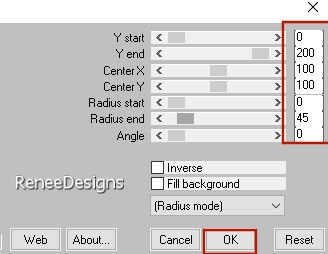
68. Effects– Distortion Effects – Pixelate use the settings below
69. Effects – Plugins – Mura’s Meister – Pôle Transformation use the settings below
70. Selections –
Select All – Selections Float- Selections Defloat
- Selections – Modify –
Contract - 55 Pixels
71. Effects - Plugins (or unlimited)- VM Toolbox – Zoom Blur using the default settings
72. Open the Tube Renee-TUBES-‘’Steampunk-2023-46’’ -Edit - Copy- Activate your work -Edit - Paste into Selection
73. Effects - Plugins - Alien Skin EyeCandy 5 - Impact – Glass -Tab- Settings-User Settings -choose my file–
Preset : ‘’STP-58-Glass’’

74.Image -Resize to 70 % -Resize all layers NOT checked
Effects-Plugins– Alien Skin Eye Candy 5 Impact – Perspective Shadow with the same settings ( at point 49)
-Place at the top left
75. We will decorate /Open a tube of your choice –Resize if necessary
- Drop shadow at your choice
76. Image - Add borders-Symmetric checked: 2 Pixels - Color #45323b= 2
Image - Add borders-Symmetric checked: 22 Pixels - Color #ffffff=6
Image - Add borders-Symmetric checked: 2 Pixels - Color #45323b= 2
Image - Add borders-Symmetric checked: 50 Pixels - Color #ffffff=6
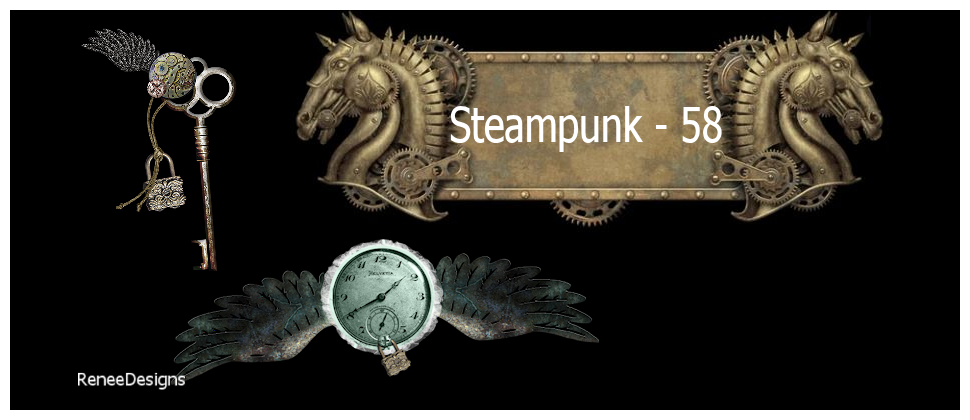
77. Open the Tube
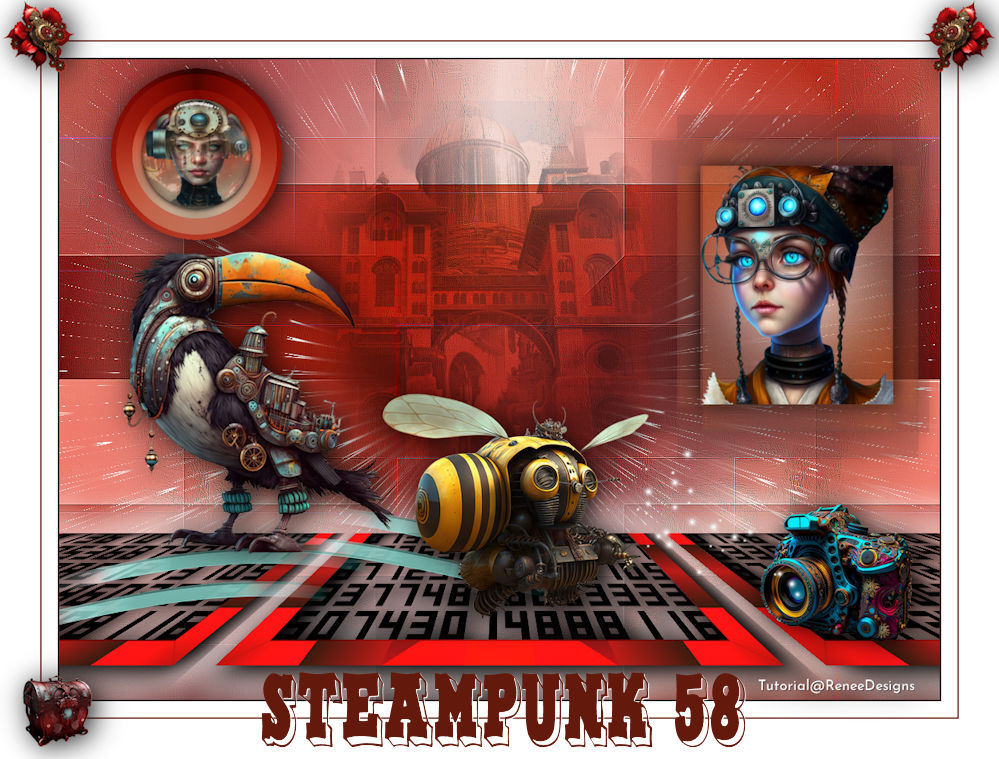
‘’STP-58-Image 3 and STP-58-Image 4’’ Edit - Copy- Activate your work -Edit - Paste as a new layer and move (or take a look at the example of Renée)
78. Paste the author's watermark on your work and your own watermark
79. Layers- Merge- Merge Visible
80. Image - Resize by 999 Pixels width
-
Open the tube with the text "Steampunk-58"- Edit - Copy- Activate your work -Edit - Paste as a new layer and move it in the right place
Or write your own text
-Layers- Merge- Merge All (flatten)
Save as JPG
I hope you enjoyed this lesson
Renée
This lesson was written by Renée
20/02/2023
Edited and Update
in 2023
*
*
Any resemblance with an existing lesson is a coincidence * Do not forget to thank the people who work with us and for us
-I have appointed the tubeurs and translators
Thanks
|
 Translations


