|
Let's start the lesson
Steampunk-62
- Preparation
-Material Properties: Set your Foreground color to color no. 1– Set your Background color to color no. 2

1. Open the background image
‘’Steampunk-62’’ – Promote background layer = Raster 1
2. Effects - Plugins - Filters in Unlimited 2.0 – Toadies - Blast 'em!...
112/ 211
3. Layers-Duplicate
4. Effects - Plugins - Filters in Unlimited 2.0 - Graphic Plus –
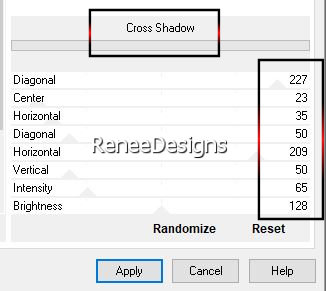
Cross Shadow use the settings below
5. Effects - Plugins - Filters in Unlimited 2.0 - [AFS IMPORT] –
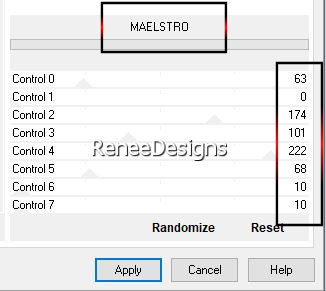
MAELSTRO use the settings below
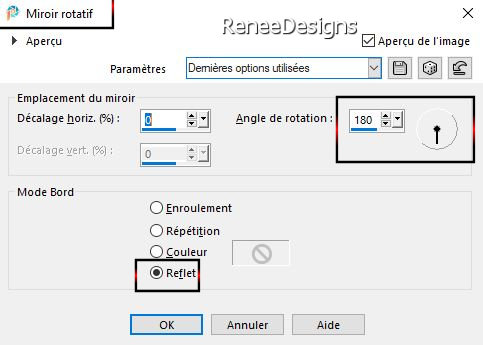
6. Effects – Plugins – Simple – Top left Mirror
7. Effects - Plugins - Filters in Unlimited 2.0 - Filter Factory
Gallery B - Button Deluxe... using the default settings
8. Selections –load/save selection –load selection from disc and select my selection: ‘’Steampunk-62-1’’
9. Selections-Promote selection to layer
- Activate Copy of Raster 1 in the layer palette


- Activate the top of the layer palette (Promoted selection)
10. Image - Resize - 70% - Resize all layers not checked
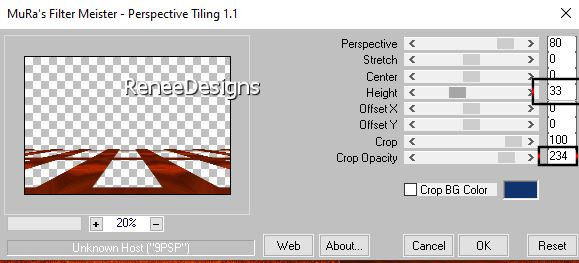
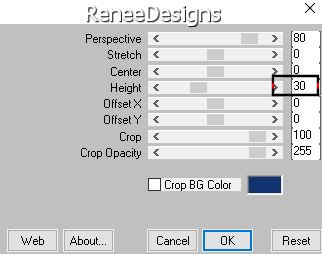
11. Effects – Plugins – Mura’s Meister – Perspective Tiling use the settings below
12. Effects – 3D- Effects- Drop Shadow with these settings: 10/-10/60/45
Color black
13. Layers-Arrange-Move Down
- Activate Raster 1 in the layer palette
14. Selections –load/save selection –load selection from disc and select my selection: ‘’Steampunk-62-2’’
15. Layers- New Raster Layer (Raster 2)
16. Activate tube ‘’ Renee-STP-62-Image1’’ - Edit - Copy- Activate your work -Edit - Paste into selection
- Activate Copy of Raster 1 in the layer palette
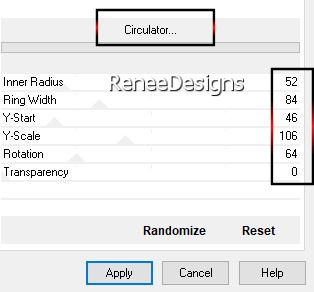
17. Effects - Plugins - Filters in Unlimited 2.0 – Factory Gallery N ou
B – Circulator use the settings below
18. Image - Resize - 70% - Resize all layers not checked
19. Layers-Duplicate
20. Image - Mirror - Mirror vertical ( Image - Flip in older versions of PSP)
21. Layers- Merge- Merge Down
22. Layers-Properties-Set the Blend Mode to Screen
23. Objects – Align – Top
24. Activate tube ‘’ Renee-STP-62-Image2.’’ -Edit - Copy- Activate your work -Edit - Paste as new layer
25. Pick Tool: (K) on your keyboard -Enter these parameters on the toolbar
 353 / 77
- Press the ( M ) button to close the tool.
26. Effects – 3D- Effects- Drop Shadow with these settings: 1/2/75/32 Color black
27. Layers- New Raster Layer
28. Selections –
Select All
29. Activate tube ‘’ Renee-STP-62-Image3’’ - Edit - Copy- Activate your work -Edit - Paste into selection
30. Effects – Plugins - L & K's – Pia-change the setting to 54
31. Image-Rotate Right
32. Effects – Plugins - L & K's – Pia change the setting to 54
33. Image – Rotate Left
34. Effects – Plugins - L & K's – Marya with these settings: 0/149/76/4
35. Effects – Plugins – Transparency – Éliminate Black
36. Effects –Reflection Effects-Rotating Mirror use the settings below
37. Effects - Plugins - Filters in Unlimited 2.0 - Sapphire Filters 01
- SapphirePlugin_0096... using the default settings
38. Effects – Plugins – Mura’s Meister – Perspective Tiling use the settings below
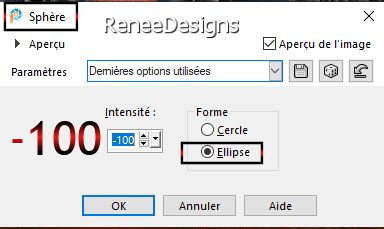
39. Effects – Geometric Effects – Spherize use the settings below
40. Activate tube ‘’ Renee-STP-62-Image4’’ - Edit - Copy- Activate your work -Edit - Paste as new layer
- Place at bottom right ( see finished image)
41. Effects – Plugins – FM TileTools – Saturation Emboss using the default settings
41. Layers- New Raster Layer
42. Selections –load/save selection –load selection from disc and select my selection: ‘’Steampunk-62-3’’
- Material Properties: Set your Foreground color to color no. 3
43. Activate Flood Fill Tool
 –
Opacity 50% -
Flood fill the selection with color no.3 –
Opacity 50% -
Flood fill the selection with color no.3
44.
Effects - Plugins - Filters in Unlimited 2.0 -
It@lian Editors
Effect - Effetto Fantasma 41/41
45. Layers-Duplicate
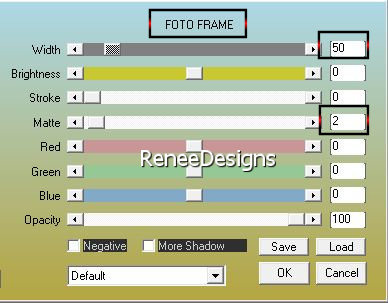
46. Effects - Plugins – AAA Frame – Foto Frame use the settings below
47. Effects – Plugins – Simple – 4 Way Average
48. Layers-Properties-Set the Blend Mode to Hard Light
49. Effects – Edge Effects – Enhance
50. Layers- New Raster Layer
51. Properties Foreground- Set your Foreground color to color no 1
Activate Flood Fill Tool
–
Opacity 50% –
Flood fill the layer with color no 1
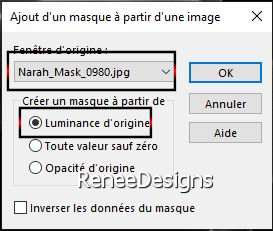
52. Layers - New mask layer - From image and select mask:‘’
Narah_Mask_0980’’
- Layers-Duplicate
- Layers- Merge- Merge Group
53. Activate tube ‘’Renee-STP-62-Image5’’ - Edit - Copy- Activate your work -Edit - Paste as new layer
54. Pick Tool: (K) on your keyboard -Enter these parameters on the toolbar
 454 / 412
Press the ( M ) button to close the tool.
55. Activate tube
‘’Titre’’ – Edit - Copy- Activate your work -Edit - Paste as new layer
Place according to your own taste
Or you can write your own text - the font and bird are included in the material.
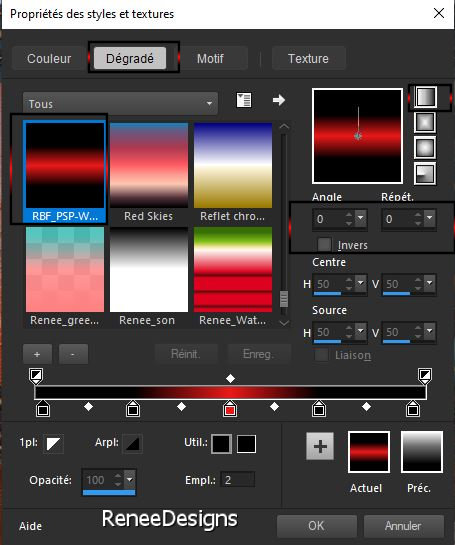
- Properties foreground: Change foreground material into gradient and select ‘’ RBF_PSP-Works_grd_3_032’’
- Put your foreground on the linear gradient with settings below
56. Layers-New Raster Layer
57. Selections –load/save selection –load selection from disc and select my selection: ‘’Steampunk-62-4’’
58.Activate Flood Fill Tool
–
Opacity 100% -
Flood fill the selection with the gradient
59. Effects - Plugins - Filters in Unlimited 2.0 – Tramages - Tow
The Line..with these settings: 80/54/48/9
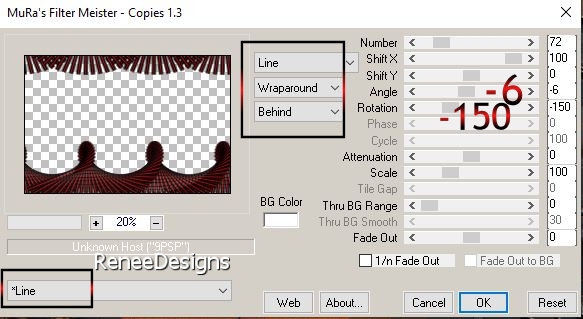
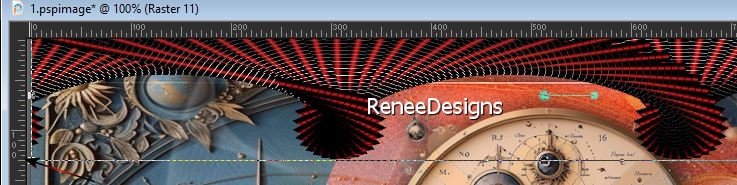
60. Effects – Plugins – Mura’s Meister – Copies use the settings below
61. Image - Mirror - Mirror vertical ( Image - Flip in older versions of PSP)
62. Selections –load/save selection –load selection from disc and select my selection: ‘’Steampunk-62-5’’
63. Edit-Cut - Edit Paste as new layer
64. Objects – Align- Top
View Rulers
65. Pick Tool:(K) on your keyboard
–Mode Scale – Push the bottom center node up to 130 as shown in the example below
66. Layers-Properties-Set the Blend Mode to Luminance
67. Activate the layer below-Layers-Properties-Set the Blend Mode to Screen
68. Effects - 3D-Effects- Drop Shadow with these settings: 1/1/78/1 Color white
69. Image - Add Borders-Symmetric checked: 1 Pixel -Color black
70. Image - Add Borders-Symmetric checked: 40 Pixel -Color white
71. Selections-Select All
72. Image - Add Borders-Symmetric checked: 10 Pixel -Color white
Selections - Invert
73. Activate Flood Fill Tool
–
Flood Fill the selection with the gradient
74. Effects - Plugins - Filters in Unlimited 2.0 – Tramages - Tow The
Line... using the default settings
75. Effects – Edge Effects – Enhance
76. Image - Add Borders-Symmetric checked: 1 Pixel -Color no 3
77. Image - Add Borders-Symmetric checked: 30 Pixels -Color white
78. Open the tube of your choice -(Folder with extra tubes is included with the material)
Resize if necessary. Place where you like it
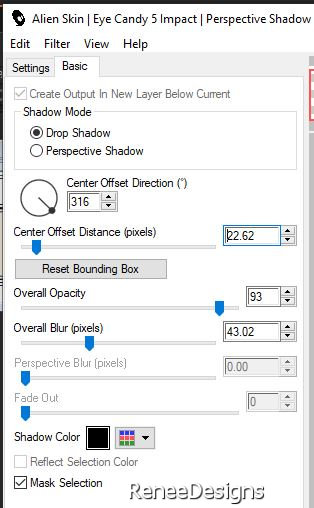
79. Effects - Plugins - Alien Skin EyeCandy 5 – Impact – Perspective
Shadow use the settings below
80. Activate tube ‘’Renee-STP-62-Image6’’ - Edit - Copy- Activate your work -Edit - Paste as new layer
-Move to the right side ( see finished image)
81. Add the author's watermark to your work and your own watermark
82. Layers- Merge- Merge All ( flatten)
83. Image - Resize - to 90% - Resize all layers checked
Save as JPG
Thanks for your time and enjoyment of this lesson.
Renée
This lesson was written by Renée 04/01/2025
Edited and Update
in 2025
*
* Any resemblance to an existing lesson is purely coincidental.
* Don't forget to thank the people who work with us and for us - the testers and translators
Thanks
*
|


 Translations


