|
Steampunk 49
-
Preparation
- Material Properties: Set your foreground color to color #830000 =1 – Set your background color to color #ffffff=2

1. Open the Image ‘’Fond_Steampunk_49’’- Window - Duplicate (or shift+D) - Close the original and proceed on the copy -Promote Background Layer =Raster 1
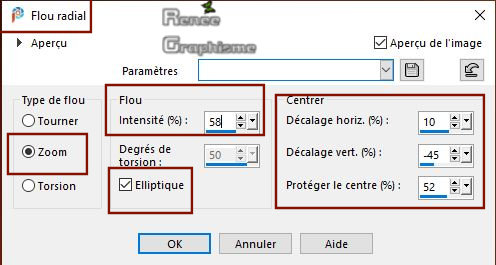
2. Adjust- Blur- Radial Blur use the settings below
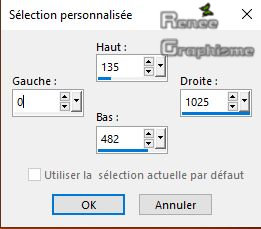
3. Activate Selection Tool -Custom Selection (S) -Rectangle with these settings
4. Selections- Promote selection to Layer
Selections-Deselect All
5. Adjust- Blur -Gaussian Blur : Radius 48
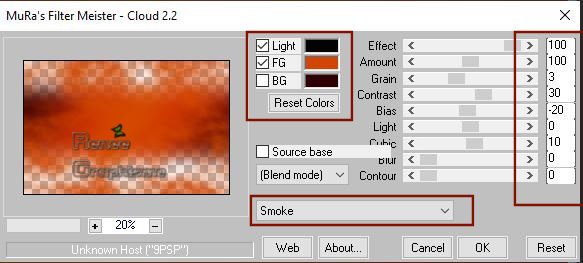
6. Effects – Plugins – Mura’s Meister Clouds -First !!! Preset Menu Smoke
/ and then adjust the settings
Colors #030303/#d24601
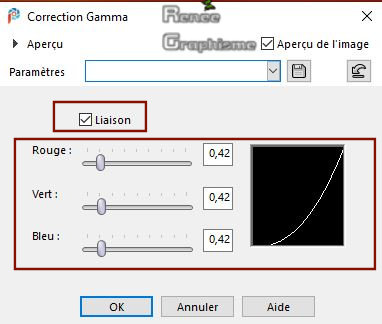
7. Gamma Correction ( Shift+G) on your on your keyboard key
8. Effects- Distortion Effects- Warp -Settings "Large Upper Right "
9. Effects – Edge Effects -Enhance More
10. Effects-User Defined Filter – Emboss 3 with the default settings
11. Effects – Plugins – AlphaWorks - Horizontal
FadeOut 236
12. Layers- Duplicate
13. Image - Mirror - Mirror Horizontal (Image - Mirror in older versions of PSP)
14. Layers- Merge- Merge Down
15. Effects –Geometric Effects- Spherize – Strength 100 - Shape - Circle
16. Layers-Duplicate
17. Layers- Merge- Merge Down
18. Effects –Geometric Effects- Spherize – Strength
100 - Shape - Circle
19. Activate the tube ‘’ ST_48_Image1’’
-
Edit - Copy- Activate your work -Edit - Paste as a new layer
20. Object –Align -Center in Canvas
21. Layers-Properties-Change the Blend Mode to " Soft Light " and Lower the Opacity to
55
-
Color Palette: Set your foreground color to gradient and select :‘’Steampunk_49’
Prepare a linear gradient configured like this
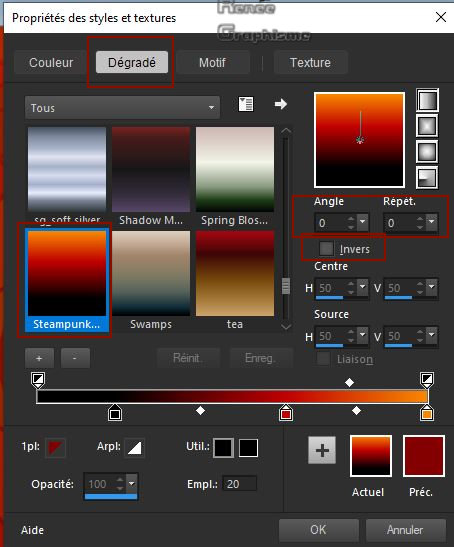
22. Layers- New Raster Layer
23. Activate Selection Tool -Custom Selection (S) -Rectangle with these settings
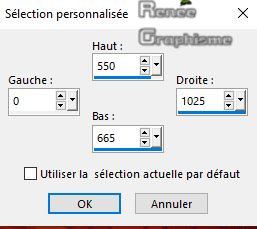
24. Activate Flood Fill Tool
 –
Opacity 50% – Fill the selection with the gradient –
Opacity 50% – Fill the selection with the gradient
Selections-Deselect All
25. Effects – Distortion Effects -Wave use the settings below
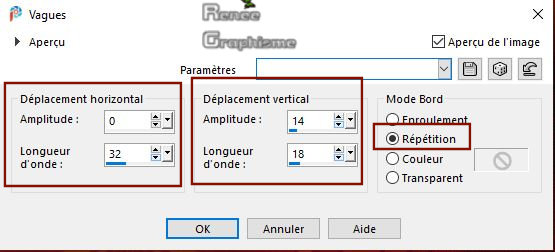
26. Adjust- Blur- Gaussian Blur - Radius 16
27. Layers- New Raster Layer
28. Selections –load/save selection –load selection from disc and select my selection:
‘’Steampunk-49-1’’
29. Activate Flood Fill Tool  - Fill the selection with the gradient
30. Selections - Modify - Contract with 5 Pixels
DELETE
31. Effects – Plugins – Alien skin Eye Candy 5
Impact – Glass -Tab Settings/User settings choose my Preset : ‘’ ST_49_Glass’’
-
Layers- New Raster Layer
32. Effects – 3 D Effects– Cutout use the settings below
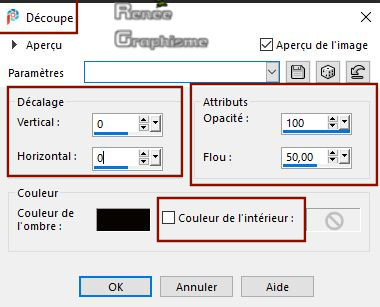
Layers-Merge- Merge Down
33. Layers- New Raster Layer
34. Selections –load/save selection –load selection from disc and select my selection:
‘’Steampunk-49-2’’
It will cancel the previous selection
35. Activate Flood Fill Tool - Opacity 100 - Fill the selection with the gradient
Selections- Deselect All
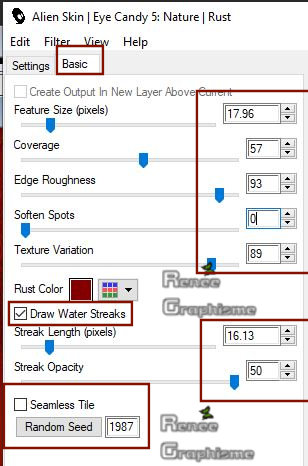
36. Effects – Plugins – Alien Skin Eyecandy 5
Nature – Rust use the settings below -Color #830000 = 1
37. Effects - 3 D Effects – Drop Shadow with these settings : 1/4/100/5 Color Black
38. Open the tube ‘’Renee_TUBES_ST49_Coeur’’ Edit - Copy- Activate your work -Edit - Paste as a new layer
39.Pick Tool: (K) on your keyboard -Enter these parameters for the X:653,00 and Y:131,00 positions on the Toolbar

40. Layers-Properties-Change the Blend Mode to " Hard Light " and Lower the Opacity to 77
41. Layers- Arrange-Move 2 x Down
(underneath Raster 4)
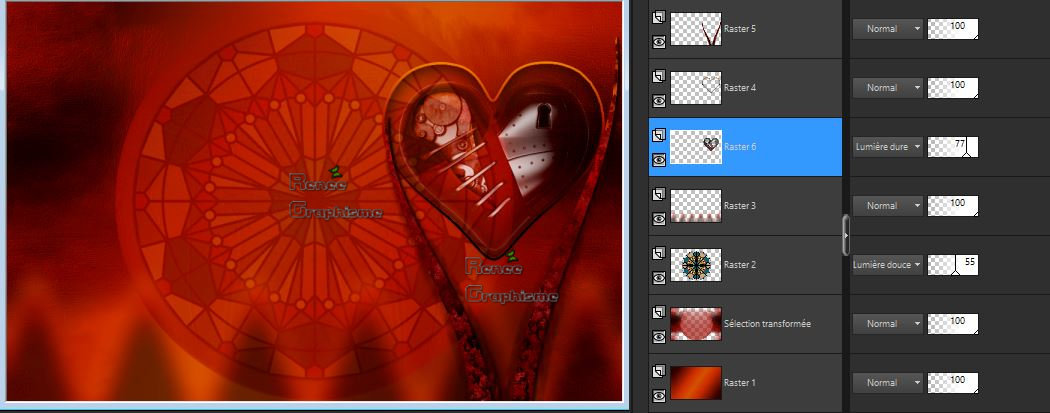
- Your work and Layer Palette look like this now-You should have this result
-
To replace the Top of the Layer-Palette
-
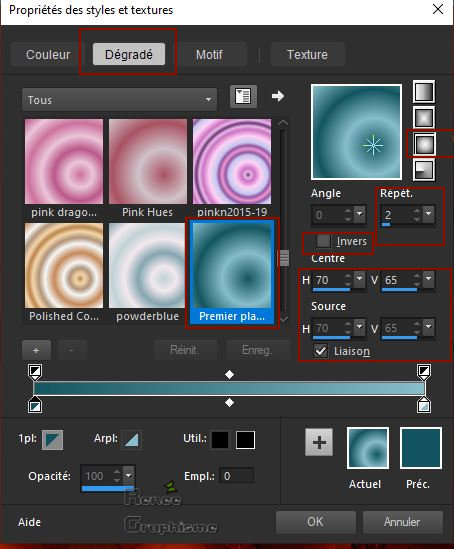
Material Properties: Set your foreground color to color #13555f =4 – Set your background color to color #88bdcb= 5
-
Set your Foregroundcolor to foreground-background sunburst gradient configured like this
42. Layers- New Raster Layer
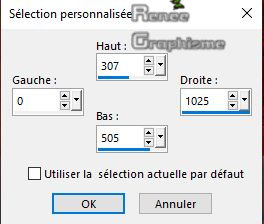
43. Activate Selection Tool -Custom Selection (S) -Rectangle with these settings
44. Activate Flood Fill Tool
 –
Opacity 40- Fill the selections with the gradient –
Opacity 40- Fill the selections with the gradient
Selections-Deselect All
45. Effects – Plugins-Unlimited 2.0 – ICNETFILTERS - Tile &
Mirror - Mirror (vertical)
46. Activate Selection Tool -Custom Selection (S) -Rectangle same settings
47. Effects –Edge Effects-Enhance More
48. Effects – Plugins – Vanderlee- Unplugged X –
Warning use the settings below -Color White and #13555f = 4
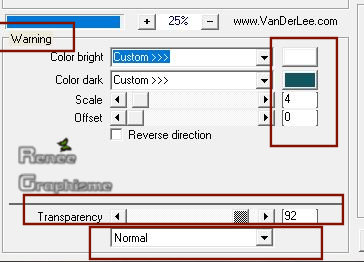
Selections- Deselect All
49. Effects –Plugins - Mura’s Meister –
Perspective Tiling with these settings
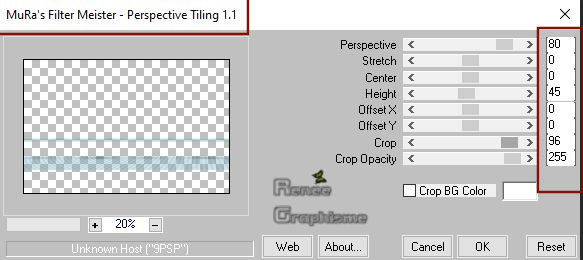
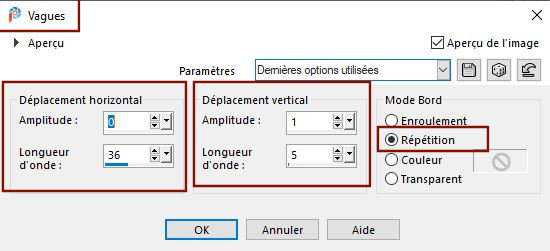
50. Objects – Align - Bottom
51. Effects – Distortion Effects – Wave use the settings below
52. Activate Selection Tool -Custom Selection (S) -Rectangle with these settings
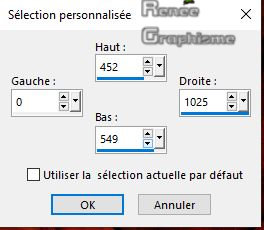
53. Selections- Promote selection to layer
54. Activate the layer underneath ( Raster 7)
DELETE
55.
To replace the top of the Layer-Palette (promoted selection 1)
Selections- Deselect All
56. Adjust-Blur- Radial Blur use the settings below
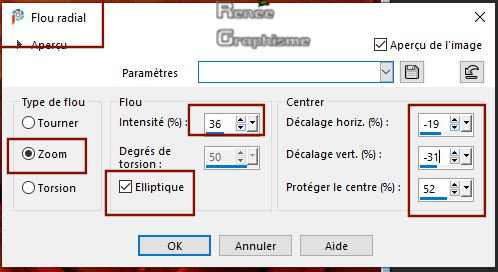
57. Effects -Image Effects - Offset with these settings : H 0 and V - 45
– Transparent
58. Layers-Properties-Change the Blend Mode to " Dodge "
59. Layers- Duplicate
60. Layers- Merge- Merge Down
61. Effects –Plugins- Unlimited 2.0- L&K’s – Pia 34
62. Layers- New Raster Layer
63. Color Palette: Set your Foreground color to color #ffffff
-Activate Flood Fill Tool – Opacity 60 – Fill the selection with the foreground color #ffffff
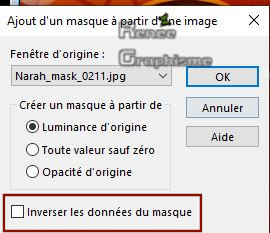
64.Layers- New Mask Layer-From Image and choose Mask ‘’ Narah_mask_0211.’’
-
Layers- Merge- Merge Group
65. Image - Resize to 50% - Resize all layers not checked
-
Activate your Move Tool (M) move it in the right place (see finished image )
66. Effects - 3 D Effects – Drop Shadow with the same settings
67. Layers-Properties-Change the Blend Mode to " Dissolve "
68. Layers- New Raster Layer
69. Selections –load/save selection –load selection from disc and select my selection:
‘’Steampunk-49-3’’
70. Color Palette:Set your foreground color to color #000000=6
Activate Flood Fill Tool
 –
Opacity 100 – Fill the selection with the foreground color Black –
Opacity 100 – Fill the selection with the foreground color Black
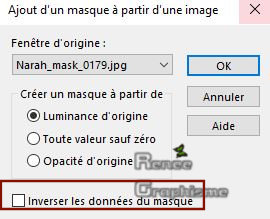
71.Layers- New Mask Layer- From Image and choose Mask
Narah_mask_0179.pspimage
-
Layers- Merge Merge Group
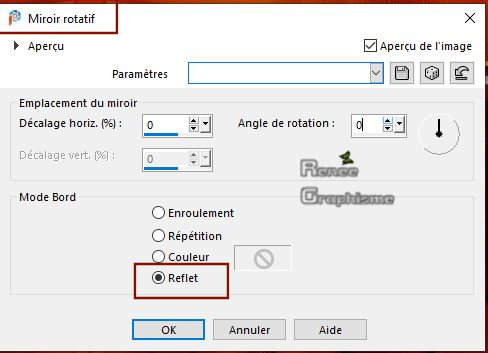
72. Effects – Reflection Effects -Rotating Mirror use the settings below
73. Layers- Duplicate
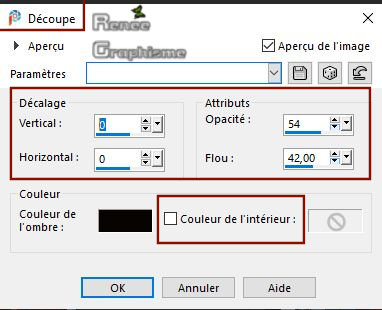
74. Effects- 3 D Effects –Cutout with these settings-Color Black
-
Layers- Merge Merge Down
75. Layers-New Raster Layer
76. Open the tube ‘’ST_48_Image2’’- Edit - Copy- Activate your work -Edit - Paste Into Selection
-
Layers- Arrange- Move Down
77. Effects – Plugins – AAA Frame – Foto Frame use the settings below
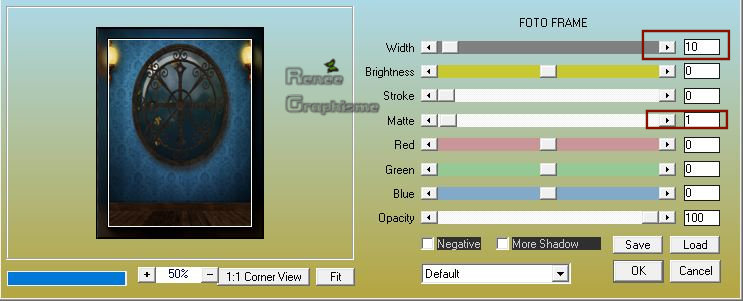
Selections-Deselect All
-
To replace the top of the layer-palette (Group - Raster 8)
78. Layers-Properties-Change the Blend Mode to " Luminance " and Lower the Opacity to 59%
79. Layers- Merge- Merge Down
80. Effects - 3 D Effects – Drop Shadow with these settings : 12/12/65/18 Color Black
81. Effects – Distortion Effects - Lens Distortion -Fisheye (Spherical) use the settings below
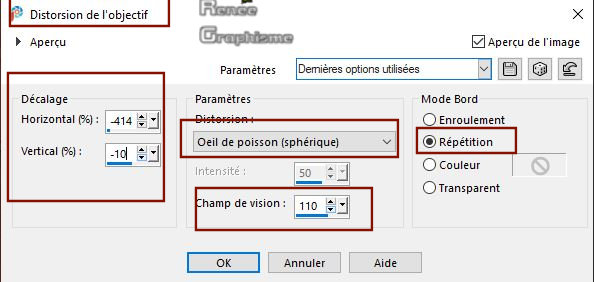
82. Objects – Align - Left
83. Activate the tube ‘’ Renee_TUBES_Steampunk-49 -Fille.pspimage’’
84. Image – Resize to 65 %
-
Edit - Copy- Activate your work -Edit - Paste as a new layer
85. Pick Tool: (K) on your keyboard
-Enter these parameters for the X:124,00 and Y:119,00 positions on the Toolbar 
86. Layers- Duplicate
87. Adjust- Blur Gaussian Blur : Radius 18
88. Effects – Distortion Effects - Wind -Wind direction From right -Wind strength 100
89. Layers- Arrange- Move Down
Layers-Properties-Change the Blend Mode to " Multiply "
-
To replace the top of the layer-palette
90.Open the tube ‘’ST_48_Image 3.pspimage’’ -Edit - Copy- Activate your work -Edit - Paste as a new layer
- Activate your Move Tool (M) move it in the right place (see finished image)
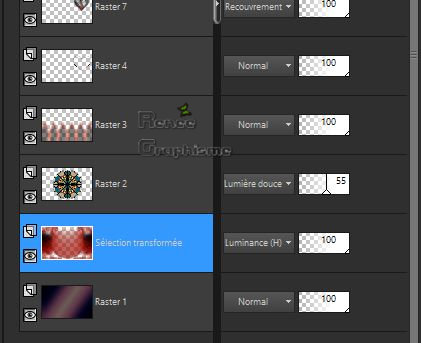
- In the Layer Palette- Activate the bottom layer= Raster 1
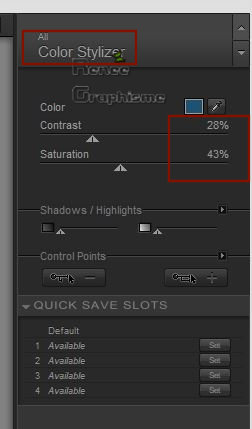
92. Effects –Plugins - Nick Softwar Color
Effex Pro.3 0 - Color Stylizer – Color #1f5173
93.
Activate the second layer from the bottom (promoted selection layer)
Layers-Properties-Change the Blend Mode to " Luminance -Legacy "
94. Image - Add borders-Symmetric checked 1 Pixel Color Black
95. Edit- Copy !!!!!
- Open the tube
‘’cadre-steampunk 49’’ in your PSP
96. Edit - Paste as new layer on the frame
97. Layers- Merge -Merge All
98. Image -Resize to 1000 Pixels width
Save as JPG
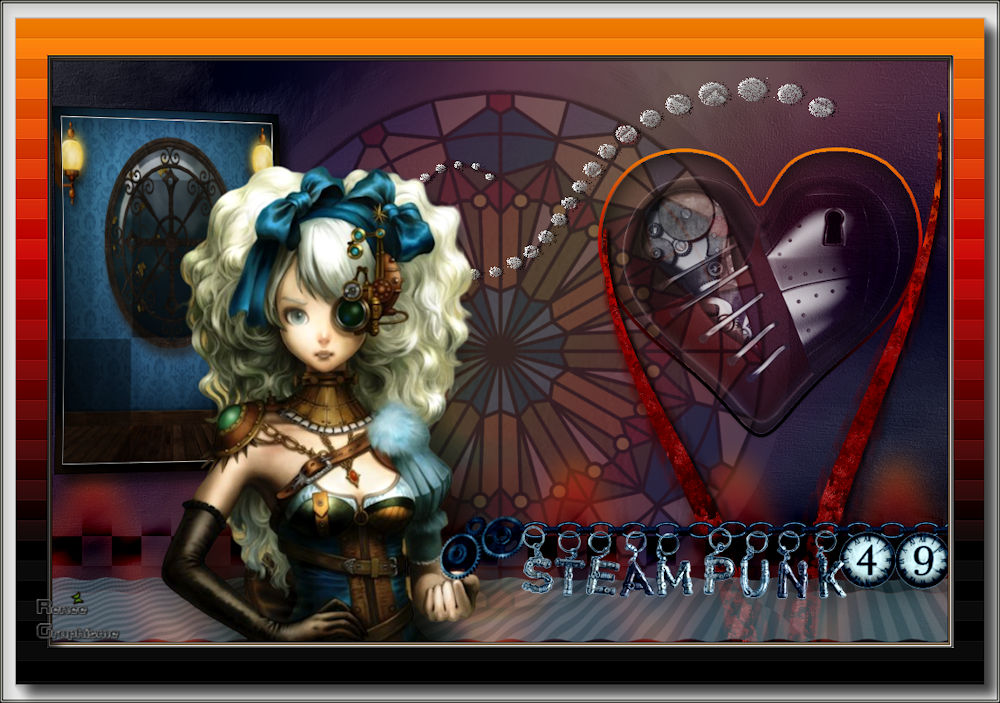
That's it !! You've done it !!
I hope you enjoyed this lesson
Renée
This lesson was written by Renée 27 10 2019
Edited and Update
2019
*
Any resemblance with an existing lesson is a coincidence
* Do not forget to thank the people who work with us and for us I have appointed the tubeurs and translators
Thanks
|

 Translations


