|
Let,s begin
1.
Open the image ''fond_steampunk_5''/Promote Background Layer = Raster 1
2.
Layers-New raster layer. Flood Fill tool : Fill the layer with this color :
#c0c0c0
3.
Layers-New mask layer from image and choose :
''mask_5"" 
4.Effects-Edge Effects-Enhance
Layers- Merge-Merge Group
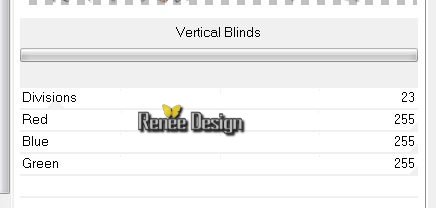
5. Effects-Plugins Graphic Plus /
Vertical Blinds
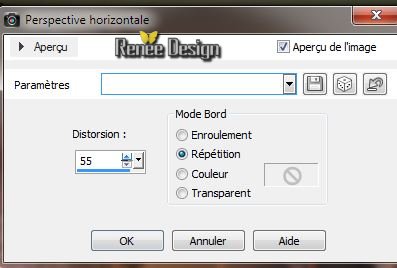
6.
Effects -Gometric Effects -Perspective horizontal
7.
Layers-Duplicate
Activate the layer underneath
(Groupe-Raster 2)
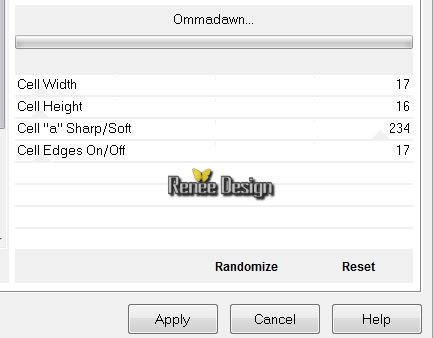
8.
Effects-Plugins Unlimited -Toadies /Ommadawn
Aktivate the top of the Layers palette
(Copie de Groupe-Raster2) -
9.
Effects -Plugins Unlimted -Toadies / 3D Supercheckers
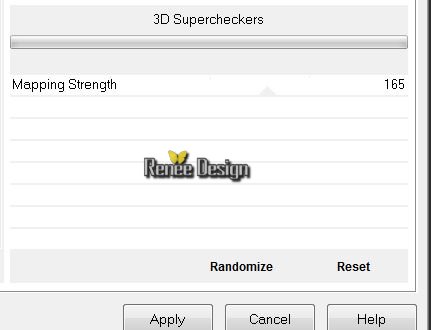
Layer Palette: Blend Mode "Hard Light" and lower the opacity to 59%

10.
Layers-New raster layer / Selections-Select All
11.
Open the Tube ''image_1-Sreampunk5" Edit/copy -Edit/paste in the selection
Selections- Select none
12.
Effects - 3D Effects -Drop shadow 10/1065/20 black
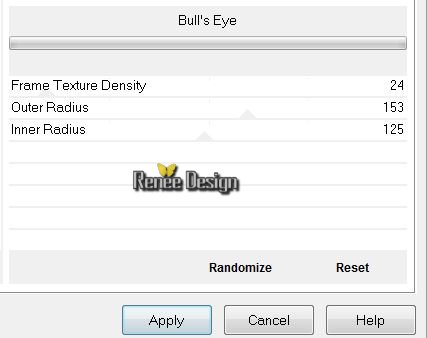
13.
Effects -Plugins ICNET Filters -Button & Frames- Bull's
Eye
14.
Selections-Custom Selection with these settings:
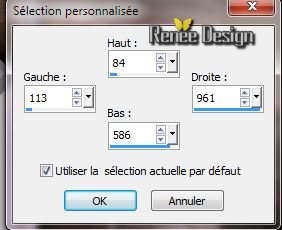
15.
Selections-Promote selection to layer
16.
Activate the layer underneath (Raster 2)/ Delete
-
Selections- Select none
Layer Palette look like this now
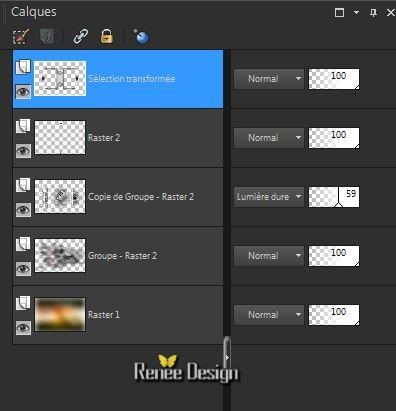
Aktivate the top of the Layers palette
(Sélection transformée)
17.
Effects-Plugins Mura's Meister -Perspective Tilling
18.
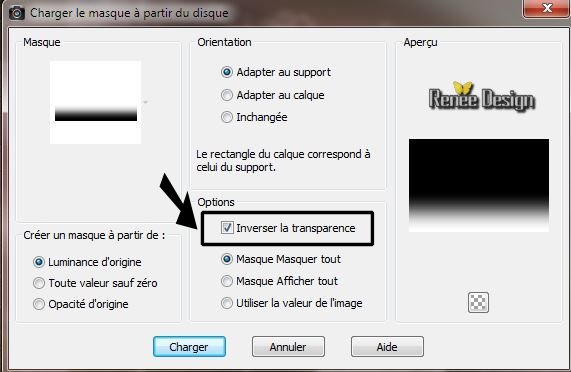
Layers-Load/Save Mask-Load Mask from Disk: ''mask_ket_01.jpg''
Layers-Duplicate
Layers-Duplicate
Layers- Merge-Merge Group
19.
Layers - New Raster Layer
20.
Selections - load/save selection - load selection from disk and choose ''steampunk5_1''
21.
Flood Fill tool : Fill the selection with this color #c0c0c0
22.
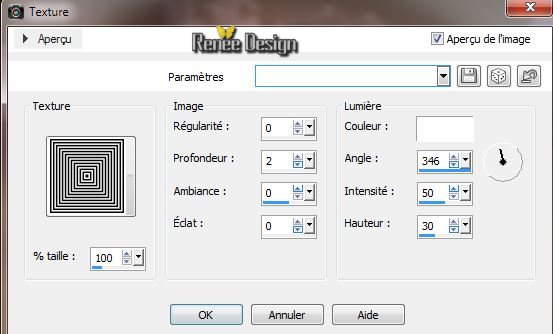
Effects -Texture Effects -Texture / square (in the folder)
Selections - Deselect all
23.
Effects -Plugins Eyecandy 5 -Impact - Extrude /Preset
''steampunk5_extrude''
24.
Layers-Duplicate /Image Mirror/Image Flip
25.
Layers-Merge-Merge Down
26.
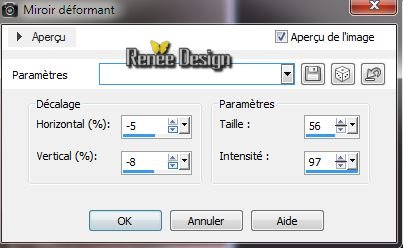
Effects- Distotion Effects - Warp
27.
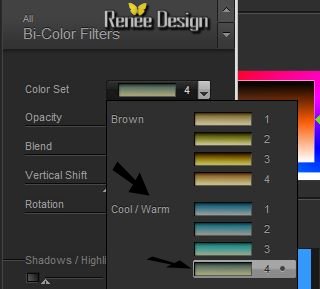
Effects - Plugins Nick Color Effex - Pro 3/ Bi colors
Filters
28. Layers-New raster layer
29.
Selections - load/save selection - load selection from disk and choose "steampunk5_2''
30.
Selections-Modify-Expand 8 pixels /Flood Fill tool : Fill the selection with this color: #c0c0c0
31.
Effects -Texture Effects -Texture / square /same settings
32.
Effects- Plugins EyeCandy 5 Impact -Extrude
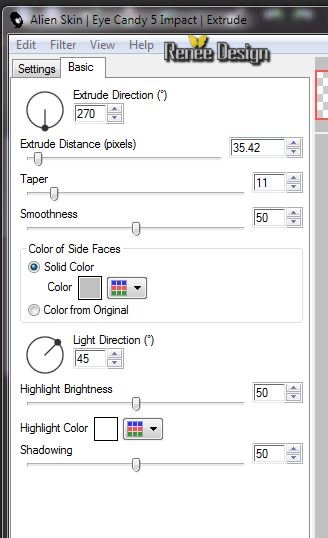
33.
Effects- Plugins EyeCandy 5 Impact - Glass - Preset
''steampunk5_glass'
-
Selections-Select none
34. Effects
- Distortion Effects -Warp
35. Layer-Palette: Blend Mode "Overlay"
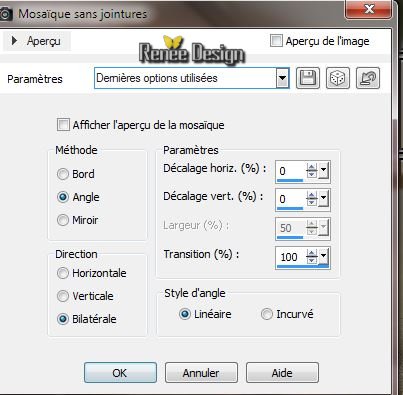
36. Effects
-Image Effects-Seamless Tilling
37.
Layers-Duplicate
38. Open the tube ''steampunk5_image 2'' Edit/copy -Edit/paste as a new Layer and place
Layer-Palette: Blend Mode "Hard Light" .Lower the opacity tot 89%
Layer Palette look like this now
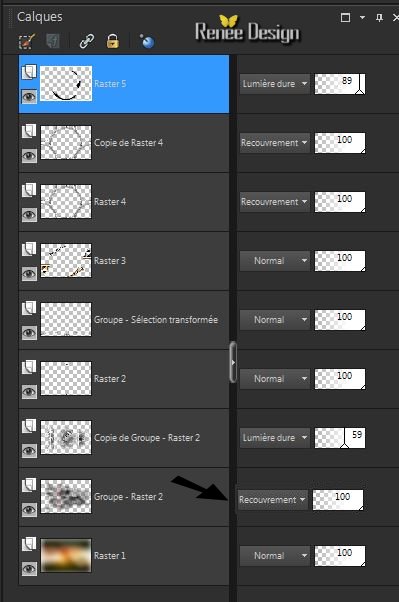
39. Activate the second bottom layer in your layer palette( Groupe-Raster 2) Layer-Palette: Blend Mode "Overlay"
40. Aktivate the top of the layer palette
41. Open the tube ''Liz_steampunk 16''/ Edit/copy -Edit/paste as a new layer and place
42. Effects
-3 D Effects -Drop Shadow 7/4/80/50 white
43. Open the tube ''Lize-steampunk21'' /Image Resize 60 %
-Edit/copy -Edit/paste as a new layer and place
44. Effects
- Illumination Effects-Lights -Projecteur

45.Layers-Merge-Merge Visible
46.
Adjust - Sharpness-Sharpen More
47. Image - Add Borders - Symmetric 2 pixels color #bb6434
48.
Image - Add Borders - Symmetric 2 pixels color
#
#c0c0c0
49. Image - Add Borders - Symmetric 2
pixels color #bb6434
50.
Image - Add Borders - Symmetric 50 pixels #ffffff
51.
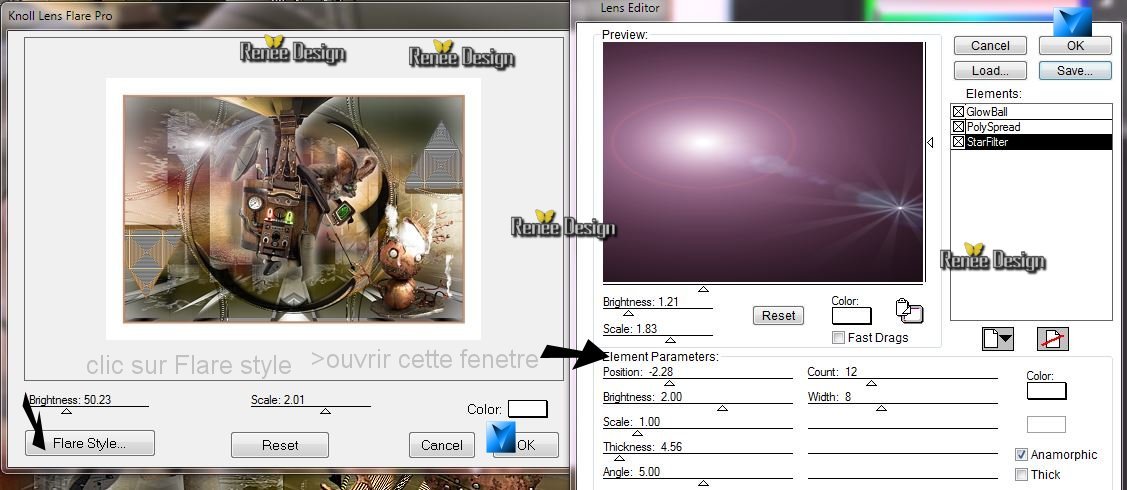
Effects -Plugins Knoll Lens Flare
Open the Filter >
Click on Flare Style >>to open the second part /settings /Click oké and oké. See the example with the two blue arrows
52. Image - Add Borders - Symmetric 2 pixels color #bb6434
53.
Image - Add Borders - Symmetric 2 pixels color
#
#c0c0c0
54 Image - Add Borders - Symmetric 2 pixels color #bb6434
55.
With your magic wand select the border of 50 pixels
56.
Selections-Promote selection to layer
57.
Effects -Plugins Unlimited - Sapphire Filter 01//
SapphirePlugin_0091
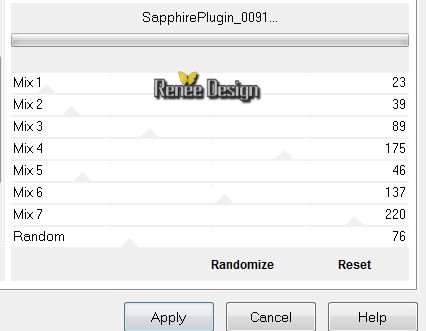
58.
Effects - Edge Effects - Enhance More
59.
Selections - Deselect all
60.
Layers- Merge -Merge All ( Flatten)
61.
Image Resize 1025 pixels width
I hope you enjoyed this lesson
Renée
This lesson was written by Renée 11/02/2014
Created
*
Any resemblance with an existing lesson is merely a coincidence
*
Don't forget to thank the people who work for us and with us. I named the tubeurs - Testers and the translators.
Thanks Renée

| 

 Translations