|
Let's start the lesson.
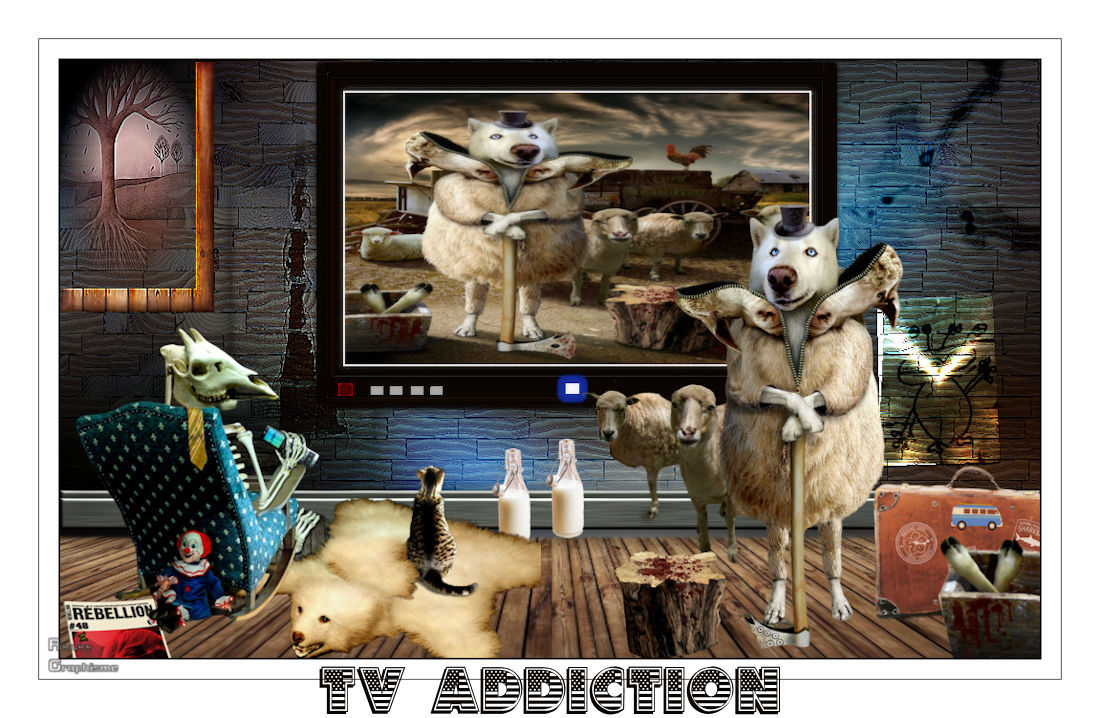
TV – Addiction
- Preparation
-
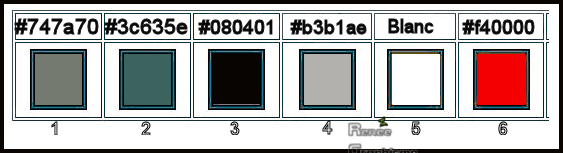
Color Palette: Set your Foreground color to color #747a70=1 – Set your Background color to color #3c635e = 2
1. Open the Background Image ‘’
Regard-TV – Addiction’’-Window - Duplicate (or shift+D) - Close the original and proceed on the copy -Promote Background Layer =Raster 1
2. Adjust-Hue and Saturation- Vibrancy 20
3. Open the tube
‘’ TV – Addiction- Image 1’’
-Edit - Copy- Activate your work -Edit - Paste as a new layer
4. Objects – Align
-Bottom
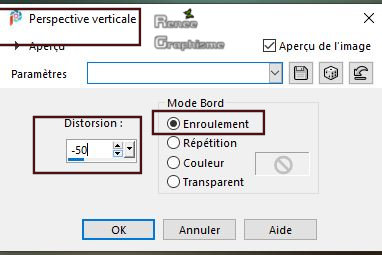
5. Effects – Geometric Effects– Perspective Vertical use the settings below
6. Activate Pick Tool (K) (Put the Preset into the Presets folder of PSP) and choose my preset ’’TV-Addicted’’
click on the Preset / Ok
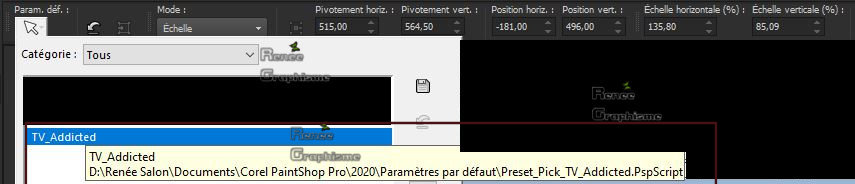
- Press( M ) to close the Pick tool
- Activate the bottom of the Layer-Palette =Raster 1
7. Selections -
Select All
- In the Layer Palette-activate Raster 2
8. Image - Crop to Selection
- Stay on this Layer
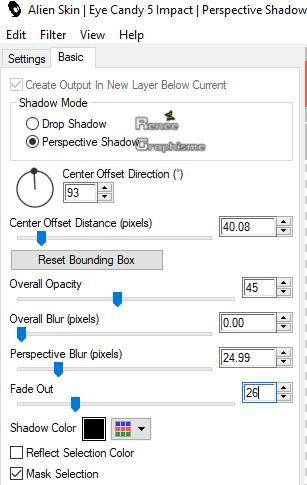
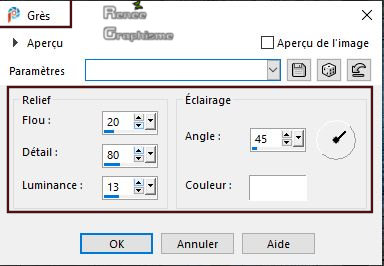
9. Effects – Plugins – Alien skin Impact Eye Candy 5 Impact–
Perspective shadow use the settings below
10. Layers- New raster Layer
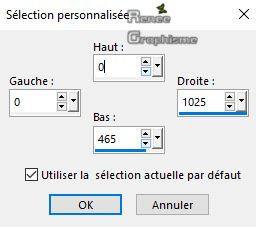
11. Activate Selection Tool -Custom Selection (S) -Rectangle with these settings 
12. Effects –Plugins – Alien skin Eyecandy 5 Textures – Wood –Tab- Settings-User Settings and choose my Preset
‘’ TV -Addiction-Texture-Wood’’
13. Layers-Properties-Set the Blend Mode to " Overlay "
Selections- Deselect all
14. Effects – Edge Effects – Enhance
15. Effects –Plugins-
Unlimited 2.0 - Color Effects - Solarize soft
16. Open the tube ‘’TV – Addiction-
Image 0 ‘’ -Edit - Copy- Activate your work -Edit - Paste as a new Layer
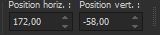
17. Pick Tool: (K) on your keyboard -Enter these parameters for the X:172,00 and Y:-58,00 positions on the Toolbar
18. Layers- New Raster Layer
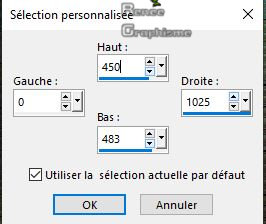
19. Activate Selection Tool -Custom Selection (S) -Rectangle with these settings
20. Activate Flood Fill Tool
 -Flood fill the selection with the foreground color = 1 -Flood fill the selection with the foreground color = 1
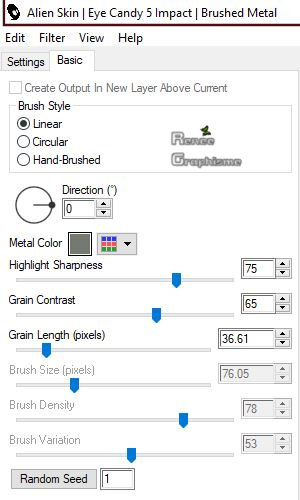
21. Effects –Plugins – Alien skin Eyecandy 5 Impact – Brushed Metal
use the settings below –Color #747a70 =1
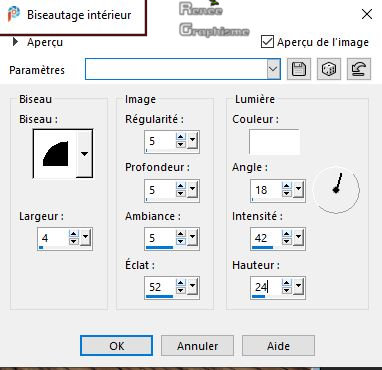
22. Effects – 3 D Effects – Inner Bevel use the settings below
Selections- Deselect all
23. Layers- Duplicate
24. Effects – Image Effects - Offset with these settings: H = 0 and V = - 8
- On these 2 layers
– Raster 3 and Raster 4
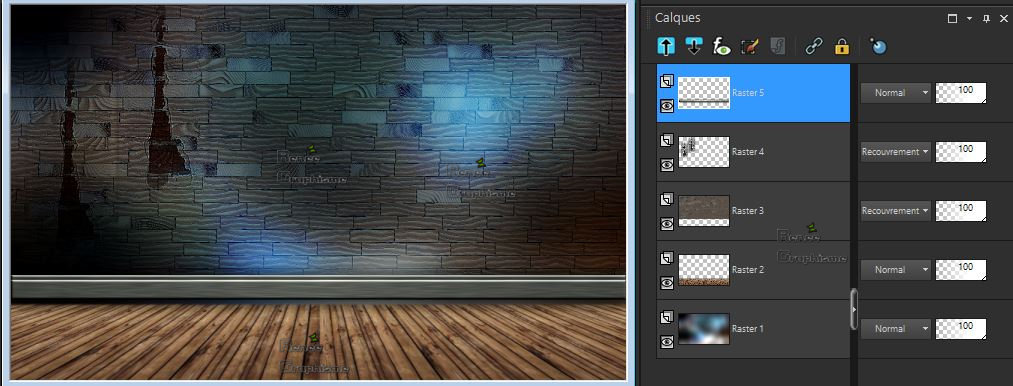
25. Effects- 3 D Effects- Drop Shadow with these settings : 1/ 0/62/42 Color Black
- To replace the top of the Layer-Palette = (Raster 5)
26. Layers- Merge- Merge Down
- Repeat : On Raster 5 - Effects- 3 D Effects- Drop Shadow with the same settings
-Your work and Layer Palette look like this now-You should have this result
27. Activate the tube
‘’ TV – Addiction- Image 2’’
-Edit - Copy- Activate your work -Edit - Paste as a new Layer
28. Image - Mirror - Mirror Horizontal (Image - Mirror in older versions of PSP)
29. Pick Tool: (K) on your keyboard -Enter these parameters for the X:566,00 and Y: - 161,00 positions on the Toolbar

-Press( M ) to close the Pick Tool
30. Effects – Edge Effects – High Pass 4
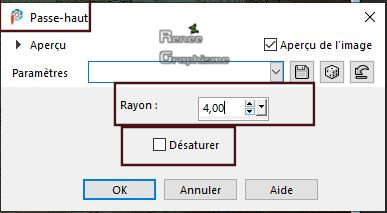
31. Effects – Edge Effects – Enhance More
32. Layers-Properties-Set the Blend Mode to " Burn "
33. Layers- Duplicate
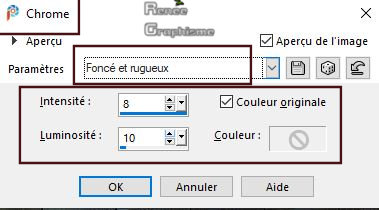
34. Layers- Merge- Merge Down
35. Effects – Artistic Effects – Chrome use the settings below
36. Layers- New Raster Layer
37. Selections –load/save selection –load selection from disc and select my selection: ‘’ TV – Addiction 1’’
- Open the Image
‘’Bois ‘’(Wood) in your Psp
- Edit - Copy- Activate your work -Edit - Paste into Selection
38. Effects –3 D Effects – Butonnize use the settings below
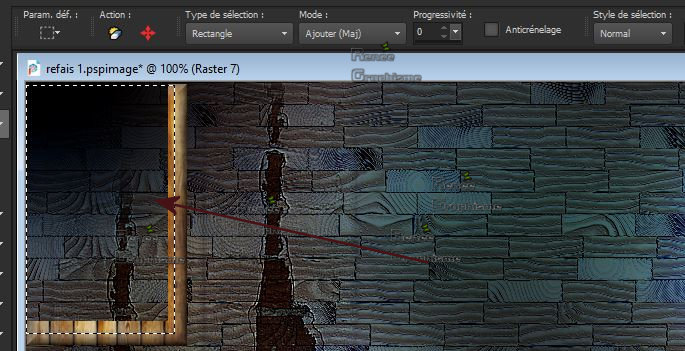
39. Activate Selection Tool (S): Rectangle
- Draw a Selection as shown in the example below
DO NOT ADD NEW LAYER
40. Open the tube ‘’Renee-Tubes-
Foret’’- Edit - Copy- Activate your work -Edit - Paste into selection
41. Effects – Edge Effects -Enhance
Selections- Deselect all
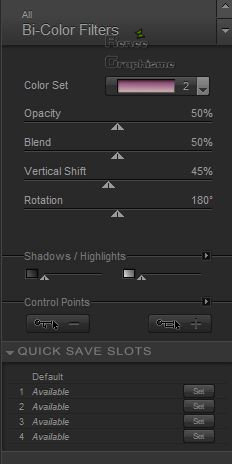
42. Effects – Plugins - Nick Softwar Color Effex Pro.3 0 – Bi color -
Filter -Color set
– Violet/Pink No 2 ( it's up to you to see if that suits your colours)
- Color Palette: Set your Foreground color to color #080401=3 – Set your Background color to color #ffffff=5
43. Layers- New Raster Layer
44. Selections –load/save selection –load selection from disc and select my selection: ‘’ TV – Addiction 2’’
45. Activate Flood Fill Tool
–
Flood fill the Selection with the foreground color = 3
46. Effects –Texture Effects – Sandstone use the settings below
47. Effects – Edge Effects – Enhance More
Selections- Deselect all
48. Activate the magic wand - Click in the middle of this Frame

DO NOT ADD NEW LAYER
49. Activate Flood Fill Tool–
Flood fill the Selection with #ffffff
50. Selections -
Modify - Contract 2 Pixels
DELETE

DO NOT ADD NEW LAYER
51. Open the tube ‘’TV – Addiction- Image
3.pspimage’’ Edit - Copy- Activate your work -Edit - Paste into Selection
Selections- Deselect all
- Color Palette: Set your Foreground color to color #b3b1ae =4 – Set your Background color to color #f40000 =6
52. Selections –load/save selection –load selection from disc and select my selection: ‘’ TV – Addiction 3’’
53. Activate Flood Fill Tool–
Flood fill the Selection with the foreground color =4
Selections- Deselect all
54. Selections –load/save selection –load selection from disc and select my selection: ‘’ TV – Addiction 4’’
55. Activate Flood Fill Tool –
Flood fill the Selection with the background color =6
56. Effects –Plugins - Alien skin EyeCandy 5 Impact – Glass – Clear
using the default settings
Selections- Deselect all
57. Selections –load/save selection –load selection from disc and select my selection: ‘’ TV – Addiction 5’’
58. Selections –
Promote Selection to Layer
59. Selections -
Modify - Contract 2 pixels
60. Set your Foreground color to color #ffffff
Activate Flood Fill Tool –Flood fill the Selection with the foreground color
#ffffff
61. Effects – Plugins – Alien skin EyeCandy 5 Impact –Gradient Glow –Renée chose color #112997-Tab-Settings/User Setting and select my Preset ‘’ TV – Addiction -Gradient
Glow’’
Selections- Deselect all
62. Layers- Merge -Merge Down
63. Effects – Plugins – Alien skin EyeCandy 5 Impact- Motion Trail –Settings Tab-User Setting and select my
Preset : ‘’TV – Addiction- Motion Trail’’ ( the effect is small - just to take off the frame of the TV slightly)
64. Image - Mirror - Mirror Horizontal (Image - Mirror in older versions of PSP)
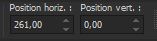
-Pick Tool: (K) on your keyboard -Enter these parameters for the X:261,00 and Y:0,00 positions on the Toolbar
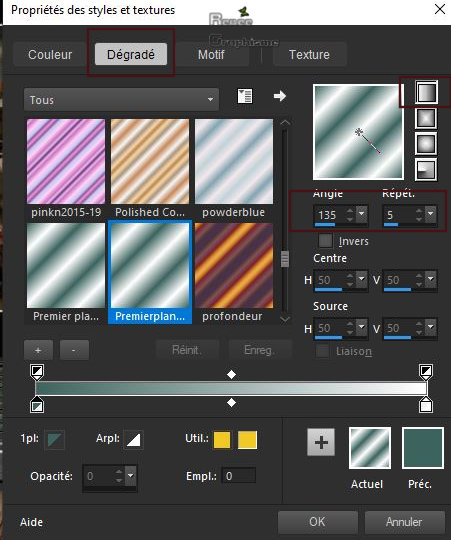
- Color Palette: Set your Foreground color to color #3c635e =2 – Set your Background color to color #ffffff=5
- Prepare a foreground/background linear gradient configured like this
- Layers- New Raster Layer
65. Selections –load/save selection –load selection from disc and select my selection: ‘’ TV – Addiction 6’’
66. Activate Flood Fill Tool
–
Flood fill the selection with that gradient
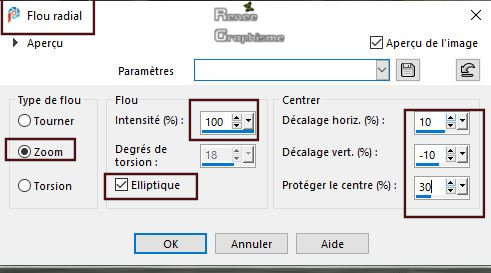
67. Adjust – Blur - Radial Blur use the settings below
68. Effects – Plugins – AP[Utility] – Reflections – Mirror 4
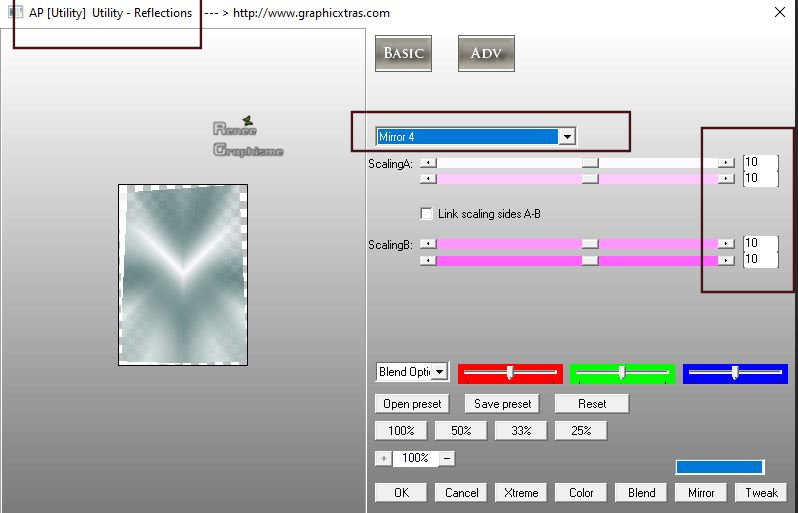
69. Effects – Plugins – AP[Utility] – Reflections – Mirror 3 (same settings as above )
Selections- Deselect all
70.Layers-Properties-Set the Blend Mode to "Dodge "
71. Open the tube ‘’TV – Addiction-
Image 4.pspimage’’ -Edit - Copy- Activate your work -Edit - Paste as a new layer
- Activate your Move Tool (M) move it in the right place (see finished Image)
72. Layers-Properties-Set the Blend Mode to " Overlay "
73. Open the tube ‘’ Renee_TUBES_TV-Addiction -
complet.pspimage’’ -Edit - Copy- Activate your work -Edit - Paste as a new Layer
74. Objects – Align-Bottom
(These tubes are individually in the folder ‘’Reserve’’- Use the tube to your choice)
75. Image - Add borders-Symmetric checked 2 Pixels Color #080401= 3
76. Image - Add borders-Symmetric checked 20 Pixels Color #ffffff
77. Image - Add borders-Symmetric checked 1 Pixel Color #080401= 3
78. Image - Add borders-Symmetric checked 40 Pixels Color #ffffff
79. Image –
Resize to 1100 Pixels Width
80. Activate your Text Tool- For Renée Font "American DReam " is into the zipfile -and write your Text
Save as JPG
That's it !! You've done it !!
I hope you enjoyed this lesson
Renée
This lesson was written by Renée 20-10-2019
Edited and Update
2019
*
Any resemblance with an existing lesson is a coincidence
*
Do not forget to thank the people who work with us and for us -
I have appointed the tubeurs and translators
Thanks
*
|

 Translations


 If a plugin supplied appears with this icon it must necessarily be imported into Unlimited *