|
-
Let's start the lesson. Open the Color-Palette
- Material Properties: Foreground color to this color: #6c0d0e Background color to this color #ffffff

1. Open File- New Transparent Image of: 995
x 685 pixels
2.Put your foreground/background linear gradient with settings below
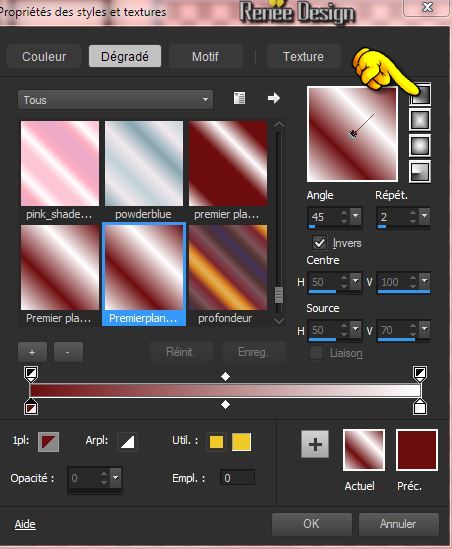
3. Activate Flood Fill Tool and fill the layer with the gradient
4. Adjust-Blur- Gaussian Blur: Radius 55
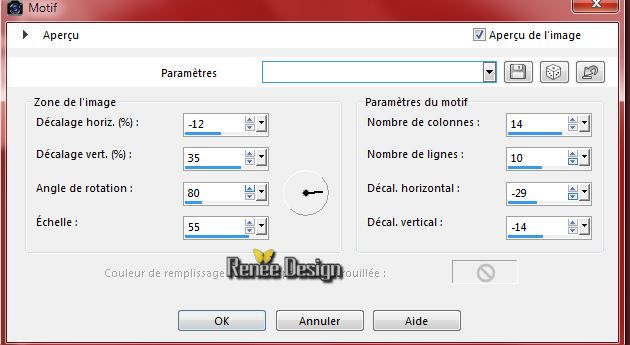
5. Effects-Reflection Effects -Pattern with these settings
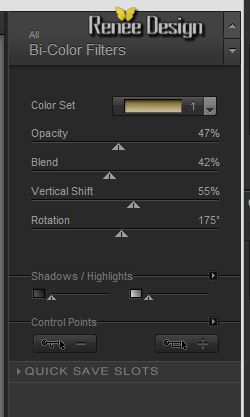
6. Effects- Plugins - Nick Color effex Pro3.0 - Bi-color Filters - Color
Brown-Set 1
7. Layers- Duplicate
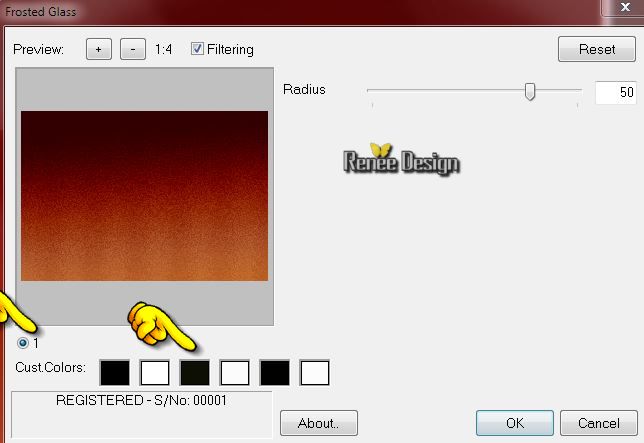
8. Effects- Plugins - Mystic Nights - Frosted Glass
9. Color Palette- BG-Color to color black
10. Effects- Plugins - Filter Attack
Explanation this filter
1. Click Filter (1)
2. Click Red slash (2)
you get into the menu
3. In the menu > Select (3): and choose Random Sterne I
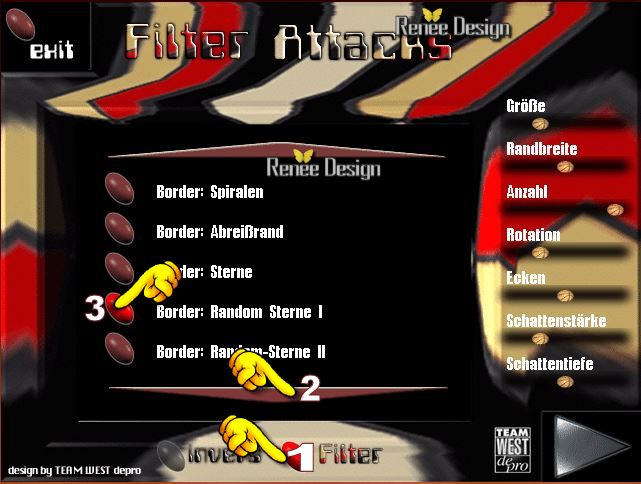
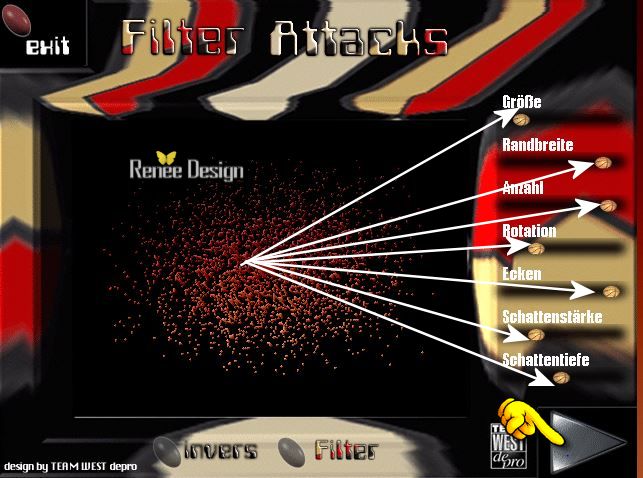
Put the settings on the right positions
*
Play with the settings for a correct picture
Click-on the arrow and OK
11. Effects-Plugins -Mura's Meister -Perspective Tilling Reset and OK
12. Image - Flip
13. Selection Tool ( S ) Custom selection use settings below
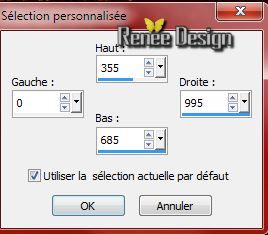
14. Edit-Cut-Paste as a new Layer
-Do not move it is in the right place
Selections- Deselect All
15. Layer Palette -Double click on this layer and set the Blendmode to Overlay and set the layer opacity of this layer to 77%
16. Layers- Duplicate -
Image Flip
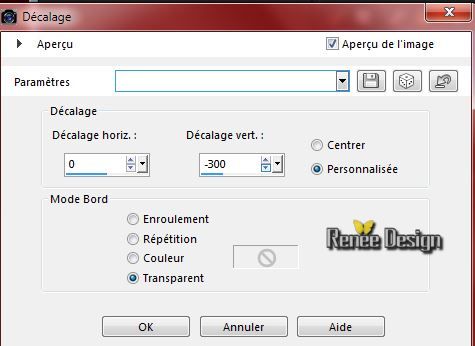
17. Effects- Image Effects- Offset with these settings
18. Layers- Merge- Merge Down
- Layer Palette -Double click on this layer and set the Blendmode to Luminance -Legacy and set the layer opacity of this layer to 46%
19. Effects- Edge Effects- Enhance
- Color Palette: BG-Color to this color #e1dbdd
20. Layers- New raster layer
- Activate Flood Fill Tool and fill the layer with the background color #e1dbdd
21. Layers- New Mask layer from Image and choose Mask: "Renee_masque_tache_rouge"
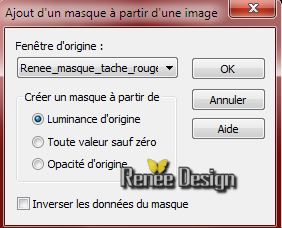
- Layers- Merge- Merge Group
22. Adjust - Sharpness - Sharpen (Repeat this step twice )
23. Layers- New raster layer
24. Selection Tool ( S ) Custom selection use settings below
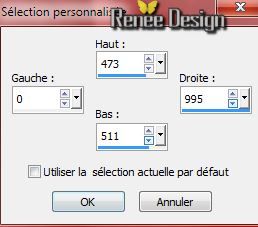
25. Activate Flood Fill Tool and fill the selection with the background color
26. Effects- Plugins - Carolaine and Sensiblity CS Reflection
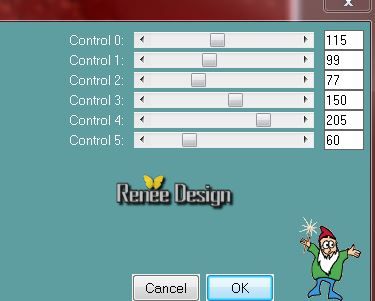
27. Effects- Distortion Effects- Twirl 500
Selections- Deselect All
28. Effects- Distortion Effects-Punch 50
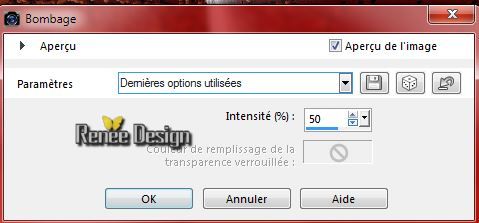
29. Layer Palette -Double click on this layer and set the Blendmode to Overlay and set the layer opacity of this layer to 79%
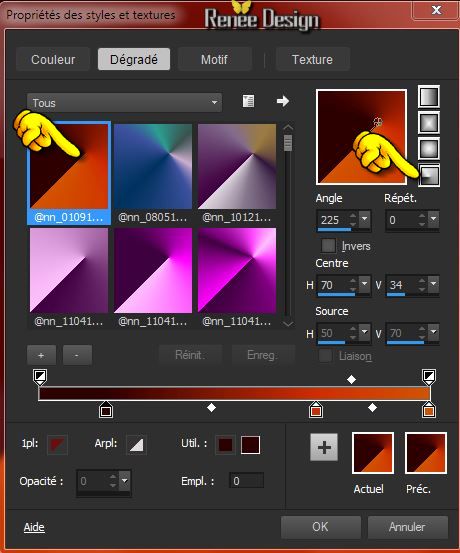
- Properties Foreground:foreground to gradient and choose ; ''
@nn_010914_GR_Autumn_tdstudio'' Prepare a Radial Gradient as configured like this.
30. Layers-New raster layer
- Activate Flood Fill Tool and fill the layer with the gradient
31. Effects-Plugins - Distort - Shear
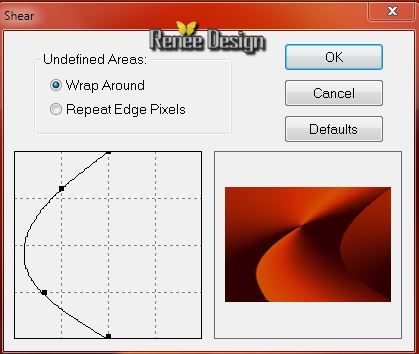
32. Layer Palette -Double click on this layer and set the Blendmode to Soft Light and set the layer opacity of this layer to 65%
33. Selection Tool ( S ) Custom selection use settings below
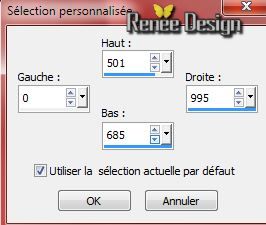
34.
Effects-Plugins - Unlimited 2.0 Toadies - Blast' em! with these settings 71/211
Selections- Deselect All
35.
Activate the tube ''Renee_3bloules_TR''
-
Edit/copy-Edit paste as a new layer on your working area
36.
Effects- Image Effects- Offset with these settings
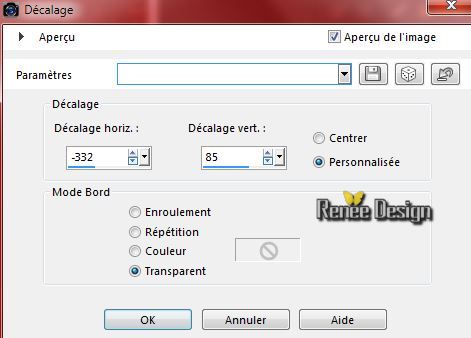
37.
Effects-Plugins - EyeCandy 5 -Impact - Glass tab Settings/User settings choose my preset:
''tache_rouge_glass''
38.
Activate the tube ''Renee_tube-soulier_globe.pspimage''
-
Edit/copy-Edit paste as a new layer on your working area
39.
With your move tool move place to in the center like this
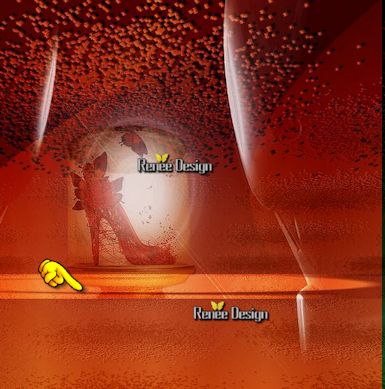
40.
Layer Palette -Double click on this layer and set the Blendmode to Overlay
41.
Activate the tube ''calguisportarait04112014.pspimage''
-
Edit/copy-Edit paste as a new layer on your working area
42.
With your move tool move to the right side ( see complete)
Activate Pick Tool (K) stretch against the edge of the top and bottom
-
Set the layer opacity of this layer to 75%
43.
Activate the tube ''TR_renee_tube_effet 1''- Edit/copy-Edit paste as a new layer on your working area and move
44.
Layers- Merge- Merge Visible
45.
Selection Tool ( S ) Custom selection use settings below
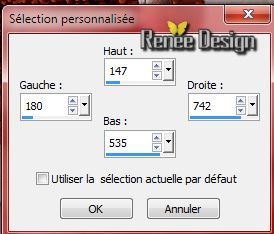
46.
Selections- Promote selection to layer
47.
Effects-Plugins - Dragon Fly - Sinedots II
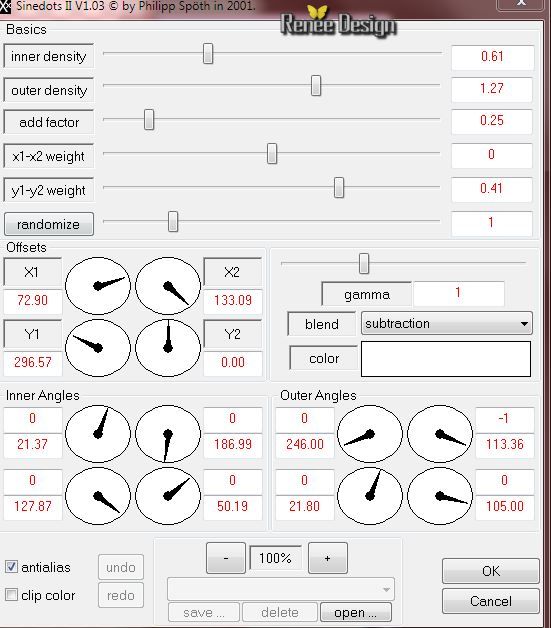
Selections- Deselect All
48.
Set the layer opacity of this layer to 44%
49.
Activate the tube ''Renee_tube_demi_cactus_robot''- Image
Resize 80%
-
Edit/copy-Edit paste as a new layer on your working area .
With your move tool move to the left
50.
Effects- Plugins - Unlimited 2.0 - Color - Color Expander
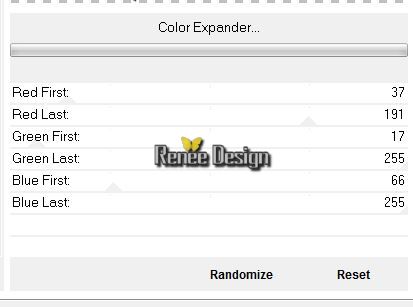
51.
Layers- New raster layer
52.
Selections - load/save selection - load selection from disk and choose my selection: ''TR_selction1''
Activate Flood Fill Tool and fill the selection with the background color #e1dbdd
53.
Effects- 3D Effects- Cutout with these settings
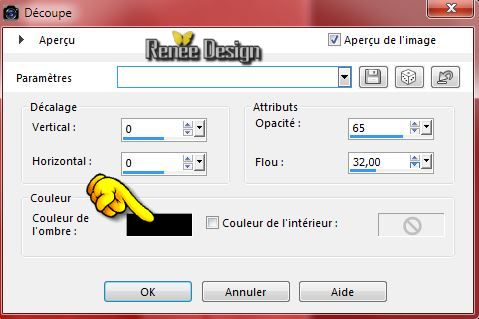
54.
Effects- User Defined Filter-Emboss 3
using the default settings
Selections- Deselect All
58.
Activer la baguette magique- Sélectionner intérieur de
la tache
-
Material Properties: Foreground color to this color:
#c60001
56.
Activate Flood Fill Tool and fill the selection with the foreground color
57.
Effects-Plugins -EyeCandy 5 Impact - Glass/ tab Settings/User settings choose my preset: ''TR_Glass''
Selections- Deselect All
58.
Activate the tube ''TR_vague '' Edit/copy-Edit paste as a new layer on your working area
-move a little to the right (see screen )
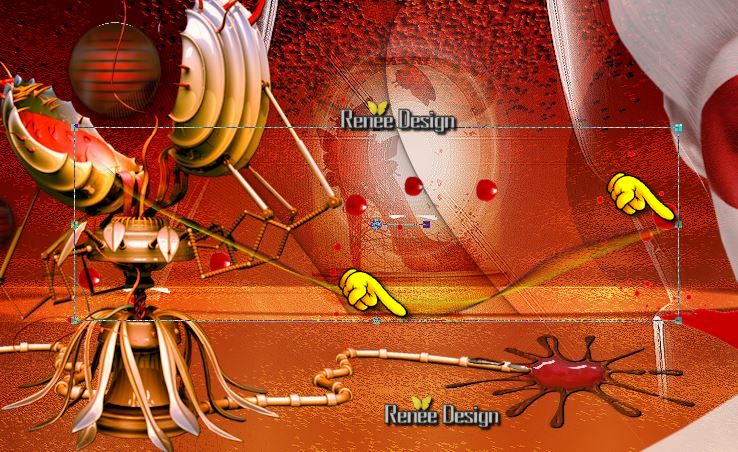
-
Layer Palette -Double click on this layer and set the Blendmode to Overlay
59.
Activate the tube ''TR-Pot_couleur''- Edit/copy-Edit paste as a new layer on your working area
-With your move tool move on the hair of the lady
60.
Image - Add borders-Symmetric checked:1 pixel black
61.
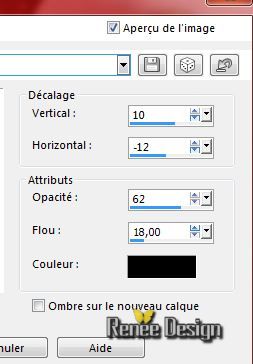
Selections- Select All
62.
Effects- 3D Effects-Drp Shadow with these settings
63.
Image - Add borders-Symmetric checked:60 pixels #e1dbdd
64.
Selections- Invert
65.
Effects- 3D Effects-Buttonize with these settings
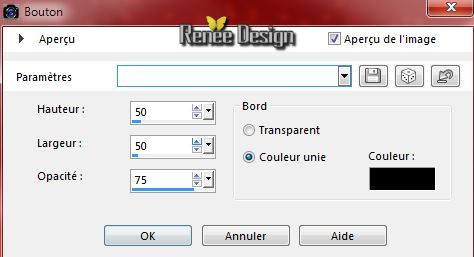
66.
Selections- Promote selections to layer
67. Effects-Plugins - Simple- Zoom Out and Flip
68. Effects- Plugins EyeCandy 5 Impact Glass -Tab-Settings -Preset Clear
Selections- Deselect All
69.
Image - Add borders-Symmetric checked:30 pixels white
70.
Activate the tube ''Tache_rouge_titre_tutoRenee''
-Edit/copy-Edit paste as a new layer on your working area
71.
Layer Palette -Double click on this layer and set the Blendmode to Luminance Legacy ( or choice)
72.
Image - Add borders-Symmetric checked:1 pixel black
73.
Image Resize 995 pixels Width
74.
Adjust-Softness-Soften
Save as JPG
Here you can download the font 
I hope you enjoyed this lesson
Renée
This lesson was written by Renée 12/11/2014
introduction
11/2014
*
Any resemblance with an existing lesson is merely a coincidence *
* Don't forget to thank the people who work for us and with us. I named the tubeurs - Testers and the translators.
Thanks Renée.
*
|