|
Let's start the lesson.
Summer time -Temps d'été

- Preparation
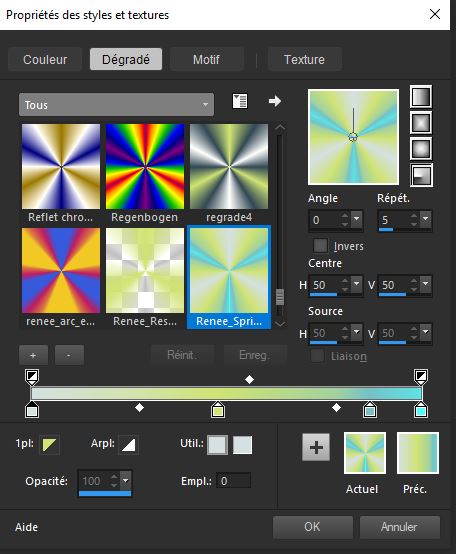
- Material Properties: Foreground material into gradient and select ‘’renee_sping_time ‘’
Prepare a foreground radial gradient configured like this – Set your background color to color #ffffff=2
1. File- Open a new transparent Image of
1005 x 665 Pixels
2. Activate Flood Fill Tool
 –
Flood fill the layer with the gradient –
Flood fill the layer with the gradient
3. Adjust-Blur -Gaussian Blur : Radius 68
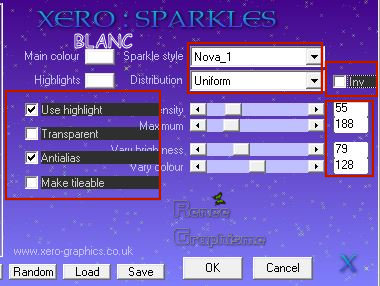
4. Effects- Plugins– Xero - Sparkles use the settings below
5.Effects- Edge Effects-Enhance
6. Layers- New Raster Layer
7. Activate Flood Fill Tool  -Settings of your paint pot to 50%- Flood fill the layer with the gradient
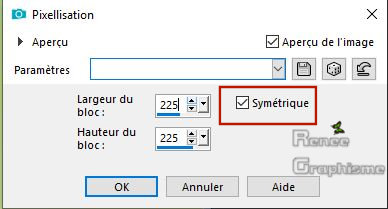
8. Effects – Distortion Effects- Pixelate use the settings below
9. Effects- Edge Effects-Enhance More
10. Layers-Properties-Set the Blend Mode to " Multiply "
11. Effects – Plugins– Mura’s Meister – Perspective Tilling using the default settings
12. Effects – Image Effects – Offset with these settings: H = 0 and V = -450
- In the Layer-Palette: activate the layer underneath = (Raster 1)
13. Selections- Select All
- To replace the top of the layer-palette
14. Image- Crop to Selection
15. Effects- Edge Effects-Enhance More
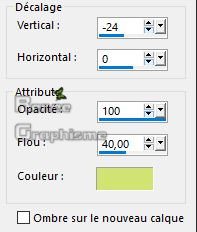
16. Effects – 3 D-Effects – Drop Shadow with these settings: Color #d0e373 =1
17. Activate the tube ‘’Ete_Image
1’’
- Edit - Copy- Activate your work -Edit - Paste as a new layer -Move tool / place the tube on the top of your image
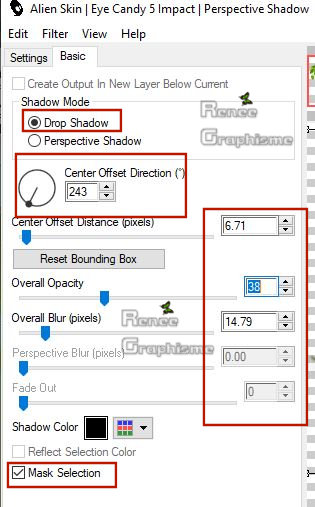
18. Effects – Plugins– EyeCandy 5 Impact – Perspective Shadow use the settings below
- In the layer palette- activate the middle layer
19. Selections –load/save selection –load selection from disc and select my selection: ‘’ete_1’’
DELETE
 3 of 4 times
Selections- Select None
- Material Properties: Set your foreground color to color #444444 = 4 – Set your background color to color #ffffff=2
- To replace the top of the layer-palette
20. Layers- New Raster Layer
21. Selections –load/save selection –load selection from disc and select my selection: ‘’ete_2’’
22. Activate Flood Fill Tool-Settings of your paint pot to 80% - Flood Fill the selection with the background color #ffffff
23. Selections-Modify-Contract 8 pixels (do not add a new layer )
- Flood Fill the selection with the foreground color #444444 = 4
Selections- Select None
24. Adjust-Blur-Gaussian Blur: Radius 12
25. Layers- New Raster Layer
26. Selections –load/save selection –load selection from disc and select my selection: ‘’ete_3’’
27. Activate the tube ‘’
Ete_Image2.png’’ -Edit - Copy- Activate your work -Edit - Paste into Selection
Selections- Select None
28. Layers- Duplicate
29. Image Resize to
90% (resize all layers not checked)
30. Effects – Image Effects – Offset with these settings: H = - 31 and V = - 12
31. Layers-Properties-Set the Blend Mode to " Soft Light " – Lower the Opacity of the layer to 81%
32. Activate the tube ‘’
Ete_Image3.png’’
- Edit - Copy- Activate your work -Edit - Paste as a new layer
33. Effects -Image Effects– Offset with these settings: H = - 264 and V = - 199
34. Layers- New Raster Layer
35. Selections –load/save selection –load selection from disc and select my selection: ‘’ete_3’’
36. Activate the tube
‘’Ete_Image4.png’’
- Edit - Copy- Activate your work -Edit - Paste into Selection
Selections- Select None
37.Layers-Properties-Set the Blend Mode to " Screen "
- Material Properties: Set your foreground color to color #1f1f1f =5
38. Layers- New Raster Layer
39. Selections –load/save selection –load selection from disc and select my selection: ‘’ete_4’’
40. Activate Flood Fill Tool –Settings of your paint pot to 30% –Flood Fill the selection with the foreground color #1f1f1f =5
Selections- Select None
41. Layers-Properties-Set the Blend Mode to " Overlay "
42. Activate the tube ‘’
Ete_Image-papillon 1’’
- Edit - Copy- Activate your work -Edit - Paste as a new layer
- Move the tube in the in the right place (see finished image)
43. Activate the tube ‘’
Ete_Image-papillon2’’
- Edit - Copy- Activate your work -Edit - Paste as a new layer and place
44. Layers-Properties-Set the Blend Mode to " Soft Light "
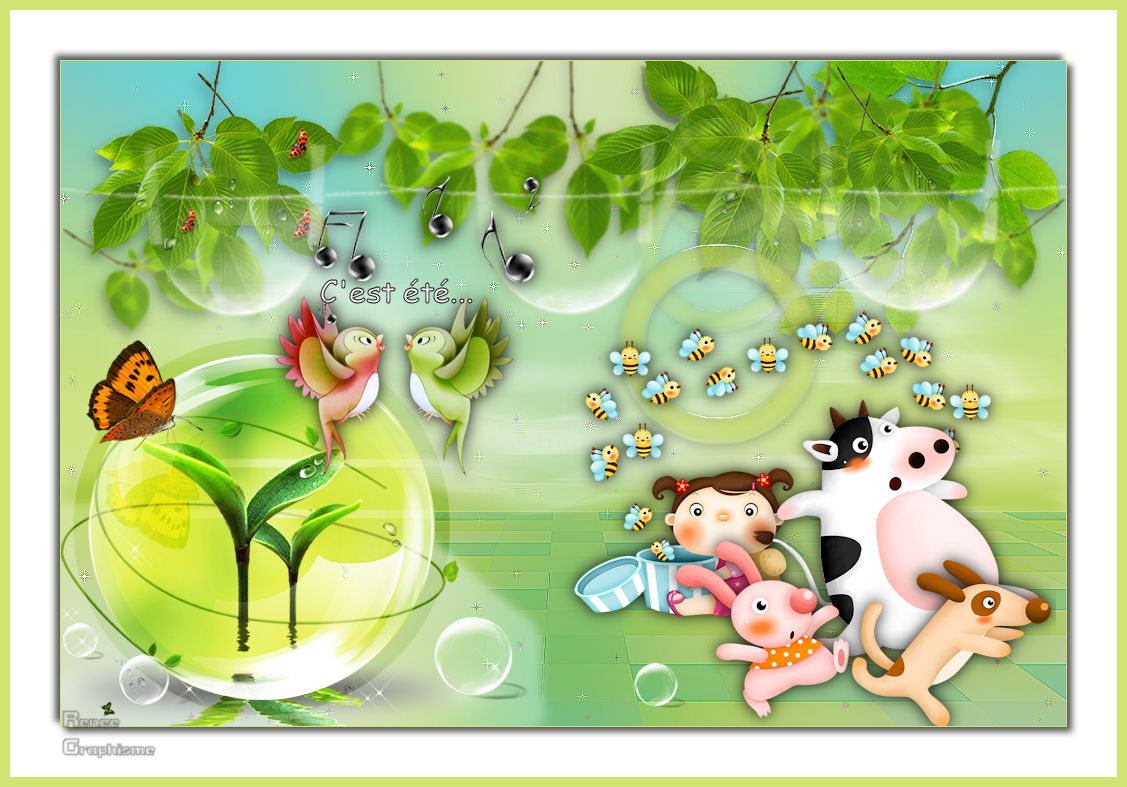
- Your work looks like this now
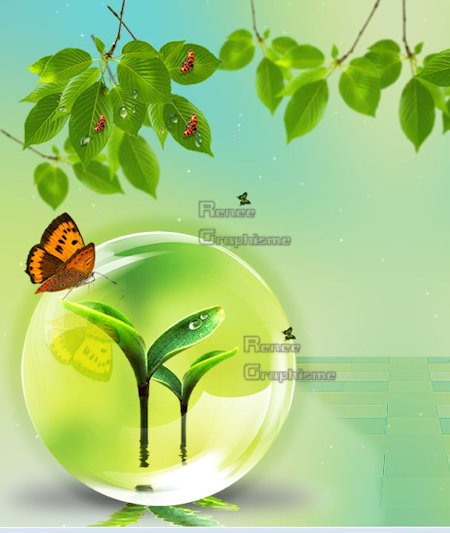
45. Activate the tube ‘’
Ete_Image5.png’’
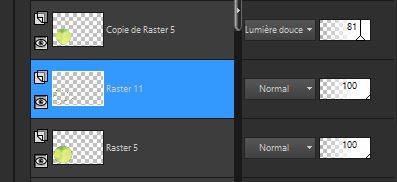
- Edit - Copy- Activate your work -Edit - Paste as a new layer
(
place it down this layer above raster 5 between the 2 spheres as shown in the example below)
46. Layers- New Raster Layer
47. Selections –load/save selection –load selection from disc and select my selection: ‘’ete_6’’
48. Activate Flood Fill Tool  -Settings of your paint pot to 100% – Flood Fill the selection with the background color #ffffff
49. Effects – 3 D-Effects – Drop Shadow with these settings: 1/1/100/4 color white
50. Selections- Select None -Layers- New Raster Layer
51. Activate Flood Fill Tool
 -
Flood Fill the layer with the background color #ffffff -
Flood Fill the layer with the background color #ffffff
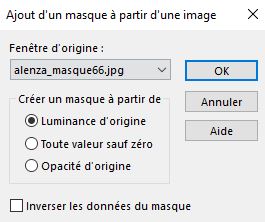
52. Layers- New Mask Layer- From Image and select Mask ‘’
alenza_masque66.jpg’’
- Layers- Merge- Merge Group
- To replace the top of the layer-palette
53. Activate the tube ‘’
Ete_Image_oiseau .png’’
- Edit - Copy- Activate your work -Edit - Paste as a new layer
- Move the tube in the in the right place (see finished image)
54. Activate Text Tool -Font at your choice (Font for Renée Comic sans Ms/ Size 30 )
Write: C’est été …Ore write your own text
55. Layers- New Raster Layer
56. Selections –load/save selection –load selection from disc and select my selection: ‘’ete_5’’
57.Set your foregroud color to #d0e373=1
Activate Flood Fill Tool  - Settings of your paint pot to 50%- Flood Fill the selection with the foreground color #d0e373 =1 - Settings of your paint pot to 50%- Flood Fill the selection with the foreground color #d0e373 =1
58. Effects – Plugins – Eyecandy 5 Impact – Glass use the settings below
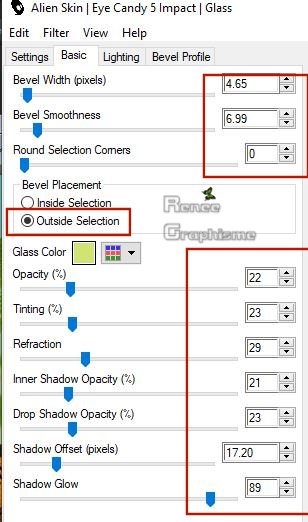
Selections- Select None
59. Effects – Plugins – Mura’s Meister – Copies with these settings
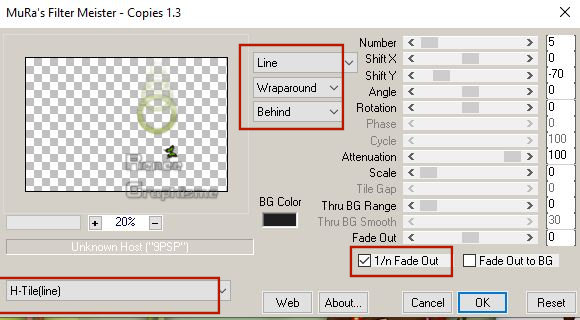
60. Activate the
tube ‘’ Ete_Image6.png’’
Edit - Copy- Activate your work -Edit - Paste as a new layer and place
61. Activate the
tube ‘’ Renee_TUBES_cest_ete.pspimage’’
Edit - Copy- Activate your work -Edit - Paste as a new layer and place
62. Image - Add borders-Symmetric checked: 1 pixel #d0e373=1
63. Selections- Select All
64. Image - Add borders-Symmetric checked: 50 pixels #ffffff
65. Effects – 3 D-Effects – Drop Shadow with these settings: 5/5/65/10 black
- Repeat: Effects – 3 D-Effects –Drop Shadow with these settings: -5/-5/65/10 black
65. Image - Add borders-Symmetric checked: 10 pixels #d0e373=1
Save as JPG
I hope you enjoyed this lesson
Renée
This lesson was written by Renée 11 -03- 2019
Edited and Update
2019
*
Any resemblance with an existing lesson is a coincidence
* Do not forget to thank the people who work with us and for us I have appointed the tubeurs and translators
Thanks
*
|
 Translations


 3 of 4 times

