|
Let's start the lesson.
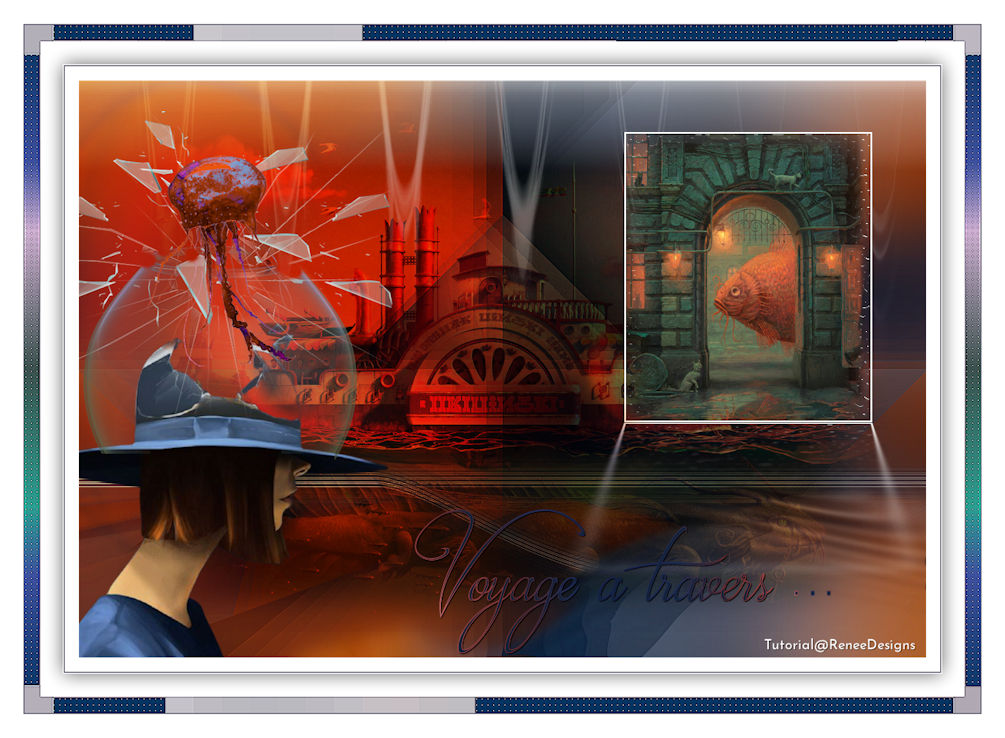
Voyage a travers...Journey through …
- Preparation
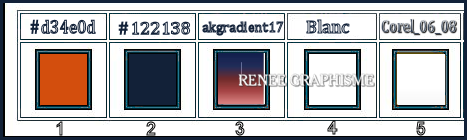
- Material Properties: Set your foreground color to color #d34e0d= 1 – Set your background color to color #122138 = 2
1. Open the BG-Image ‘’
Fond-Voyage-a-travers’’ – Promote Background Layer =Raster 1
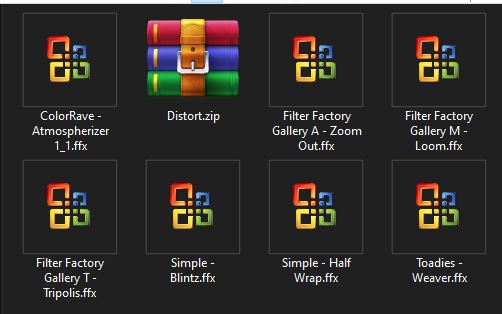
2. Effects –
Plugins-Unlimited 2.0 – Simple – Blintz
3. Effects –Plugins-
Unlimited 2.0 – Simple – Half Wrap
4. Effets –Plugins- Ulimited
2.0 - Filter Factory Gallery A – Zoom Out with these settings: 78/84/227/215
5. Adjust-Sharpness-Sharpen More
6. Layers- Duplicate
7. Effects –Plugins- Ulimited
2.0 -Filter Factory Gallery T – Tripolis with these settings:
116/38/49/89/249
8. Adjust-Sharpness-Sharpen More
9. Layers-Properties-Lower the Opacity to 44%
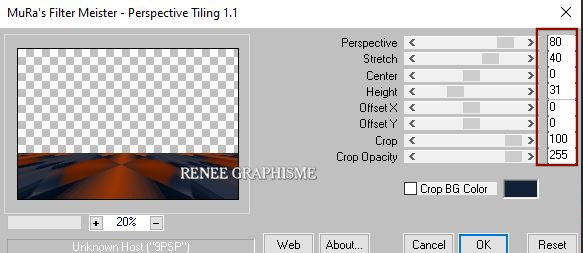
10. Effects – Plugins – Mura’s Meister – Perspective Tiling use the settings below
11.
Selections –load/save selection –load selection from disc and select my selection:‘’
Voyage a
travers -1’’
-
DELETE 5 times
- Selections remains active
12. Layers- New Raster Layer
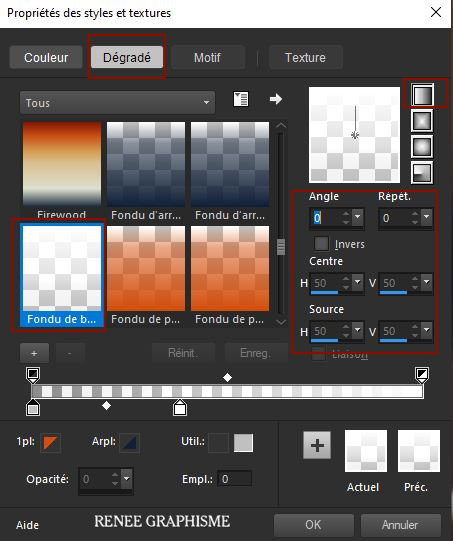
- Properties foreground: Change foreground material into gradient and select "Fading White " -Prepare a foreground linear gradient configured like this
13. Activate Flood Fill Tool – Fill the selection with the gradient
 Selections- Deselect All Selections- Deselect All
14. Adjust- Blur- Gaussian Blur: Radius 5
15. Effects –Plugins-
Ulimited 2.0 - Filter Factory Gallery M – Loom: 0/255
ATTENTION !!! (The image remains white, don't use unlimited ... !!!)
16. Effects –Plugins-
Ulimited 2.0 - Toadies – Weaver with these settings: 255/15/255
17. Layers- Duplicate
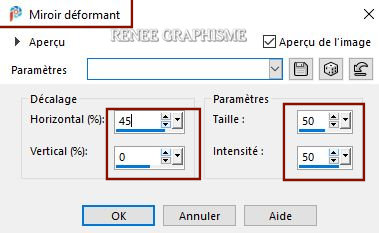
18. Effects- Distortion Effects – Warp use the settings below
19. Layers- Merge- Merge Down
- Activate the bottom layer in the layer palette=
Raster 1
20.
Selections –load/save selection –load selection from disc and select my selection:‘’
Voyage a
travers -2’’
21. Selections- Promote selection to layer
22. Layers- Arrange- Bring to Top
Selections- Deselect All
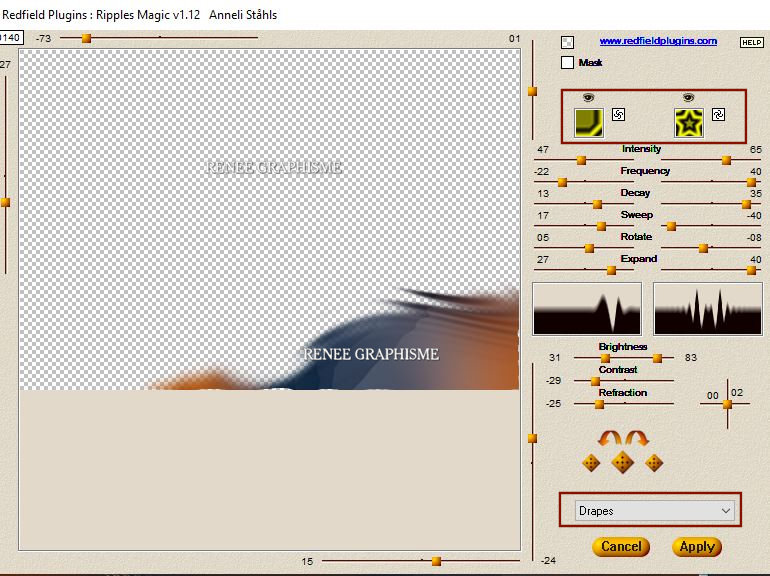
23. Effects – Plugins – Redfield – Ripples Magic use the settings below
24. Layers- New Raster Layer
25.
Selections –load/save selection –load selection from disc and select my selection:‘’
Voyage a
travers -3’’
26. Activate Flood Fill Tool  -
Fill the selection with the Fading White gradient -
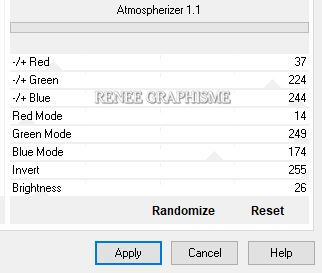
Fill the selection with the Fading White gradient
Selections- Deselect All
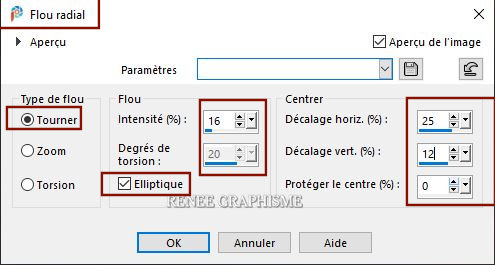
27. Adjust- Blur- Radial Blur use the settings below
28. Layers- Duplicate
29. Image - Mirror - Mirror Horizontal (Image - Mirror in older versions of PSP)
30. Layers-Merge- Merge Down
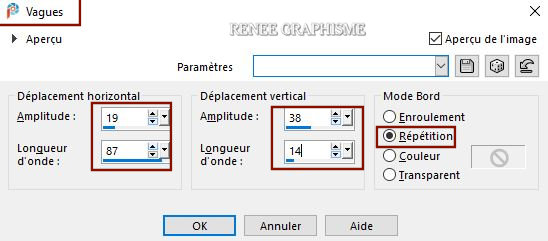
31. Effects – Distortion Effects – Wave use the settings below
32. Layers-Properties-Change the Blend Mode to " Lighten " –Lower the Opacity to 40%
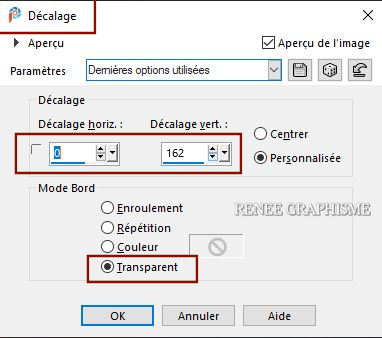
33. Effects – Image Effects– Offset with these settings
34. Layers- New Raster Layer
35.
Selections –load/save selection –load selection from disc and select my selection:‘’
Voyage a
travers -4’’
36. Properties Foreground - Change foreground material into white #ffffff=4
Activer le Activate Flood Fill Tool –
Fill the selection with #ffffff=4
Selections- Deselect All
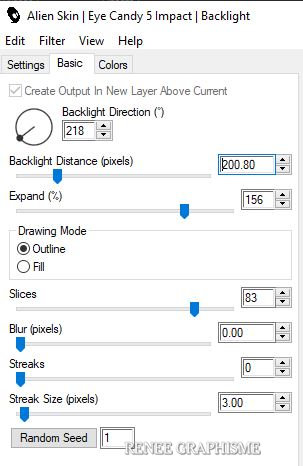
37. Effects – Plugins– Alien Skin Eye Candy 5 Impact – Backlight use the settings below
38. Layers-Properties-Lower the Opacity to 71%
39. Layers- New Raster Layer
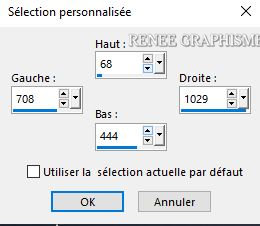
40. Activate Selection Tool -Custom Selection (S) -Rectangle with these settings 
41. Activate Flood Fill Tool – Fill the selection with #ffffff=4
42. Selections-
Modify – Contract 2 Pixels
DELETE
Selections remains active
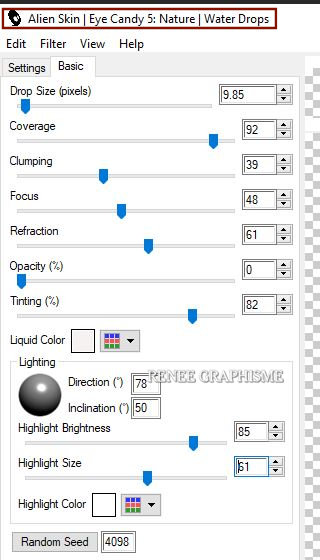
43. Effects – Plugins – Alien skin EyeCandy 5 Nature / Waterdrops use the settings below
44. Layers-Properties-Set the Blend Mode to " Hard Light"
45. Layers- New Raster Layer
46. Open the tube ‘’Renee-TUBES-Voyage a
travers-Image 1’’ -Edit - Copy- Activate your work -Edit - Paste into selection
Selections- Deselect All
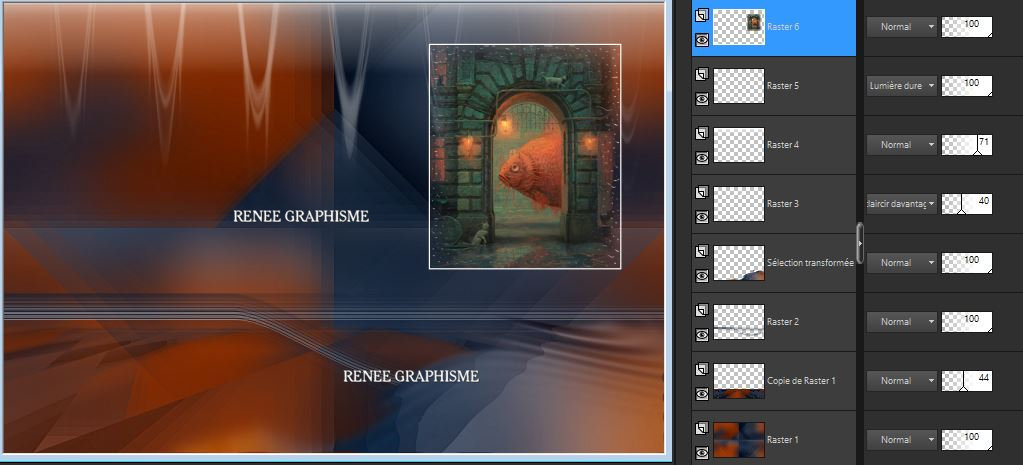
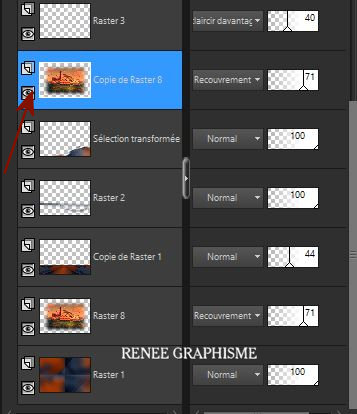
- Your work and Layer Palette look like this now-You should have this result
47. Layers- Duplicate
48. Layers- Merge- Merge Down
- Activate the layer underneath= ( Raster 5)
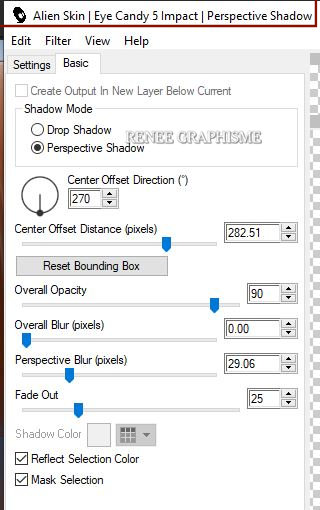
49. Effects –Plugins– Alien Skin EyeCandy 5 Impact – Perspective
shadow use the settings below
(The settings may differ. Adjust if necessary. Shadow is below the picture (See finished image)
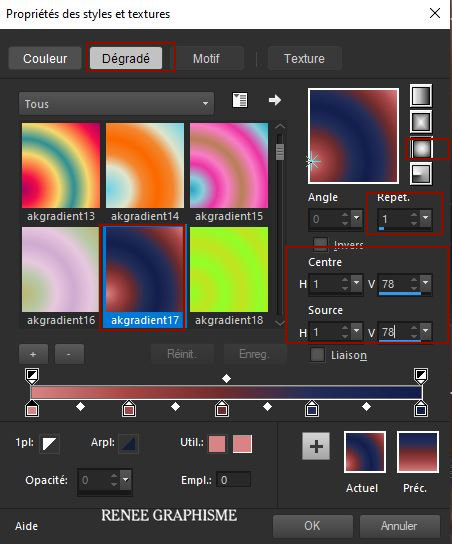
- Properties foreground: Change foreground material into gradient and select ‘’ akgradient17 ‘’- Prepare a foreground sunburst gradient configured like this
- Activate the top of the layer palette
50. Layers- New Raster Layer
51.
Selections –load/save selection –load selection from disc and select my selection:‘’
Voyage a
travers -5’’
52. Activate Flood Fill Tool –
Fill the selection with the gradient
Selections- Deselect All
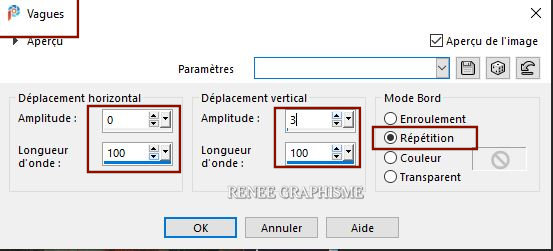
53. Effects – Distortion Effects– Wave use the settings below
54. Effects – Plugins- L& K - Sanne : 0/39
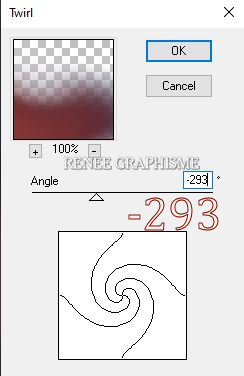
55. Effects –Plugins– Distort- Twirl with these settings (do not look at the effect in the capture window it varies with each new manipulation but the effect will be done correctly with the angle measurement)
56. Effects– 3D -Effects-Drop Shadow with these settings: -12 / 12 /100/10 Color #d34e0d=1
57.
Selections –load/save selection –load selection from disc and select my selection:‘’
Voyage a
travers -6’’
58. Effects –Plugins-
Unlimited 2.0 – ColorRave - Atmospherizer 1.1 use the settings below
59. Adjust- Blur- Radial Blur use the settings below
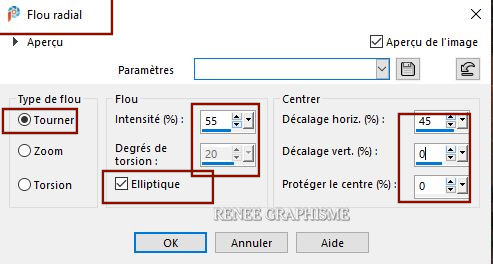
SELECTIONS- INVERT
60. Repeat - Adjust- Blur- Radial Blur with the same settings
61.Layers-Properties-Set the Blend Mode to " Hard Light "
- Activate the bottom layer in the layer palette=
Raster 1
62. Open the tube‘’
Renee-TUBES-Voyage-a-travers-bateau.’’ -Edit - Copy- Activate your work -Edit - Paste as a new layer
63. Layers-Properties-Change the Blend Mode to "Overlay" –Lower the Opacity to 71%
64. Layers- Duplicate
65. Layers- Arrange -Move Up -Above the promoted selection layer (see in the example below)
- Activate the top of the layer palette
66.Open the tube
Renee-TUBES-Avril-2021-57
67. Image
–Resize by 75%
68. Edit - Copy- Activate your work -Edit - Paste as a new layer-Move the tube in the right place ( see finished image )
69. Activate your Text Tool-Renée used this font "Brotherhood_script.ttf"
Foreground color remains on the gradient-Background color remains #122138=2
Size 150
Write ‘’Voyage a
travers . . .’’/ (Convert to Raster Layer.) Move it in the right place
70.Layers- Merge Merge Visible
71 Edit- Copy !!!!
72. Open the tube " Cadre/Frame " in your Psp
Activate the Magic Wand-
- select the inside of the frame
Edit- Paste -Into Selection (Image is still in your PSP memory)
Selections- Deselect All
73.Paste the author's watermark on your work and your own watermark
Layers- Merge- Merge All ( Flatten)
74. Image -
Resize 1015 Pixels Width
-Save as JPG
I hope you enjoyed this lesson
Renée
This lesson was written by Renée 06/04 2021
Edited and Update
2021
*
Any resemblance with an existing lesson is a coincidence
*
Do not forget to thank the people who work with us and for us I have appointed the tubeurs and translators
Thanks
*
|

 Translations