|
Let's begin
1.File: Open the image: ''fond_commencer_terminer''/Promote Background Layer= Raster 1
2.
Layers- New Raster layer
3.
Selections - load/save selection - load selection from disk and choose : ''commencer_terminer_1'' /Flood Fill Tool: Fill the selections with color:#fea67c
4.
Effects - Plugins -Mock - Windo
with these settings 86/132/25/25/25/25
5.
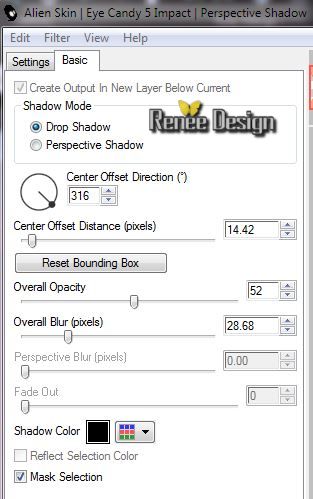
Effects -Plugins -EyeCandy 5 Impact - perspective
shadow/ Preset - ''Drop shadow Blury ''
6.Selections-Deselect all
7.
Effects-Plugins Simple - Horizontal Grain
8.
Layer palette: Blend mode:"Hard Light"- Opacity
55%
9.
Layers Duplicate
10.
Effects - Geometrie Effects - Circle /check transparent
/Repeat 1x
11.
Effects -Plugins -EyeCandy 5 Impact - perspective
shadow/ Drop shadow(keep the settings)
12.
Layers -Merge- Merge Down/Opacity 55%
-Blend mode "Hard Light"
13.
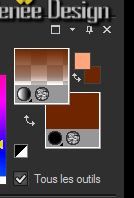
Material Properties: Foreground color to color: #fea67c
Background color to color: #6f2601
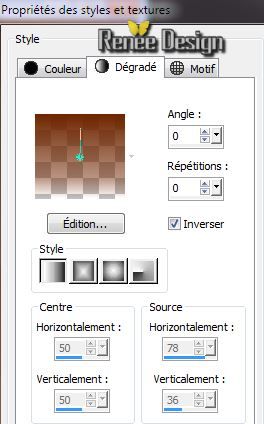
14. Material Properties: Turn your colors !!!Make with your dark foreground color a linear Fading Foreground color gradient (configured like this.)
15.
Layers- New Raster layer
16.
Selections - load/save selection - load selection from disk and choose : ''commencer_terminer_2''/Flood Fill Tool: Fill the selection with the gradient
17.
Effects - 3D Effects-Drop Shadow: 1/1/100/15
black
18.
Selections-Deselect all
19.
Effects -Plugins - L and K's / Maxime- with these settings
204/0
20.
Layers -Duplicate
21.
Effects -Plugins - Simple - Zoom out and
Flip
22.
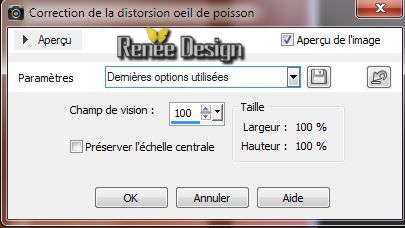
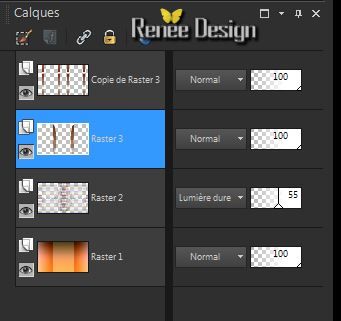
Layer Palette: Activate the layer underneath (Rater 3)
Adjust- Fisheye Distortion Correction
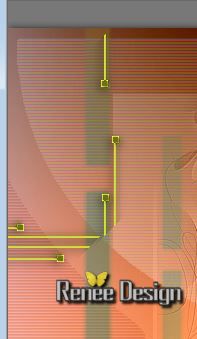
Layer Palette look like this now
23.Activate the top of the layer palette
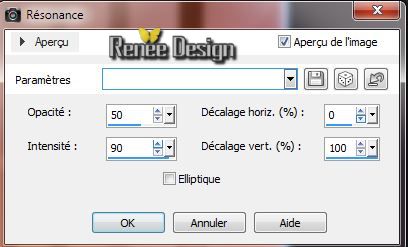
24.
Effects - Reflections Effects -Feedback
25.
Layer Palette: Blend mode "Exclusion"
26.
Activate tube ''commencer_terminer_femmes" /Edit/copy- Edit/ paste as new layer (do not move it is in the right place)
27.
Effects- Plugins -FM Tile Tools / Saturation Emboss /
default
28.
Layer Palette: Blend mode: "Luminance legacy "Opacity
83%
29.
Activate tube''''commencer_terminer_ronds''-Edit/copy- Edit/ paste as new layer
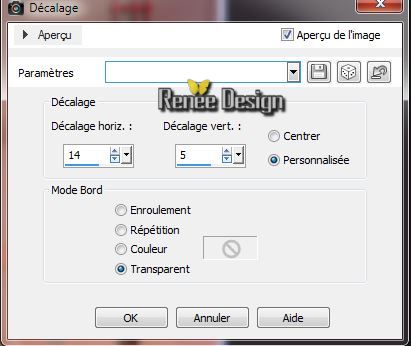
30.
Effects -Image Effects - Offset
31.
Layer palette: Blend mode: "Hard Light" Opacity
63%
32.
Layers- New Raster layer
33.
Selections - load/save selection - load selection from disk and choose : ''commencer_terminer_3"/ Flood Fill Tool: Fill the selections with this color:#6b701a
34.
Effects - Edge Effects -Enhance
35.
Effects - 3D Effects-Drop Shadow:2/2/65/15 black
-.
Selections-Deselect all
36.
Layers- Duplicate /Image Mirror
37.
Effects-Plugins /Simple - Blintz (Repeat 1x )
38
. Actvate the Selection Tool: Rectangle
/select this part
39.
Edit/copy -Edit paste as a new layer/Activate the layer underneath/Delete
40.Selections- Deselect all
41.
Place left like this
42.Layers- Merge- Merge Visible
43.
Layers- New Raster layer
44.
Selections - load/save selection - load selection from disk and choose : ''commencer_terminer_4''/ Flood Fill Tool: Fill the selections with this color:#be7741
45.
Effects - Plugins - Toadies - What are you 20/20
46. Effects - 3D Effects-Drop Shadow:2/2/65/15 black
47.
Selections-Deselect all
-
Aktivate the bottom of the Layer palette(Fusionné)
48.
Layers- Duplicate
49.
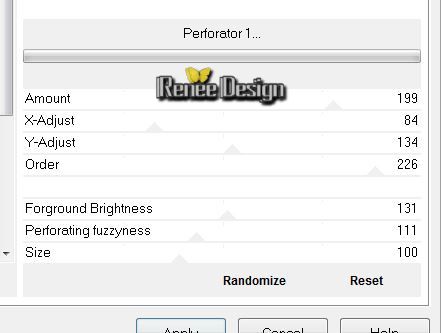
Effects -Plugins Unlimited - Tramage - Perforator 1
50.
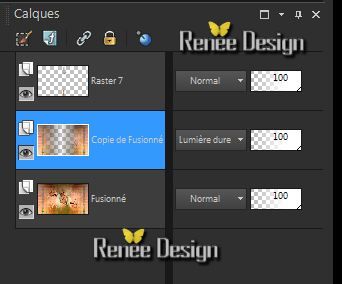
Layer palette: Blend mode: "Hard Light"
Layer Palette look like this now
51.
Layers- Merge- Merge Visible
52.
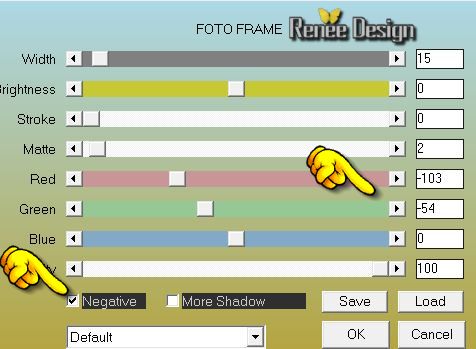
Effects- Plugins - AAA Frame / Foto
frame
53.
Image - Add Borders - Symmetric 1 pixels black
54.
Edit/copy!!!
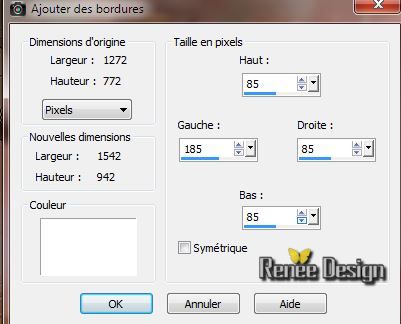
55. Image - Add Borders - Asymmetric white
56.
Layers- New Raster layer
57.
With your magic wand select the white border
58.
Edit paste into selection / image in memory
59.
Adjust-Blur-Gaussian Blur:Radius 100
60.
Selections-Deselect all
61.
Activate tube ''Faceless~UKA~Sassydeb.pspimage''/Edit/copy-Edit paste as a new layer
62.
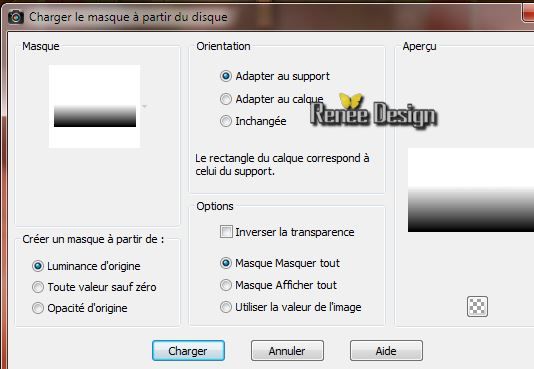
Layers-Load/Save Mask-Load Mask From Disk and choose Mask:
"gradientedworisch''
63. Layers- Merge-Merge Group
64. Effects -
Image Effects- Offset
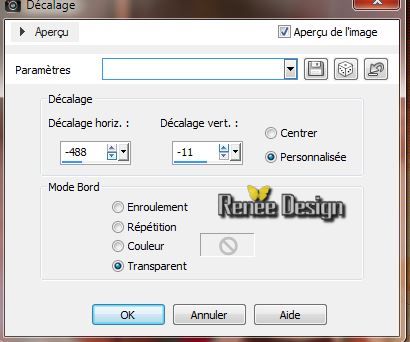
65.
Layers- New Raster layer
66.
Selections - load/save selection - load selection from disk and choose : ''''''commencer_terminer_5''/Flood Fill Tool: Fill the selections with this color: #ffffb5
(zoom in for a better view)
67.
Selections-Deselect all /Layer palette: Blend mode: "Soft Light "
68. Activate tube''commencer_terminer_deco_1.pspimage''/Edit/copy- Edit/ paste as new layer
69. Layer palette: Blend mode: "Luminance Legacy" Opacity 63%
70. Activate tube''Kryssurealisme-12-04-2014-168.pspimage''/Edit/copy- Edit/ paste as new layer
71. Effects-
Plugins - Adjust Variation -Lighter /click twice
78.
Layers- Merge- Merge Visible
79. Image - Add Borders - Symmetric: 2 pixels black
80. Image - Add Borders - Symmetric: 20 pixels white
81. Activate these tuben: ''titres"/ Edit/copy- Edit/ paste as new layer
82. Image
Resize 80%

I hope you enjoyed this lesson
Renée
This lesson was written by Renée 12/04/2014
Created the
05/2014
*
Any resemblance with an existing lesson is merely a coincidence
*
Don't forget to thank the people who work for us and with us. I named the tubeurs - Testers and the translators.
Thanks Renée | 
 Translations