|
Let's start the lesson.
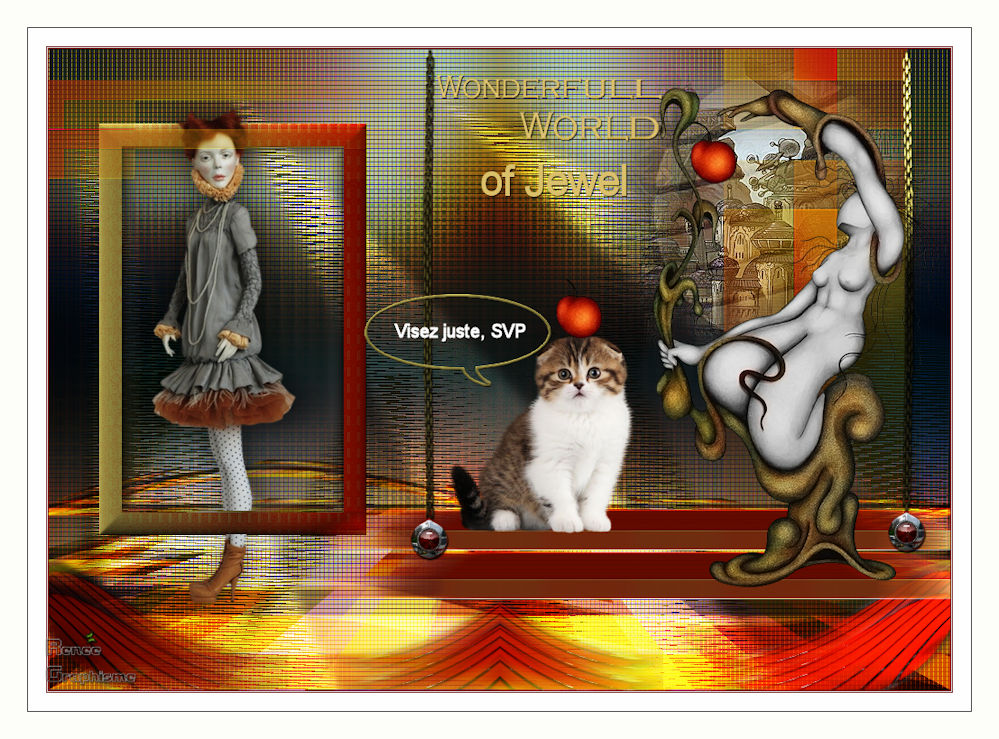
Wonderful_World of
Jewel

-Preparation
- Color Palette: Set your Foreground color to color #cfcfcf=1 – Set your Background color to color #7f7743=2
1. Open the Image ‘’
Wonderful world of Jewel’’- ’Window - Duplicate (or shift+D) - Close the original and proceed on the copy
-Promote Background Layer =Raster 1
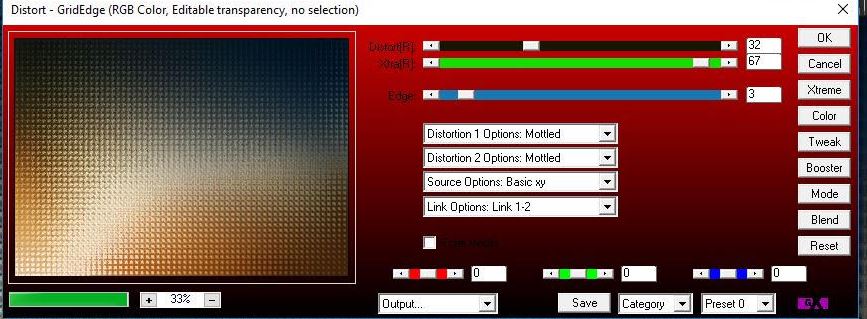
2. Effects – Plugins - [ AP] Distort – GridEdge
(1.Click
Reset
2. Click Tweak
the functions will be good
3. use the settings below )

Or this version
Filter 16 AP Power blend
Distort- Grid-Edge
3. Effects –Plugins
Unlimited 2.0 - Sapphire Filters 03 -
SapphirePlugin_0238...using the default settings

4. Effects – Plugins– Fotomatic – Skygrad use the settings below

5. Adjust-Softness-Soft Fokus with these settings

6. Layers- New Raster Layer
7. Selections –load/save selection –load selection from disc and select my selection: ‘’Renee_Jewel’’
8. Activate Flood Fill Tool
 –
Flood Fill the selection with the foreground color –
Flood Fill the selection with the foreground color
9. Effects – Plugins – Artistic –Film grain or Grain
photo 2/6/2 ( they give the same result)
10. Effects –
Plugins – L & K’s – Elvida : 191
Selections- Select None
11.Effects- Edge Effects- Enhance
12. Layers-Properties-Set the Blend Mode to " Overlay "
13. Layers- Duplicate
14. Effects –Plugins-
Unlimited 2.0– Simple - Top Left Mirror
15. Layers-Properties-Set the Blend Mode to " Multiply "
16. Activate the tube
‘’ Paysage fantastique jewel 0003.pspimage ‘’ Activate the layer ‘’Paysage
fantastique jewel -transforme.pspimage’of the tube
- Edit - Copy- Activate your work -Edit - Paste as a new layer
- Activate your Move Tool (M) place the tube on the top right
- Activate the bottom of the Layer-Palette =
Raster 1
17. Activate Selection Tool -Custom Selection (S) -Rectangle with these setting

- Selections- Promote Selection to Layer
Selections-Keep Selected
18. Effects –Plugins-
Unlimited – Neology – Vasarely Mosaics : 77
19. Effects- Plugins – Frischluft – Mosaic plane use the settings below

Selections- Select None
20. Effects – Plugins – Mura’s Meister – perspective Tilling use the settings below

21. Layers-Properties-Set the Blend Mode to " Hard Light "
22. Layers- Duplicate
23. Layers- Merge -Merge Down
24. Layers- Duplicate
25. Layers-Properties-Set the Blend Mode to " Overlay "
26. Effects- Distortion Effects- Wave with these settings

- To replace the top of the layer-palette
27. Activate the tube
‘’ Renee_Tubes_jewel-image1’’
- Edit - Copy- Activate your work -Edit - Paste as a new layer
28. Effects –Plugins – Graphic plus - Horizontal Mirror with these settings: 53/0
29. Objects - Align
-Bottom
30. Layers- Duplicate
31. Effects- Image Effects- Offset with these settings: H = 0 and V = - 25
32. Layers- Merge -Merge Down
33. Effects – Illumination Effects- Lights (load preset)‘’ Preset-Renee_Jewel_projecteur

34. Layers- New Raster Layer
35. Activate Selection Tool -Custom Selection (S) -Rectangle with these setting

- Color Palette: Set your Foreground color to color #831100=3 – Set your Background color to color #7f7743 =2
- Set your Foregroundcolor to foreground-background linear gradient configured like this

36. Activate Flood Fill Tool  - Flood fill the selection with the gradient
37.Effects- Texture Effects-Mosaic Glass with these settings

38. Effects- 3 D Effects- Inner Bevel use the settings below

- Repeat: Effects- 3 D Effects- Inner Bevel with the same settings
39. Selections- Modify-Contract with 25 pixels
DELETE on your keyboard

40.
Effects – 3D Effects – Buttonize – Load preset "Dark fade "with these settings

Selections- Select None
41. Activate the tube
‘’ art doll jewel 003.pspimage’’ ( remove the signature
)
- Image
Resize 85 %
- Edit - Copy- Activate your work -Edit - Paste as a new layer
42. Effects- Image Effects- Offset with these settings: H = - 305 and V = 15
43. Activate Selection Tool-Rectangle-(S) draw a selection as shown in the example below
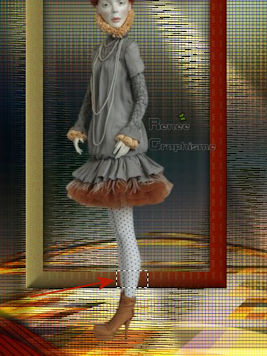
DELETE
on your keyboard .gif)
Selections- Select None
44. Effects – Plugins - EyeCandy 5 Impact - Perspective shadow use the settings below

45. Activate the tube
‘’ Renee_Tubes_jewel-image2.pspimage’’
- Edit - Copy- Activate your work -Edit - Paste as a new layer (Do not move, it is in the right place)
46. Effects – Plugins - Toadies – What are you : 20/20
47. Effects - Plugins – AAA Filters - AAA Multi Filter with these settings

48.
Effects – Edge Effects -Enhance
- Material of the foreground: Change your linear gradient into a sunburst gradient configured like this
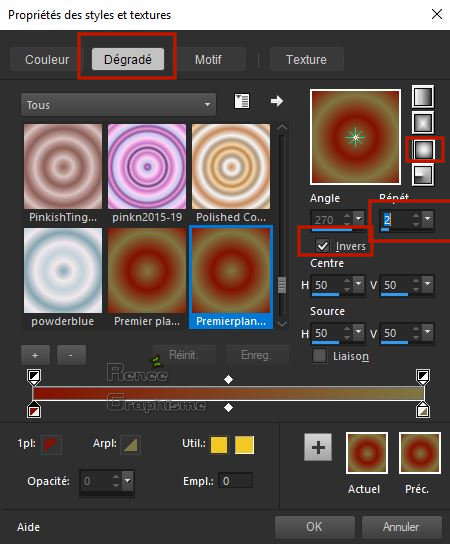
49. Layers- New Raster Layer
50.
Activate Selection Tool -Custom Selection (S) -Rectangle with these setting

51. Activate Flood Fill Tool
 -
Flood Fill the selection with the gradient -
Flood Fill the selection with the gradient
Selections- Select None
52. Effects – Plugins - Toadies – What are you
20/20
53. Effects – Plugins– Eyecandy 5 Impact - Extrude use the settings below

54. Effects- Edge Effects- Enhance
55. Effects-Distortion Effects-Wind/Winddirection From right -Windstrength 100
56. Effects-Distortion Effects-Wind/Winddirection From left -Windstrength 100
57. Activate the tube
‘’ Renee_Tubes_jewel-image3’’
- Edit - Copy- Activate your work -Edit - Paste as a new layer
58. Effects- Image Effects- Offset with these settings: H = 188 and V = 90
59. Effects – Illumination Effects– Lights (load preset)''Renee_jewel_Projeteur2''

60. Layers- New Raster Layer
61. Selections –load/save selection –load selection from disc and select my selection: ‘’Renee_Jewel-1’’
62.
Close the foreground gradient -Activate Flood Fill Tool
 –
Flood Fill the selection with the foreground color =3 –
Flood Fill the selection with the foreground color =3
63. Effects – Plugins – EyeCandy 5 –Impact –Tab-Settings -Chrome – Preset ''City
" using the default settings
Selections- Select None
64. Layers- Duplicate and place under the right chain
65. Layers- Merge- Merge Down
66. Effects –3D- Effects – Drop Shadow with these settings : 2/1/80/2 Color black
67. Activate the tube
‘’ Renee_Jewel_petit_bouton.png’’
- Activate your Move Tool (M) move it in the right place as shown in the example below
68. Layers- Duplicate
- Activate your Move Tool (M) move it in the right place as shown in the example below

69. Activate the tube
‘’ Strange jewel 004.png’’( remove the signature
)
-
Image Resize to 78%
- Image - Mirror - Mirror Horizontal (Image - Mirror in older versions of PSP)
- Edit - Copy- Activate your work -Edit - Paste as a new layer
- Activate your Move Tool (M) move the tube to the right side (see finished image)
70.
Activate the tube’’ Chat jewel 008’’
- Image
Resize to 45%
- Edit - Copy- Activate your work -Edit - Paste as a new layer
- Activate your Move Tool (M) move it in the right place (see finished image )
71. On the tube " Strange jewel 004.png’’- Select the apple with the lasso
- Edit - Copy- Activate your work -Edit - Paste as a new layer >>Place on the cat's head (see finished image)
72. Activate the tube
‘’visez_juste’’(speech bubble) Edit - Copy- Activate your work -Edit - Paste as a new layer /or create one to your taste
73. View - Toolbars - Script checked !! in your psp -Put the script in your script folder –restricted script from PSP-
Activate toolbar Script, choose my file in the list ‘’ Renee_jewel-script’’
click the little blue arrow and let the script run
Or manual settings as below
-Image - Add borders-Symmetric checked 1 Pixel Color #831100=3
-Image - Add borders-Symmetric checked 1 Pixel Color #cfcfcf=1
-Image - Add borders-Symmetric checked 1 Pixel Color #831100=3
-Image - Add borders-Symmetric checked 20 Pixels Color #ffffff
-Image - Add borders-Symmetric checked 1 Pixels Color #000000
- Image - Add borders-Symmetric checked 30 Pixels Color #ffffff
74. Activate the "titre"-Edit - Copy- Activate your work -Edit - Paste as a new layer and move
75. Layers- Merge- Merge All (flatten)
76. Activate toolbar Script, choose my file in the list "08 Augmentation de la saturation des couleurs"(Increased color saturations)
77. Image -Resize to 999 Pixels width.
Save as JPG file and you're done!
I hope you enjoyed this lesson
Renée
This lesson was written by Renée 20 May 2019
Edited and Update
2019
*
Any resemblance with an existing lesson is a coincidence
* Do not forget to thank the people who work with us and for us I have appointed the tubeurs and translators
Thanks
*
|

 Translations


.gif)


