|
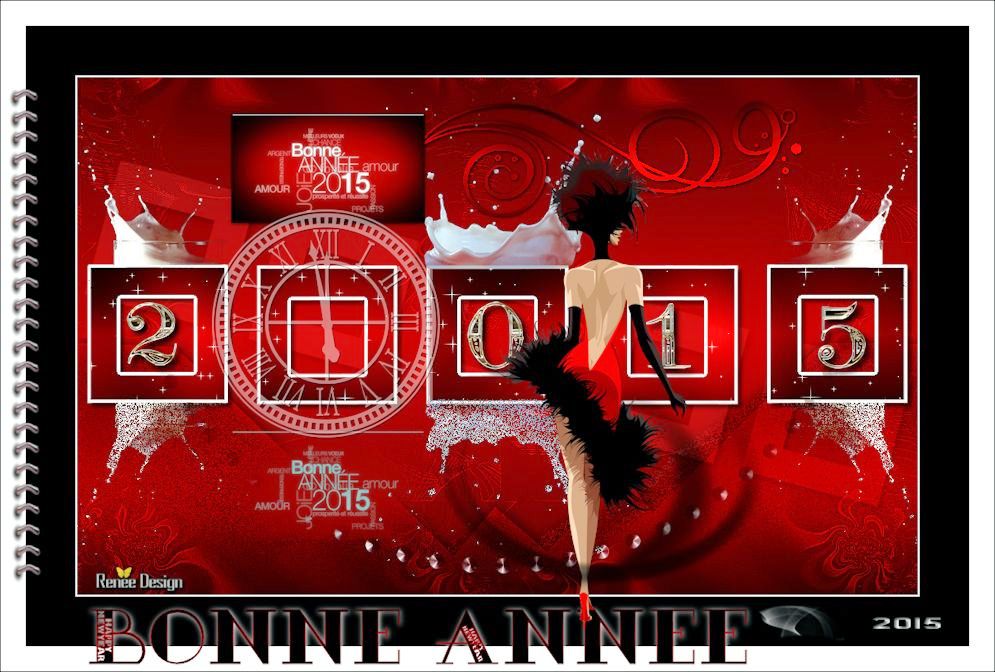
I wish everyone a happy and good
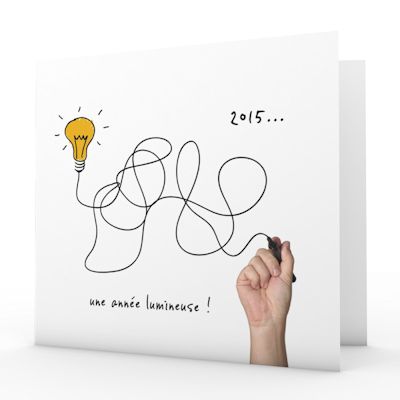

1. File - New - New Transparent Image:1015 x 625 pixels
2. Material of the foreground: foreground to Gradient and choose: ''red_satin'' Put your foreground into a linear gradient with settings below./Material of the background:backgroundcolor to color white
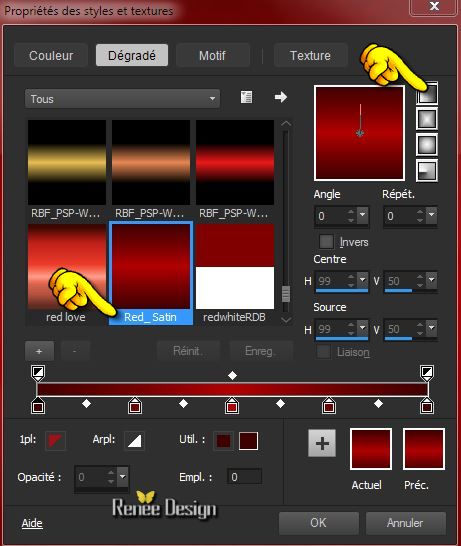
3. Flood Fill Tool: Fill the layer with the linear gradient
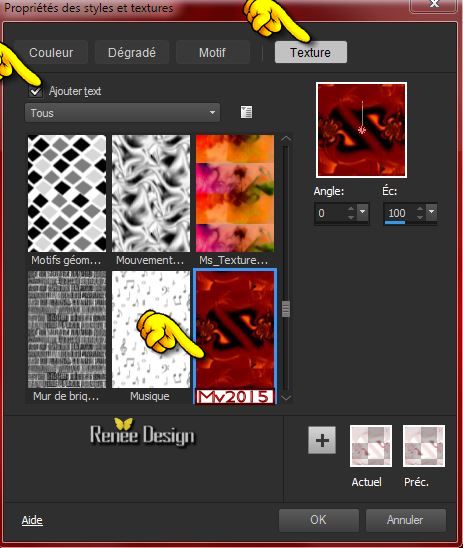
4. Material of the foreground: foreground to Gradient - texture checked and choose: texture ''Mv2015"with settings below.''
5. Layers-New raster layer
- Flood Fill Tool: Fill the layer with the foreground/texture
6. Effects-Edge- Effects-Enhance More
7.Effects-Image Effects-Seamless Tiling using the default settings
8. Layers-New raster layer
9. Selections - load/save selection - load selection from disk and choose my selection: "2015_1' -Activate Flood Fill Tool and fill the selection with the backgroundcolor white
- Selections- Deselect All
10. Effects - 3D Effects - Drop shadow: 5/5/50/5 color black
11. Layers- Duplicate
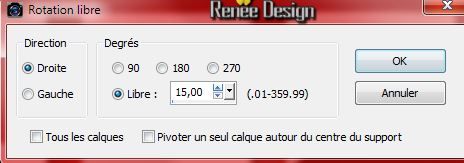
12. Image - Free Rotate degrees 15 right
13. In the Layerpalette, set Blend Mode to Soft Light and Opacity to 65%
14. Layers- Arrange-Move Down
15. Layers-New raster layer
16. Selections - load/save selection - load selection from disk and choose my selection: ''2015_2''
- Material of the foreground: foreground to Gradient
''red_satin''
with the same settings
17. Activate Flood Fill Tool and fill the selection with the gradient
Selections- Deselect All
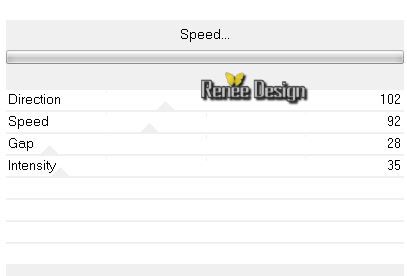
18.Effects- Plugins - VM Natural- Speed with these settings
19. Effects - 3D Effects - Drop shadow: 1/1/100/25 color black
20. In the Layerpalette, set Blend Mode to Hard Light
- Activate the top of the layer-Palette
21. Layers - New raster layer
22. Selections - load/save selection - load selection from disk and choose my selection: 2015_3'' - Activate Flood Fill Tool and fill the selection with the gradient
- Keep selected
23. Effects- Plugins - Unlimited 2.0
- Greg's Factory Ouput vol. II/ Pool Shadow using the default settings
- Selections- Deselect All
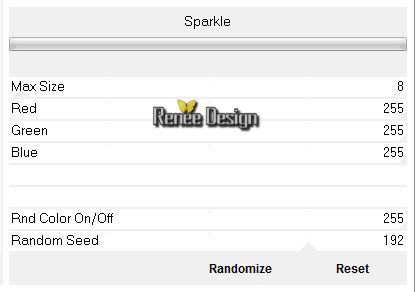
24. Effects- Plugins - VM Natural - Sparkle with these settings
25.
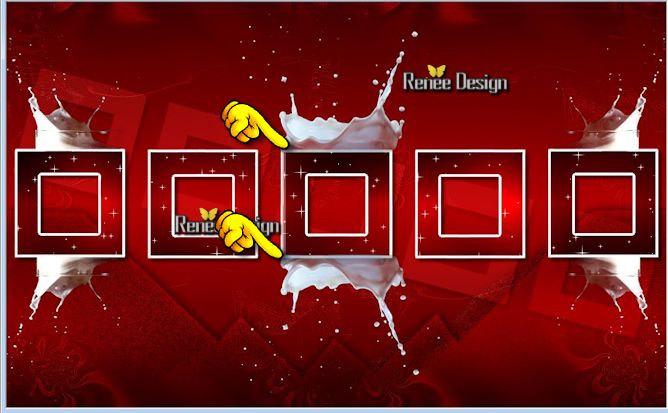
Open your tube '' Renee_2015_image1''- Edit/copy-Edit paste as a new layer on your working area
and move see example
26.
Layers- Duplicate -Image Flip
-(move against the lower edge of the square)
Like this
27.
In the Layerpalette, set Blend Mode to Dissolve and Opacity to 51%
28.
Layers-New raster layer
29.
Selections - load/save selection - load selection from disk and choose my selection: ''2015_4''- Activate Flood Fill Tool and fill the selection with color black
30.
Effects- Plugins -Eyecandy 5 Impact -Chrome- tab Settings/User Settings and choose my Preset
''2015_chrome''
Selections- Deselect All
31.
In the Layerpalette, set Blend Mode to Hard Light
32.
Layers-New raster layer
33.
Selections - load/save selection - load selection from disk and choose my selection: ''2015_5''- Activate Flood Fill Tool and fill the selection with the linear gradient
Selections- Deselect All
34.
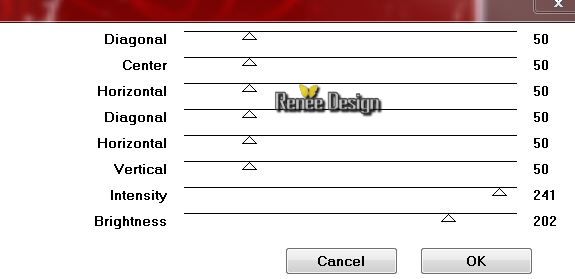
Effects- Plugins -Graphic Plus - Cross Shadow with these settings
35.
Effects - 3D Effects - Drop shadow:1/1/100/6 color black
36.
Open the tube''2015.logo_texte'' -activate raster 1 of the tube
-
Edit/copy-Edit paste as a new layer on your working area
37.
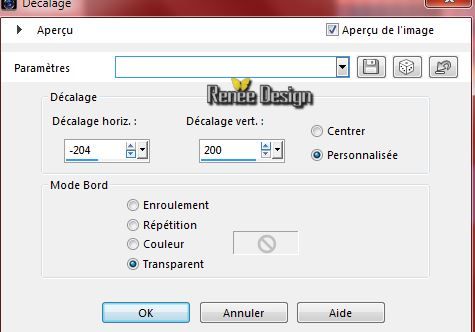
Effects - Image Effects - Offset with these settings
38.
Layers- Duplicate
39.
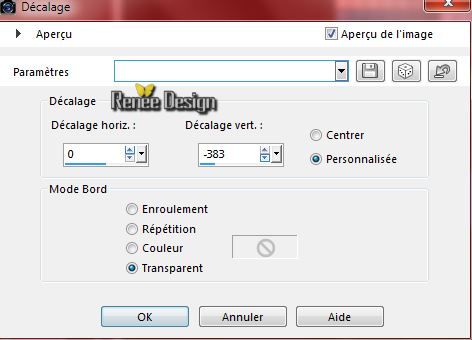
Effects - Image Effects - Offset with these settings
40.In the Layerpalette, set Blend Mode to Exclusion and Opacity to 75%
41.
Open the tube ''2015_pinceau_horloge '' in psp
-
File-Export-Custom Brush and give a name.
-
(2015_pinceau_horloge)
42.
Layers-New raster layer
43.
Open the brush ''pinceau-2015 Horloge ''Material of the foreground: foregroundcolor to color white /Stamp as follows with color white

-
Reduce the opacity of this layer to 51%
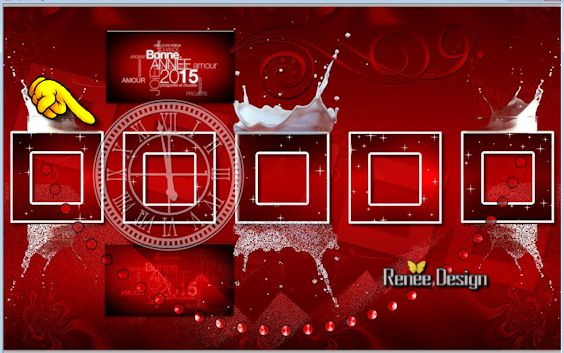
Your work look like this now
44.
Layers- Merge- Merge Visible
45.
Open the tube ''2015_chiffres'' -Edit/copy-Edit paste as a new layer on your working area (do not move it is in the right place)
46.
Image - Add borders-Symmetric checked: 2 pixels color white
47.
Image - Add borders-Symmetric checked: 60 pixels color black
48.
Image - Add borders-Symmetric checked: 30 pixels color white
49.
Open the tube ''deco_2015_bonne_annee_Renee''-Edit/copy-Edit paste as a new layer on your working area (
this tube has several layers and place to taste)
50.
Image - Add borders-Symmetric checked: 1 pixels color black
51.
Image Resize 995 Pixels Width
52.Adjust-One Step Photo Fix
Save as JPG
*
My loyal employees
I start anything without your help
Marion - Graziella -Doucelyne-
Roland - Christiane(Copiloot)
and myself
thank you all
*
I hope you enjoyed this lesson
Renée
This lesson was written by Renée 20/10/2014
Created the
12/2014
*
Any resemblance with an existing lesson is merely a coincidence *
* Don't forget to thank the people who work for us and with us. I named the tubeurs - Testers and the translators.
Thanks Renée. |
 Translations


 All rights reserved