|
New
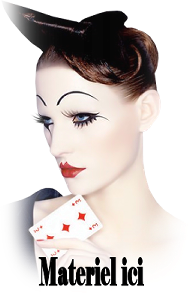
Translations here
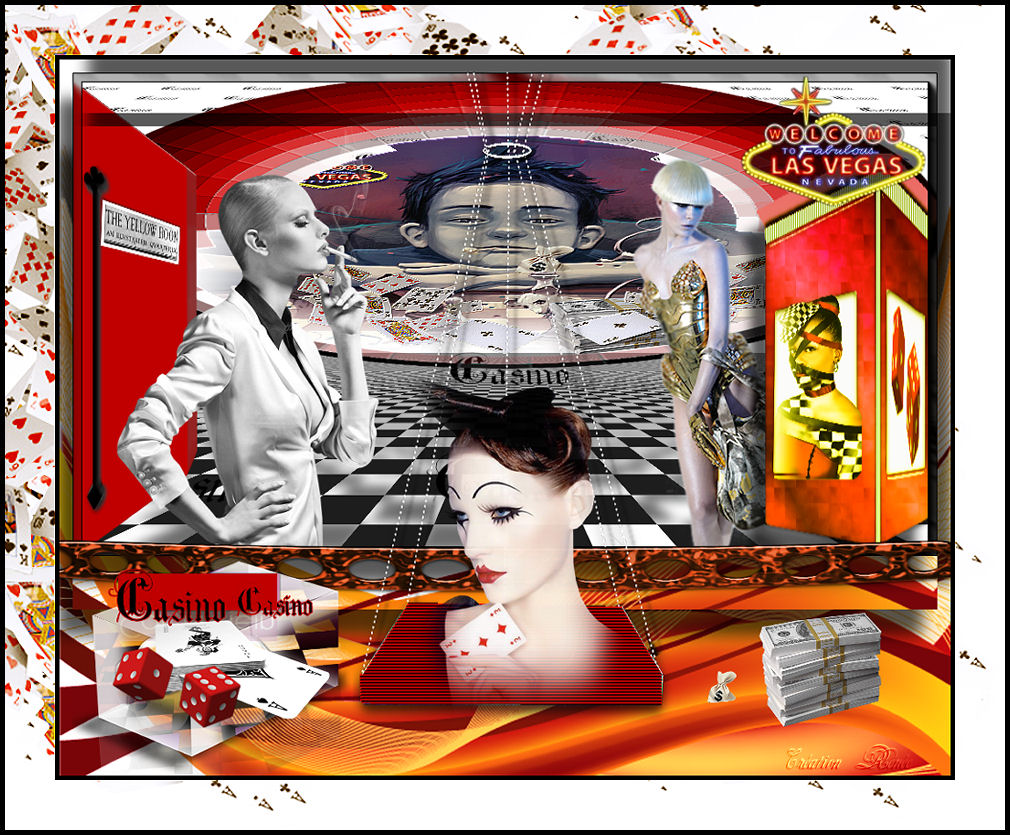
Casino Jeux
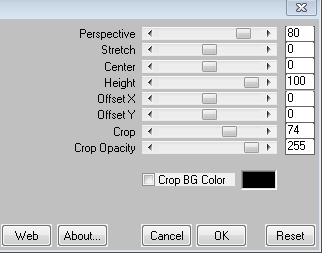
1. File - New - New Image 985 x 550 pixels color white !!!!! 2. Open the tube ''renee-casino1''-Edit - Copy -Edit - Paste as new layer on your working area. Do not move !! 3. Effects- Plugins - Mura's Meister /perspective Tiling with these settings
4. Layers-Merge- Merge Visible
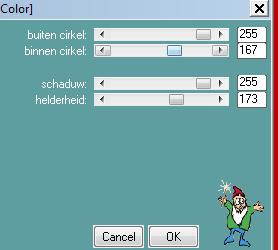
5. Layers- New raster layer -Activate Flood Fill Tool: fill the layer with color #c00000 6. Effects- Plugins - L and K's-Kaithlyn
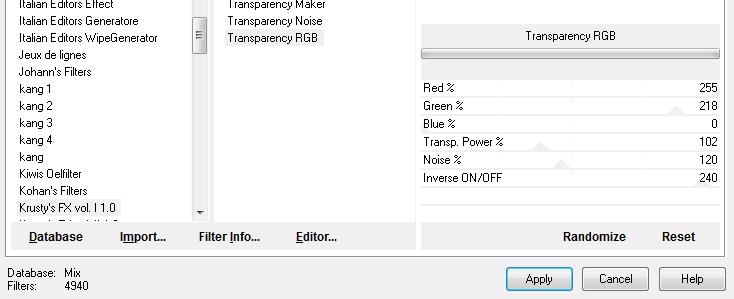
7. Effects- Plugins - Krusty's Filters/TransparencyRGB with these settings
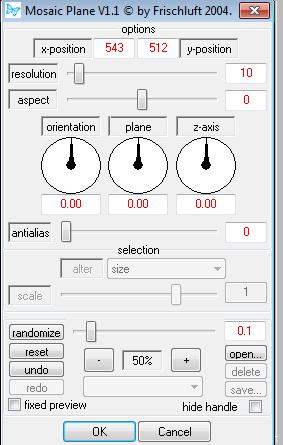
8. Activate the magic wand and select into the circle / Press the delete button on your key board 9. Selections- Deselect All 10. Effects- Plugins - Eyecandy5 Impact extrude tab Settings/User settings choose my preset: ''renee-casino-jeux'' 11. Effects- Plugins - Frischluf /Mosaic plane V1.1
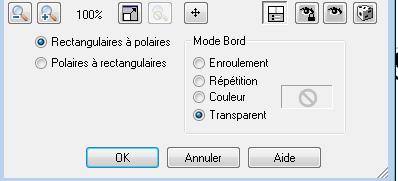
12. Effects- Edge Effects- Enhance More 13. Image Flip 14. Effects- Distortions Effects-Polar Coordinates-Rectangular to Polar
15. Image Resize with 61% (Resize all the layers not checked) - Activate the Pick Tool/Deformation tool (K) put the circle straight up and stretch the left and right in its place
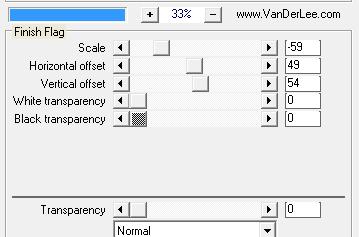
- Activate the bottom of the layer-Palette 16. Layers- New raster layer 17. Effects- Plugins - Vanderlee-UnpluggedX-Finish Flag with these settings
18. With your Move Tool select the white rectanlges/ Press the Delete button on your key board/(I leave three white rectangles, but that's my personal choice) 19. Selections- Deselect All 20. Effects- Plugins - Mura's Meister /Perspective tilling
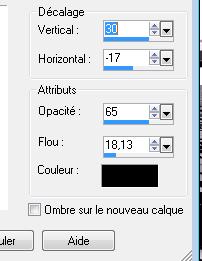
21. Effects- 3D Effects- Drop Shadow with these settings
- Set the layer opacity of this layer to 89% 22. With the magic wand with these settings select the transparent part
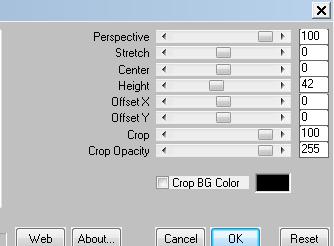
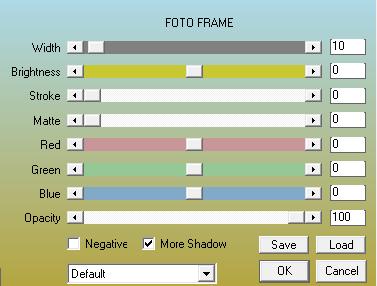
23. Layers- New raster layer 24. Open the tube ''renee-casino-jeux-affiche ''Edit/copy-Edit paste into selection 25. Selections- Deselect All 26. Effects- Plugins - FM Tile Tools /Blend emboss using the default settings 27. Open the tube ''tube roserika cabine modifie-casino-jeux '' Edit - Copy -Edit - Paste as new layer on your working area. Activate your Move Tool (M) place it in the bottom right corner 28. Layers- New raster layer 29. Selections - load/save selection- load selection from disk and select my file ''renee-casino-jeux selection'' Activate Flood Fill Tool and fill the layer with the foregroundcolor #c00000 30. Effects- Plugins - EyeCandy5 impact-Extrude- Tab -Settings/User settings choose my preset: ''renee-casino-jeux extrude'' (The effect is included with the material" pspimage'' Paste it as a new layer on your working area ) 31. Open the tube ''renee-casino-jeux-poteau ''Edit/copy-Edit paste as a new layer. With your move tool place it in to the left side 32. Open the tube ''Allies449-vrouw-25032011'' Image Resize with 75% Image Mirror / Edit/copy-Edit paste as a new layer. With your move tool place it in to the left side 33. Open the tube ''96.png de Flore '' Edit/copy-Edit paste as a new layer. With your move tool place it in to the right side 34. Layers- Arrange- Move Down under raster 4 (the cabine) 35. Layers- Merge- Merge- Visible 36. Effects- Plugins- AAA Frame /Foto frame >>>>attention more shadow !!!
37. Image - Add borders-No Symmetric-white
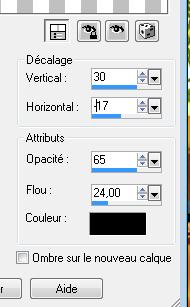
38. With the magic wand select the white border 39. Layers- New raster layer /Open the tube ''effet 11'-Nataika 355'' Edit/copy-Edit paste into selection 40. Selections- Invert 41. Effects- 3D Effects- Drop Shadow with these settings
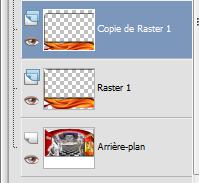
- Repeat Drop Shadow with these settings V= -30 and H= 17 42. Selections- Deselect All 43. Open the tube ''barre -casino'' Edit/copy-Edit paste as a new layer on your working area and move 44. Open the tube ''bloc-casino-jeux'' Edit/copy-Edit paste as a new layer on your working area and move 45. Open the tube ''echec -roserika-activate raster renee modifié''on the tube / Edit/copy-Edit paste as a new layer on your working area and move 46. Open the tube ''67642d29.png'' Edit/copy-Edit paste as a new layer on your working area and move 47. Open the tube ''calguismoney23102011'' Image Resize with 35% Edit/copy-Edit paste as a new layer on your working area and move 48. Open the tube 'calguiswelcomelasvegas'' Edit/copy-Edit paste as a new layer on your working area and move 49. In the layer palette-activate Raster 1 / Layers- Duplicate -Activate your Pick Tool (K) mode scale- push down as shown in the example below
50 . Is all in place? Layers- Merge- Merge All 51. Image - Add borders-Symmetric checked:5 pixels black 52. Image Resize with 980 pixels width 53. Image - Add borders-Symmetric checked:50 pixels white 54. With the magic wand select the white border //Open the ''image carte pour le cadre'' Edit/copy-Edit paste into selection 55. Selections- Deselect All 56. Image - Add borders-Symmetric checked: 5 pixels black Save as JPG I hope you enjoyed this lesson Renée This lesson was written by Renée januari 2011 * Any resemblance with an existing lesson is merely a coincidence * * Don't forget to thank the people who work for us and with us. I named the tubeurs - Testers and the translators. Thanks Renée. *
I am part of Tutorial Writers Inc. My tutorials are regularly recorded ReneeGraphisme_All rights reserved
*
|
 Translations


 Let's start the lesson.