|
New
Translations here
Catch me -Attrape moi
*
1. Open the backgroundimage'' fond 1-'Window - Duplicate (or shift+D) - Close the original and proceed on the copy Material Properties-Set your foreground to #ffffff -Set your background color to #701302 2. Layers- New raster layerFlood Fill Tool : Change the opacity of the color at 60%
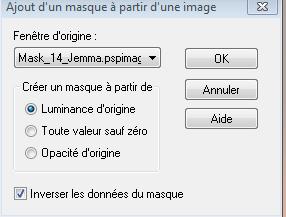
3. Activate Flood Fill Tool and fill the layer with the foreground color #ffffff 4. Layers- New Mask layer from Image and select Mask ''Mask_14-jemma.pspimage''
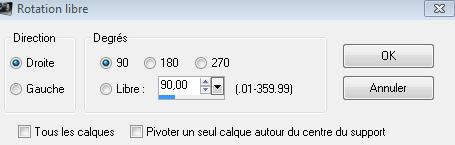
5. Layers-Merge- Merge- Group -Layer Palette -Double click on this layer and set the Blendmode to "Overlay" 6. Image Free rotate 90°right
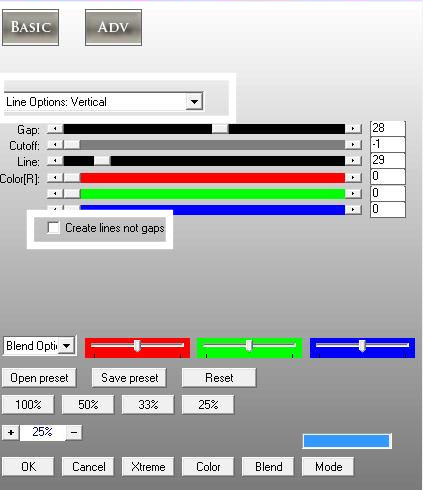
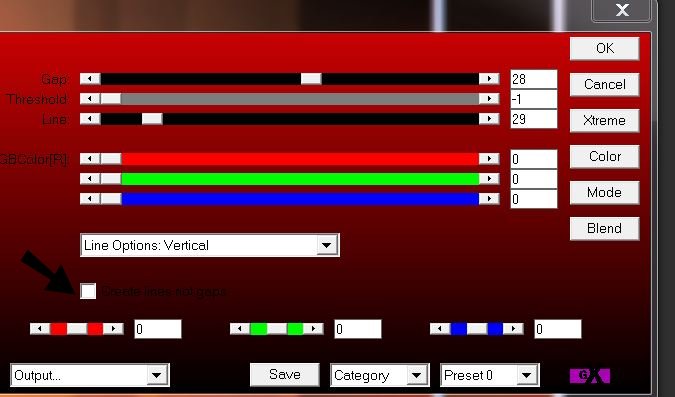
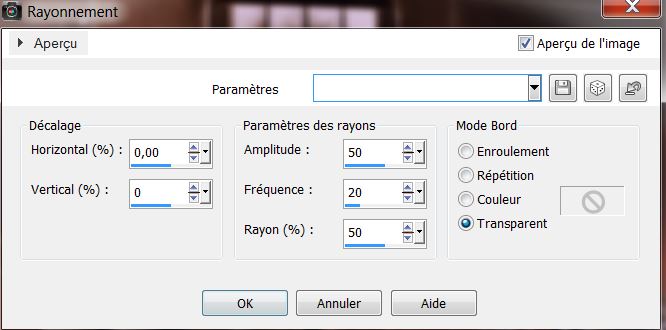
7. Effects-Plugins - AP01 (Innovation) Lines Silverlining (depending on the version of your filter)
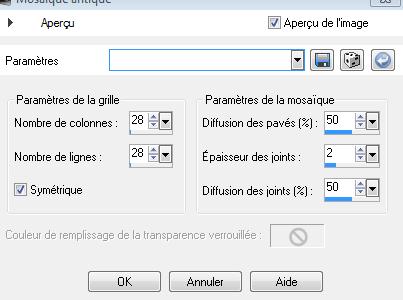
8. Layers-Duplicate /Image Mirror 9. Layers-Merge-Merge Down Layer Palette -Double click on this layer and set the Blendmode to "Soft Light " 10. Effects-Plugins - Simple /Blintz 11. Selections –load/save selection –load selection from disc and choose:"renee -catch me "/Hit the Delete Key of your Keyboard 12.Selections-Deselect All 13. Layer-Palette- Make raster 1 active Effects- Texture Effects - Mosaic Antique with these settings
14. Activate the top of the layer palette 15. Open the tube « sol-catch-me '' Edit/copy- Edit/ paste as new layer on your working image 16. Effects-Image Effects-Offset with these settings H = 0 and V = -250 17. Effects-Plugins -FM Tile Tools - Blend Emboss using the default settings Layer palette look like this now
18. Open the tube ''calguisHDRrool71010 '' / Image Resize a 75 % - Edit/copy- Edit/ paste as new layer on your working and move Layer Palette - Double click on this Layer and set the Blend Mode to "Hard Light " 19. Layers-Duplicate -Layers-Merge- Merge Down (Blend Mode to "Hard Light ") Your work look like this now
20. Open the tube « pantin -MTM'' Image Resize 2x 75%/Image Mirroir Edit/copy- Edit/ paste as new layer on your working image 21. Open the tube ''attache catch -me'' -Edit/copy- Edit/ paste as new layer on your working image -With the move tool, move it in the right place (see finished image) 22. Open the tube ''magicien de guismo'' - Edit/copy- Edit/ paste as new layer on your working image /With the move tool,move it to the bottom right corner 23. Layers-Duplicate /Adjust-Blur-Gaussian Blur : Radius 30 24. Layers-Arrange-Move Down Activate the top of the layer palette 24. Open the tube '' bras-catch me '' Edit/copy- Edit/ paste as new layer on your working image and move 25. Effects-Edge Effects-Enhance Is everything in the right place? 26. Layers-Merge-Merge-Visible 27. Effects-Geometric Effects -Perspective Horizontal with these settings-Color #701302
28.With the magic wand select the two red parts #701302 29. Selections-Promote selection to layer Selections-Deselect All 30. Effects-Plugins -EyeCandy5 Impact /blacklight–tab Settings/User settings choose my preset: ''renee-catch me'' 31. Activate the bottom of the layer palette - With the magic wand select the red part of the top 32. Layers-New raster layer - Layers Arrange-Move Up 33. Open the tube ''calguismetedcity8092011 '' Edit/copy- Edit/ paste into selection 34. Selections-Deselect All -Layer palette look like this now
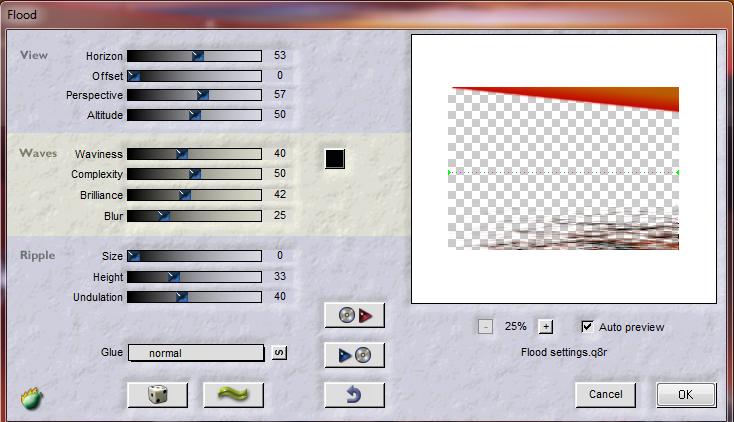
35. Effects-Plugins - FMTile tools/Blend emboss using the default settings -Layer-palette-Replace on the middle layer (promoted selection) 36. Effects-Plugins- Flaming Pear /flood with these settings
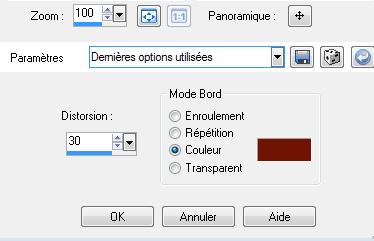
37.Open the tube « image5-catch-me'' -Edit/copy- Edit/ paste as new layer on your working image -With your move tool place it to the bottom right corner (see finished image) 38. Effects-Distortion Effects-Spiky Halo-with these settings
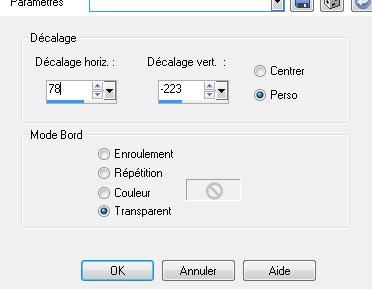
check position see finished image 39. Open the tube '' rat ''/-Image Resize with a 75% 40. Open the tube « arcade -cash -me ' '-Edit/copy- Edit/ paste as new layer on your working image 41. Effects-User Defined Filter - Emboss 3 using the default settings -Layer Palette -Double click on this layer and set the Blendmode to "Hard Light" 42.Effects-Image Effects-Offset with these settings
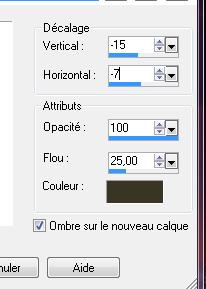
43. Oupen the tube « oiseau catch-me'' Edit/copy- Edit/ paste as new layer on your working image and move 44. Layers-Merge-Merge- Visible 45. Image - Add borders-Symmetric checked: 5 pixels black 46. Image - Add borders-Symmetric checked: 50 pixels background color 47. With the magic wand -select the border of 50 pixels -Selections-Invert 48. Effects -3D Effects - Drop Shadow with these settings
47. Selections-Deselect All 48. Open the tube cadre Edit/copy- Edit/ paste as new layer on your working image(do not move it is in the right place) 49. Effects -3D Effects - Drop Shadow with these settings-color #3a3524
50. Layers- Merge- Merge All -Activate the Text Tool: Font ''Hirosh "" /size 48- Set the background color to #ffffff -Type the text: -attrape -/ moi and catch - / me Move tool/ put it in its place 51. Layers- Merge- Merge All/Image Resize 985 pixels Width Save as JPG
*
I am part of Tutorial Writers Inc. My tutorials are regularly recordedt ReneeGraphisme_All rights reserved
|

 Translations


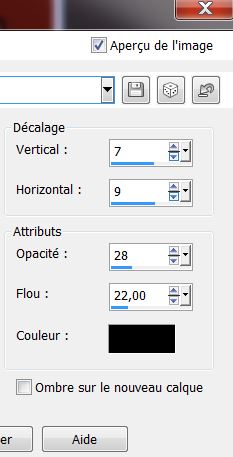 repeat drop shadow but negative -7/-9