|
New
Translations here
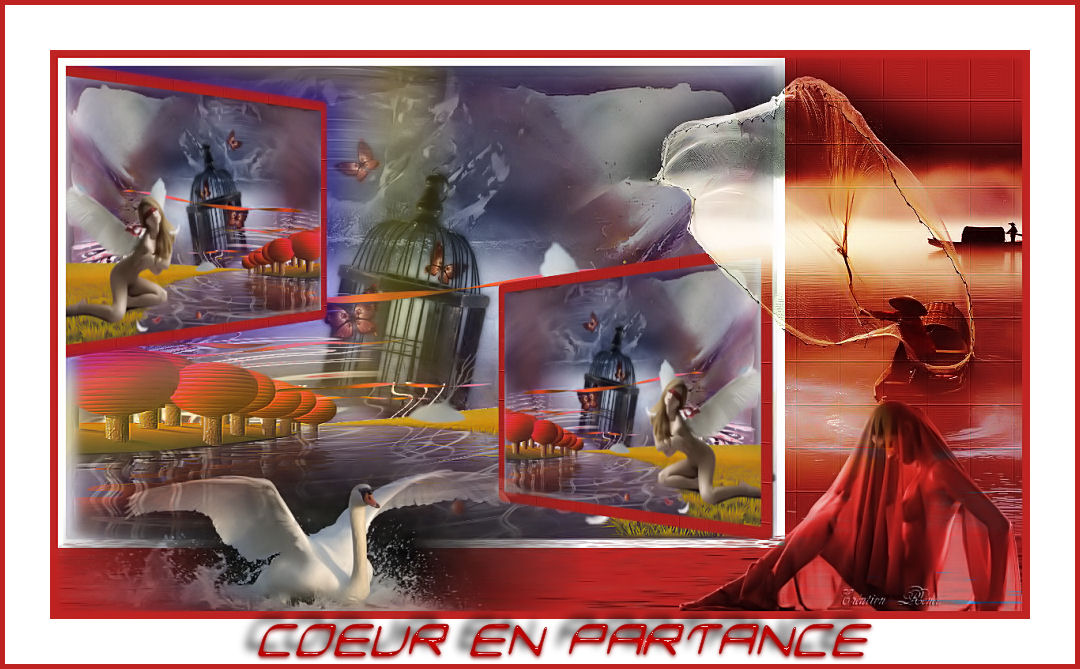
CŒUR EN PARTANCE
Let's start the lesson. 1. Open the image fond « rendez-vous «Window - Duplicate (or shift+D) - Close the original and proceed on the copy -Promote Background Layer =Raster 1 2. Layers- New Raster Layer 3. Selections- Select All 4. Open the image « JHanna-5083background » -Edit- Copy-Edit Paste into selection Selections- Deselect All 5. Double click on this Layer and set the Blend Mode to " Difference" - Set the layer opacity of this layer to 67% 6. Layers- New Raster Layer 7. Selections –load/save selection –load selection from disc and choose my selection: « @renee-rendezvous 2 » 8. Open the tube « untangled trees « -Edit- Copy-Edit Paste into selection Selections- Deselect All 9. Effects- Plugins- FMTileTools / Blend emboss using the default settings 10. Open the tube « triziaTubed-IceButterflies Edit/ Copy-Edit - Paste as new layer on your working image and move as shown in the example below
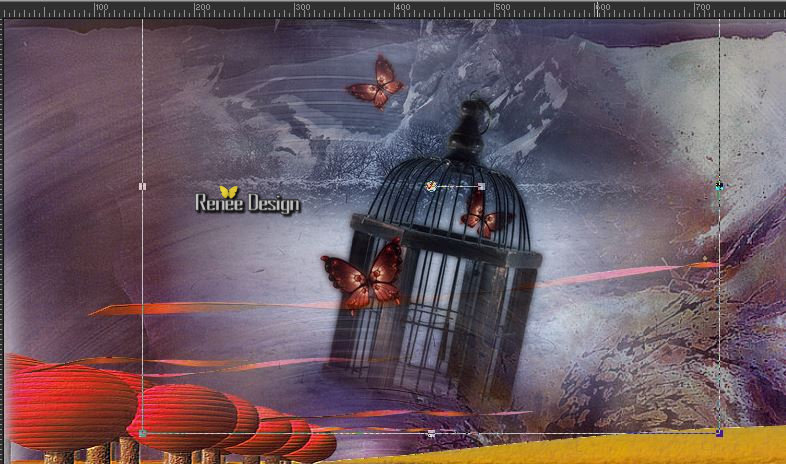
11. Open the tube « image2 » - Edit/ Copy-Edit - Paste as new layer on your working image and move 12. Layers- Arrange- Move Down - Layer Palette - Double click on this Layer and set the Blend Mode to "Soft Light " - In the Layer Palette-Make Raster 4 aktive 13. Effects- Plugins- Redfield Plugins /Ripples Magic v1.12 use settings below
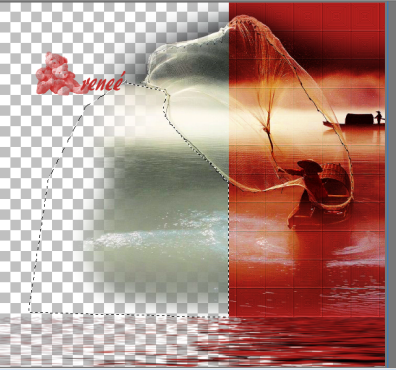
-Activate your Pick Tool (K) stretch on the both sides and upwards that it fits (See printscreen)
- Layer Palette - Double click on this Layer and set the Blend Mode to "Soft Light " - On the top in the layer Palette =Raster 2 - You should have this result as shown in the print screen below
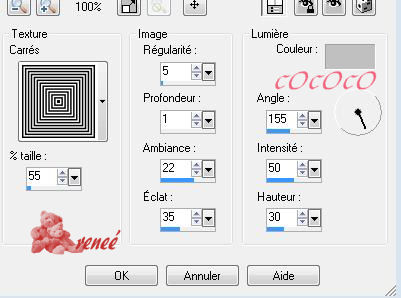
14. Open the tube « ange - Edit/ Copy-Edit - Paste as new layer on your working image and move 15. Layers- Merge- Merge Layers Visible 16. Layers- Duplicate 17. Image Resize to 65% all layers not checked 18. Selections- select All - Selections- Float - Selections- Modify - Select-Selection Borders with 8 pixels-Both side 19. Layers- New Raster Layer 20. Activate Flood Fill Tool and fill the selection with color #bf2321 21. Effects- Texture Effects- Texture- Squares use settings below
- Layers- Merge- Merge- Layers Down 22. Effects- Plugins - Andromeda /perspective /side walls - preset ''rt open '' 23. Layers- Duplicate - Image Mirror /Move tool / place your tube on the upper left corner of your image 24. Effects- Plugins - Eyecandy5/Impact - black light -tab Settings/User settings choose my Preset « reneeange » 25. Image - Add borders-Symmetric checked: 10 pixels 26. Image- Canvas Size use settings below- Color #bf2321
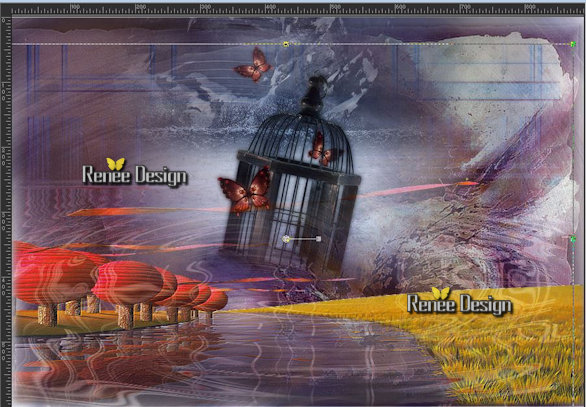
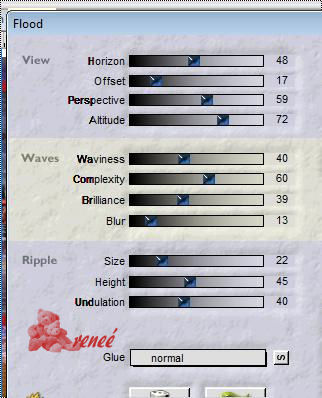
27. Activate Magic Wand and select the red part of your work - Selections- Promote selection to Layer -Repeat: Effects- Texture Effects- Texture- Squares use the same settings (-Step21) 28. Selections –load/save selection –load selection from disc and choose my selection: "@renee-rendezvous3" 29. Effects- Plugins- Flaming pear / Flood use settings below
30. Open the tube « ann.misted1031'' - Image Mirror -Edit/ Copy-Edit - Paste as new layer on your working image and move -Layer Palette - Double click on this Layer and set the Blend Mode to "Hard Light " -Close the bottom Layer-Activate your Freehand selection Tool – Selection type Point to Point – select this part (see example below) and Delete- Open the bottom Layer
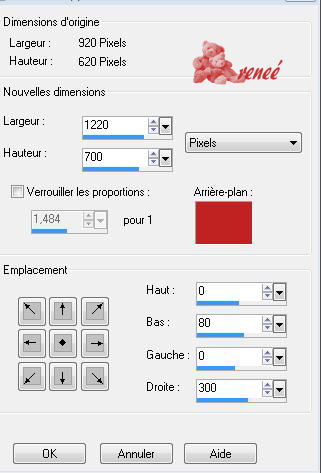
31. Open the tube " anna-be-transparencia-28-08-10" - Image Resize to 55% - Edit/ Copy-Edit - Paste as new layer on your working image and move - Layer Palette - Double click on this Layer and set the Blend Mode to "Luminance " 32. Open the tube « ANI-M2008-17 » - Edit/ Copy-Edit - Paste as new layer on your working image and move Ist all in place?? 33. Layers- Merge-Merge Layers All 34. Image - Add borders-Symmetric checked:10 pixels #bf2321 35.Image Resize to 980 pixels width 36.Adjust-Digital Camera Noise Removal with these settings
37. Image - Add borders-Symmetric checked:45 pixels #ffffff 38. Image - Add borders-Symmetric checked: 5 pixels #bf2321 39. Open the Text-Edit/ Copy-Edit - Paste as new layer on your working image and move 40. Effects-3 D Effects- Drop Shadow with these settings: -9/-9/65/12 black Save as JPEG
I hope you enjoyed this lesson Renée
This lesson was written by Renée 2008
Edited and Update 2010 Renée
* Any resemblance with an existing lesson is a coincidence * Do not forget to thank the people who work with us and for us I have appointed the tubeurs and translators Thanks Renée *
* I am part of the Tutorial Writers Inc. My tutorials are registered regularly ReneeGraphisme_All rights reserved
|
 Translations


 ci
ci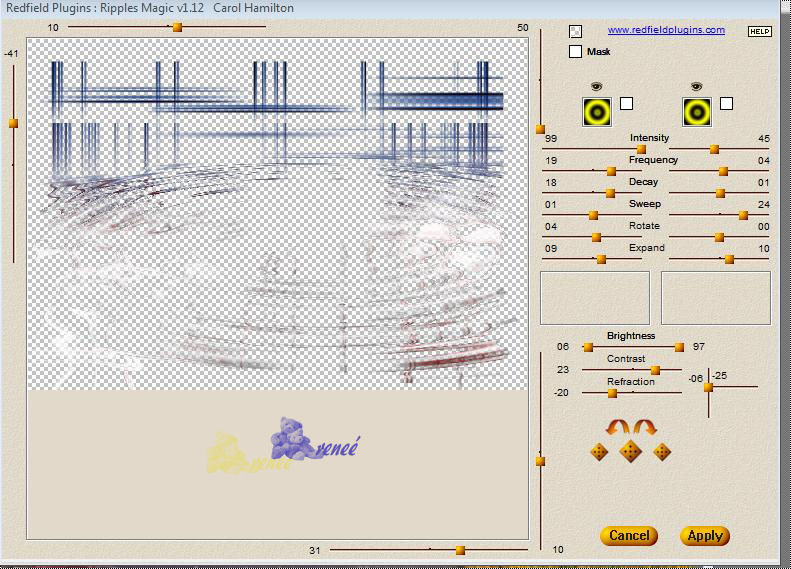 D
D