|
New
Translations here
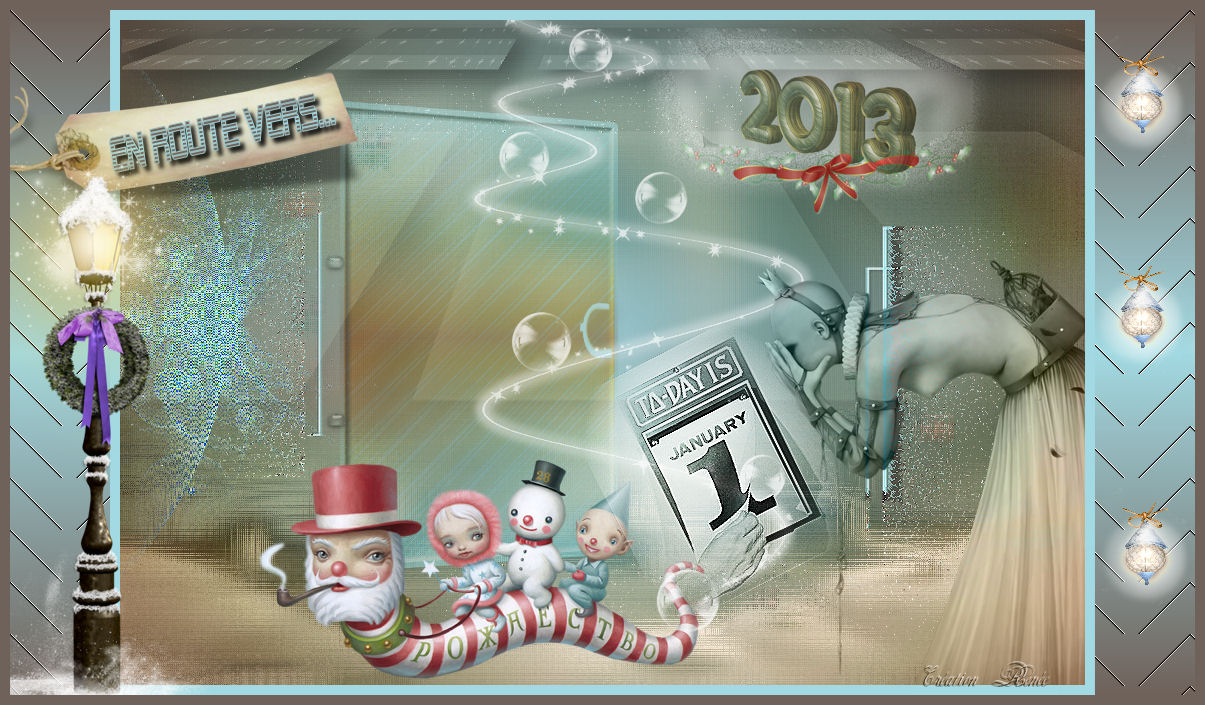
En route to 2013
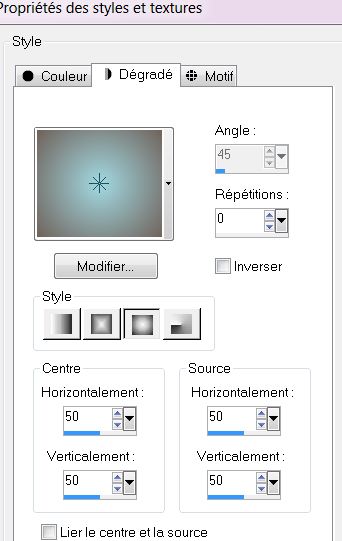
2. Material Properties: Foreground color to this color:#a2d9e2 Background color to this color :#6f625a 3.Prepare a Sunburst Gradient as configured// Activate Flood Fill Tool and fill the layer with the gradient
4. Layers - New raster layer 5. Selections-Select All 6. Open the tube ''Jhanna_ 316Background ''Edit/Cpoy-Edit Past into selection 7. Selections- Deselect All
8. Effects-Plugins - Unlimited
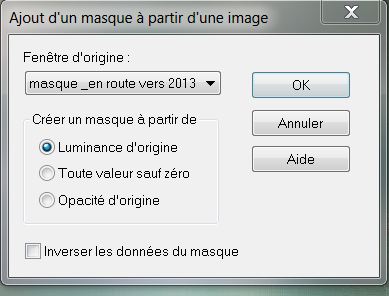
-Funhouse /Loom 9. -In the Layerpalette, set Blend Mode to Overlay 10. Layers- New Mask layer from Image and choose Mask:masque_en route vers 2013''
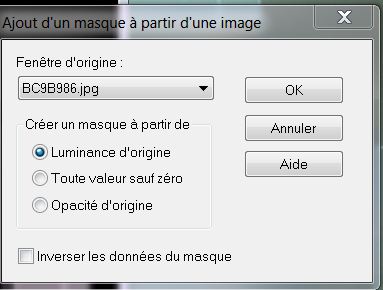
Layers- Merge -Merge Group 11. Layers- New raster layer // Activate Flood Fill Tool and fill the layer with the foregroundcolor 12. Layers- New Mask layer from Image and choose Mask: ''BC9B986''
13. Layers- Merge -Merge Group
TO INSTALL THIS FILTER GO SEE EXPLANATION HERE 14. Effects- Plugins Filter Attacks /click filter / select the first item and click on the arrow (3)
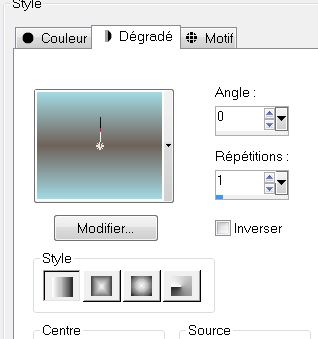
15. Effects- Edge Effects-Enhance 16. Change the gradient //Prepare a Linear Gradient as configured like this.
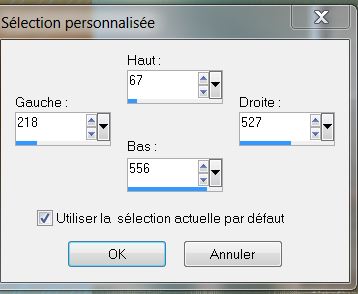
17. Selection Tool ( S ) Custom selection use settings below
18. Layers - New raster layer/ Activate Flood Fill Tool and fill the selection with the linear gradient 19. Effects- Plugins - Azyzam's Designer / Crazy stripes ( into the zip file )
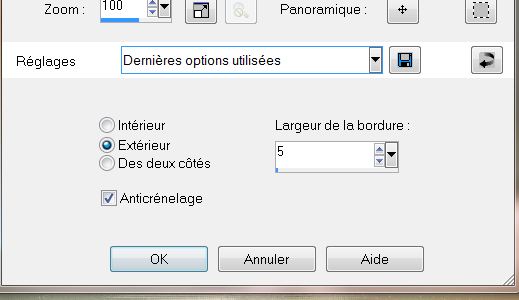
20. Selections-Modify-Select-Selection Borders with these settings
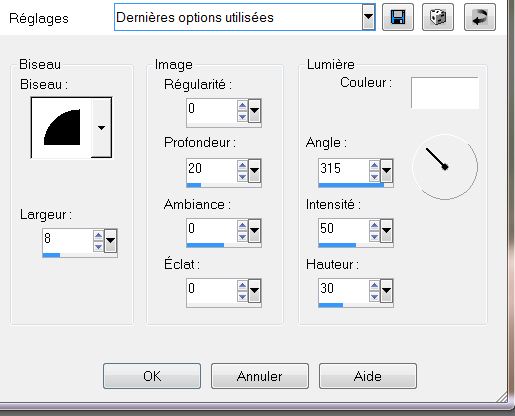
21. Activate Flood Fill Tool and fill the selection with the linear gradient Keep selected 22. Effects- 3D Effects -Outer Bevel with these settings
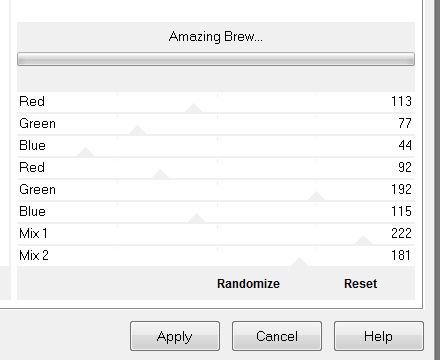
23. Selections- Deselect All 24. Open the tubes ''renee_en route vers 2013_attaches"" Edit/copy-Edit paste as a new layer on your working area and move ' 25. Open the tubes ''renee_en route vers 2013_poignée'' Edit/copy-Edit paste as a new layer on your working area and move on the door 26. Effects- Plugins -Unlimited - Lumière ambiance- Not particularly shady…using the default settings 27. Layers- Merge-Merge Down twice (two layers and the door is one layer ) 28. Effects- Plugins - Andromeda-perspective /Side walls /Preset - It shift 29. In the Layerpalette, set Blend Mode to Hard Light /Opacity of this layer to 51% 30.Activate the top of the Layer-Palette 31. Layers - New raster layer 32.Selections - load/save selection - load selection from disk and choose my selection:''renee_ en route vers 2013'' Activate Flood fill tool and fill the selection with the foregroundcolor 33.Selections- Deselect All 34. Effects-Plugins -Unlimited -Andrew's Filter Collection 55/ Amazing Brew
35. Layers - New raster layer 36. Selections - load/save selection - load selection from disk and choose my selection:''renee_en route vers 2013_1'' Activate Flood fill tool and fill the selection with the linear gradient 37. Effects- Plugins -Lotis /Mosaic Toolkits Plus V2.55
38. In the Layerpalette, set Blend Mode to Luminance /Opacity of this layer to 38% 39.Effects- Distortion Effects-Punch- 100 40.Effects-Geometric Effects-Perspective vertical with these settings
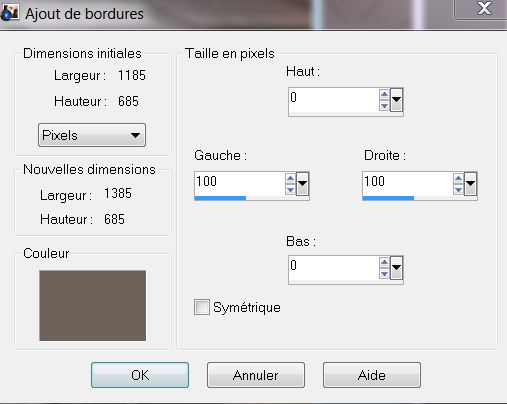
41. Effects- Plugins Eye Candy 5Imapct / Perspective Tab-Settings - Preset - Drop shadow blury 42. Open the tube ''Jen_Kerst367_09_12'' Edit/Copy -Edit - Paste as new layer on your working area and move 43. Open the tube ''renee_en route vers 2013_ligne ''Edit/Copy -Edit - Paste as new layer on your working area and move 44. In the Layerpalette, set Blend Mode to Luminance /Opacity of this layer to 75% 45. Open the tube ''1_january ''Edit/Copy -Edit - Paste as new layer on your working area and move -In the Layerpalette, set Blend Mode to Hard Light 46. Open the tube ''Jen_women 604_07-04-2012'' Image Resize 75% / Edit/Copy -Edit - Paste as new layer on your working area and move 47. Open the tube ''texte 2013'' mettre en place /Image Resize 50% Resize all Layers not checked/Edit/Copy -Edit - Paste as new layer on your working area and move - In the Layerpalette, set Blend Mode to Hard Light /Opacity of this layer to 77% 48.Layers- Merge -Merge All 49.Image - Add borders-Symmetric checked:10 pixels Foregroundcolor 50.Image - Add borders-Asymmetric with these settings: Backgroundcolor
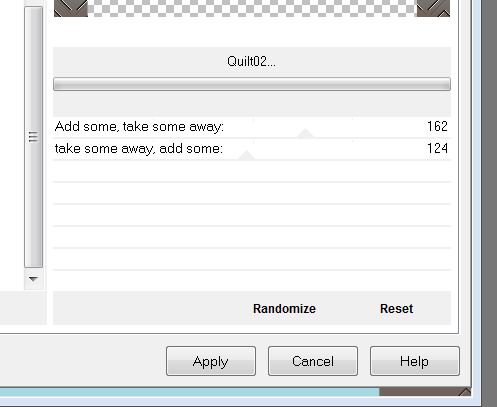
51. Magic Wand : click with your magic wand in the border of 100 pixels 52. Selections- Promote selection to Layer 53. Activate Flood fill tool and fill the selection with the linear gradient but invert checked !!! 54. Effects- Plugins &<BkG- Designer sf10II/ Quilt 02
55. Selections- Deselect All 56. Open these tubes ''renee_enroute vers 2013_etiquette ''/''reverbère'' and ''3 lumières ''Edit/Copy -Edit - Paste as new layer on your working area and move 57.Image - Add borders-Symmetric checked:10 pixels Backgroundcolor Save as JPG
I hope you enjoyed this lesson Renée This lesson was written by Renée 20/11/2012 Placing 25/12/2012 Any resemblance with an existing lesson is merely a coincidence * * Don't forget to thank the people who work for us and with us. I named the tubeurs - Testers and the translators. Thanks Renée.
I am part of Tutorial Writers Inc. My tutorials are regularly recorded. ReneeGraphisme__All rights reserved
*
|
 ou
2014
ou
2014 Translations