|
New
Translations here
Entre deux âges
Let's start the lesson.
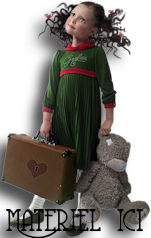
2. Layers- Duplicate 3. Effects- Plugins -Tramage /Perforator1 with these settings
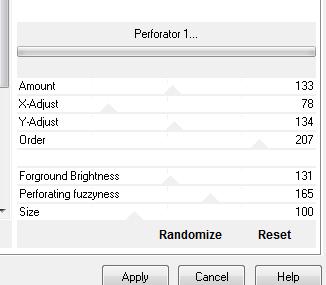
4. Effecs-Plugins -Simple /Diamonds 5. Effects- Plugins - XERO / Mistifier with these settings
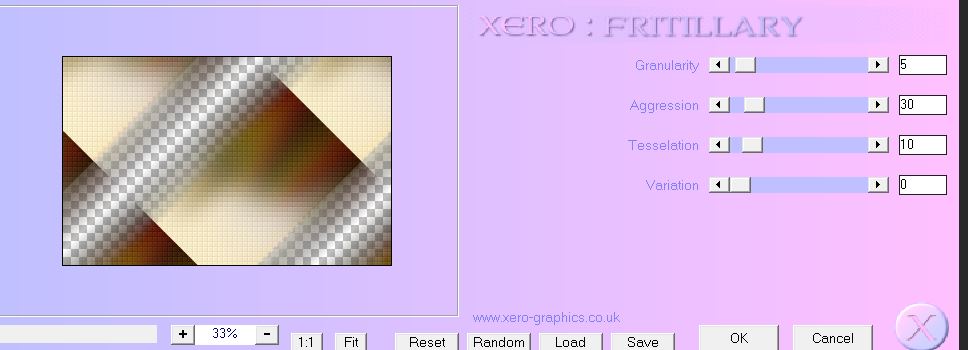
Effects- Plugins -Xero Fritillary with these settings
6. Layers- New Raster layer 7. Selections- Select All 8. Open the background image « arriere plan '' -Edit-Copy-Edit Paste into selection 9. Selections- Deselect All Double click on this layer and set the Blendmode to "Overlay " 10. Open the tube « effet de halo » Edit/copy- Edit/ paste as new layer on your working image -do not move 11. Effects- Plugins -Adjust variation -klick 3 x more red 12. Open the tube « luna paisagem33 » Edit/copy- Edit/ paste as new layer on your working image- Activate your Pick Tool (K) place it in the right place as shown in the example below
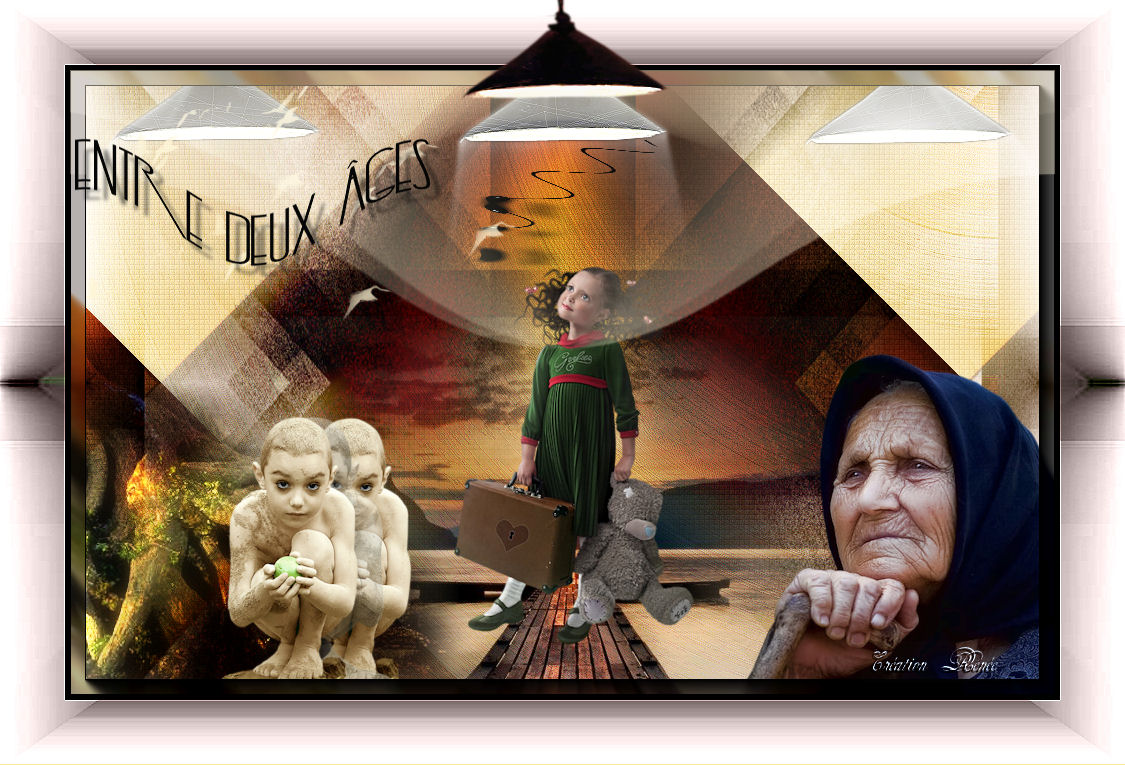
13. Open the tube- « Nicole-couple1 » Image Resize 80% -Edit/copy- Edit/ paste as new layer on your working image and move 14. Open the tube « 3 lampes « -Edit/copy- Edit/ paste as new layer on your working image and move 15. Effects- Plugins -Eyecandy5/blacklight-Tab-Settings- User/settings and choose my preset:- Preset '' entre deux ages'' 16. Open the tube « note fluide « -Edit/copy- Edit/ paste as new layer on your working image and move 17. Open the tube « JVDE-katya » Image Resize 80% -Edit/copy- Edit/ paste as new layer on your working image and move 18. Open the tube « racine-feerie »-Edit/copy- Edit/ paste as new layer on your working image and move Double click on this layer and set the Blendmode to "Hard Light " 19. Effects -Plugins - Xero /Fritillary with these settings
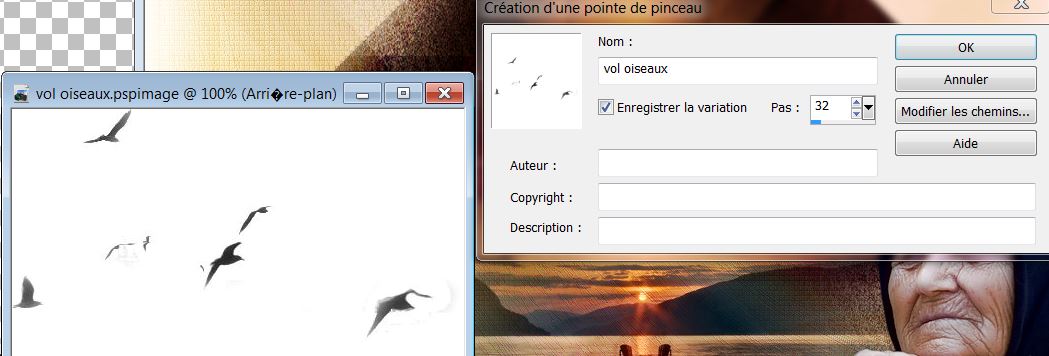
20. Open the tube « 1293385474 -enfants -nikita » in je psp Attention Activate >pierre " of this tube /Image Resize 45% /Edit/copy- Edit/ paste as new layer on your working image and move -Activate ''1293385474 -enfants -nikita'' of this tube //Edit/copy- Edit/ paste as new layer on your working image and move Layers- Merge- Merge- Down /Image Resize 45% -Edit/copy- Edit/ paste as new layer on your working image and move 21. Material palette:Set your foreground color to #fff4d1 Activate the brush image'' vol oiseaux '' in your psp - - File- Export Custom Brush-Give it a name '' vol oiseaux ''
22. Layers- New Raster layer "Activate your Brush Tool and choose the brush '' vol oiseaux '' with these settings -Apply 3 ore 4 times in the upper left corner by using your foreground color
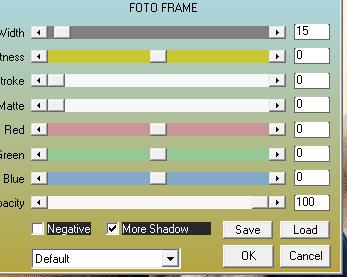
23. Layers- Merge- Merge Visible 24. Effects- Plugins AAA Frame - Foto frame /with these settings - More Shadow checked
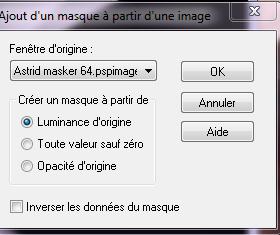
25. Layers- New Raster layer 26. Activate Flood Fill Tool and fill the layer with the foreground color #fff4d1 27. Layers- New Mask layer from Image and choose Mask:« Astrid masker 64 »
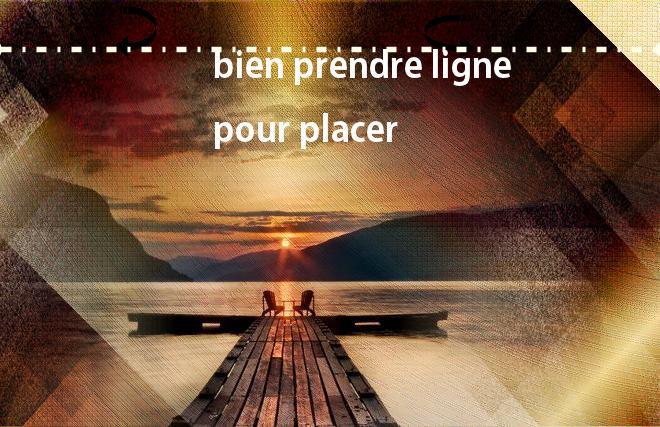
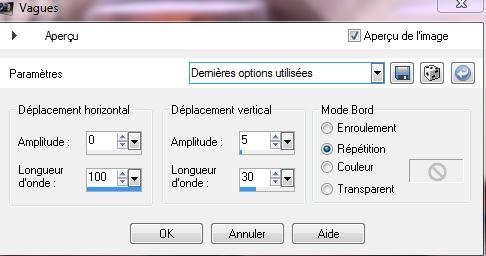
- Layers-Merge-Merge Group 28. Selections –load/save selection –load selection from disc and choose:" @renee entre deux âges" /DELETE !! 29. Selections- Deselect All Double click on this layer and set the Blendmode to "Screen " Set the layer opacity of this layer to 44% 30. Image - Add borders-Symmetric checked:5 pixels black 31. Image - Add borders-Symmetric checked:65 pixels #fff4d1 32. With the magic wand -select the border of 65 pixels 33. Openthe image '' image1''/---Edit-Copy-Edit Paste into selection 34. Effects- Edge Effects- Enhance 35. Selections- Deselect All 36. Open the tube "lampe-png" Edit/copy- Edit/ paste as new layer on your working image and move 37. Activate Text Tool-Font -" yaroslav " Size 72 /Write your text. Close your foregroundcolor- Set your backgroundcolor to black 38. Effects- Distortion Effects- Wave with these settings
39. Effects- 3D Effects-Drop Shadow with these settings
*
I am part of Tutorial Writers Inc. My tutorials are regularly recordedt ReneeGraphisme_All rights reserved
*
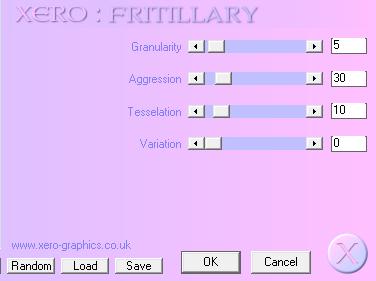
|
 Translations


 Layers- Merge- merge All- Save as JPG