|
New
Entre deux Mondes
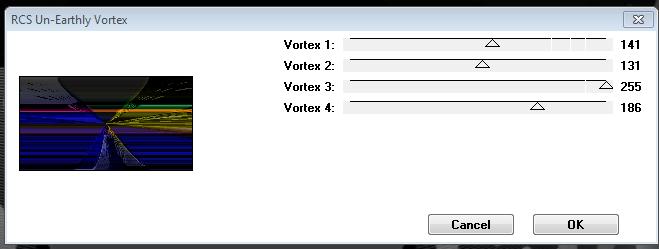
Let's start the lesson. 1. Open the Backgroundimage ''renee-entre-deux-monde-fond" -Window - Duplicate (or shift+D) - Close the original and proceed on the copy -Promote Background Layer =Raster 1 2. Layers- Duplicate 3. Effects-Plugins - Rcs Un-Earthy Vortex with these settings
4. Image- Distortion Effects-Twirl 150 5. Effects-Plugins - Andromeda perspective /Floors/Floor low - Activate the Pick Tool/Deformation tool (K)Mode Scale Pull the Top Node down to 500 high as shown in the example below
6. Open the tube ''renee-entre-deux-monde-image_2'' //Edit/ Copy-Edit - Paste as new layer on your working area and move 7. Open the tube ''renee-entre-deux-monde-cruche ''// Edit/ Copy-Edit - Paste as new layer on your working area Activate the Pick Tool/Deformation tool (K)Mode Scale place it in the right place as shown below
8. Layers- New raster layer 9. Selections - load/save selection - load selection from disk and select my file: ''renee-entre-deux-monde-selection 1'' 10. Open the tube ''feuillaga '' Edit/ Copy-Edit - Paste into selection 11. Effects-Plugins -EyeCandy5 extrude 12. Selections- Deselect All 13. Layers- Duplicate /Image Resize with 85% (Resize all the layers not checked) 14. Image Mirror - Activate the Pick Tool/Deformation tool (K)Mode Scale place it in the right place as shown below
15. Open the tube 'gnomes-roserika '' Edit/ Copy-Edit - Paste as new layer on your working area and move 16. Open the tube ''jma55bluefal_corel'' -Image Resize with 65% /Image Mirror //Edit/ Copy-Edit - Paste as new layer on your working area and move 17. Open the tube ''surfeur'' //Edit/ Copy-Edit - Paste as new layer on your working area and move//Activate the Pick Tool/Deformation tool (K)Mode Scale place it in the right place as shown below
18. Open the tube ''13-09-2006_landscape01'' // Edit/ Copy-Edit - Paste as new layer on your working area and move 19.Open the tube ''B1D6A907 » » Edit/ Copy-Edit - Paste as new layer on your working area and move/Image Resize with 65% (Resize all the layers not checked) 20. Open the tube ''renee-entre-deux-monde-chute'' coller chute 1 and chute2 / Edit/ Copy-Edit - Paste as new layer on your working area and move 21.Open the tube ''image a 1'' // Edit/ Copy-Edit - Paste as new layer on your working area and move /Set the layer opacity of this layer to 67% 22. Open the tube ''sffantasy204'' Image Resize with 50 % //Edit/ Copy-Edit - Paste as new layer on your working area and move /Double click on this layer and set the Blendmode to luminance Legacy 23. Open the tube ''-image-herbe'' /Edit/ Copy-Edit - Paste as new layer on your working area and move 24. Layers- Duplicate /Activate the Pick Tool/Deformation tool (K)Mode Scale place it in the right place as shown below
25. Open the tube ''Mtm-misted_misc-011-small-3 sept 2007'' Image Resize with 75% // Edit/ Copy-Edit - Paste as new layer on your working area and move on grass 26. Open the tube ''renee-image 4-buildings'' /Edit - Copy -Edit - Paste as new layer on your working area and move 27. Open the tube ''Alies_444-princess_and_the_frog-18032011'' /Image Resize with a 50% /Edit/ Copy-Edit - Paste as new layer on your working area and move 28. Open the tube ''sea BreezeJuli element 13 '' /Edit - Copy -Edit - Paste as new layer on your working area and move 29. Open the tube '' texte '' /Edit - Copy -Edit - Paste as new layer on your working area and move.Ore write your own text. 30. Image - Add borders-Symmetric checked: 2 pixels #668a2e 31. Image - Add borders-Symmetric checked: 20 pixels White Save as JPG
I hope you enjoyed this lesson Renée This lesson was written by Renée Placing 4 July 2012 *
Any resemblance with an existing lesson is merely a coincidence * * Don't forget to thank the people who work for us and with us. I named the tubeurs - Testers and the translators. Thanks Renée.
I am part of Tutorial Writers Inc. My tutorials are regularly recorded ReneeGraphisme_All rights reserved
*
|

 Translations