|
- Let's start the lesson. Open the Color -Palette
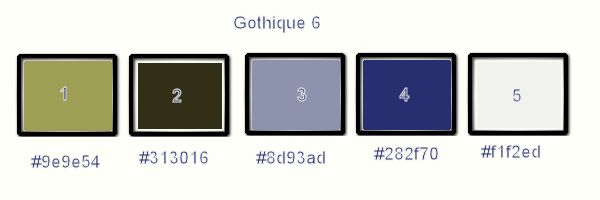
-Material Properties: Foreground color to this color : #9e9e54 Background color to this color : #313016
1. Open the Background image:
''fond_gothqiue_6"/ Promote Background to Layer= Raster 1
2.Layers- New Raster layer
- Activate Flood fill tool and fill the layer with the BG-Color
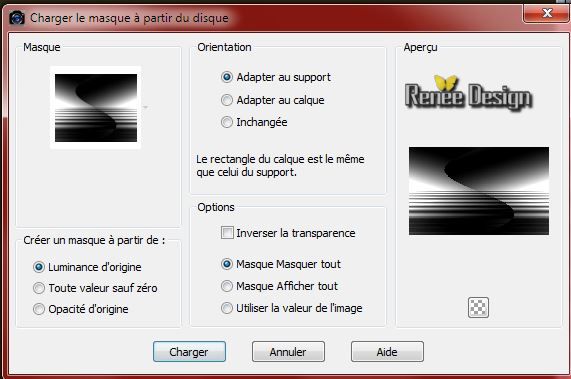
3. Layers- Layers-load/save Maske Load Mask from Disk and select Mask: "Narah_mask_0386''
- Layers- Merge- Merge Group
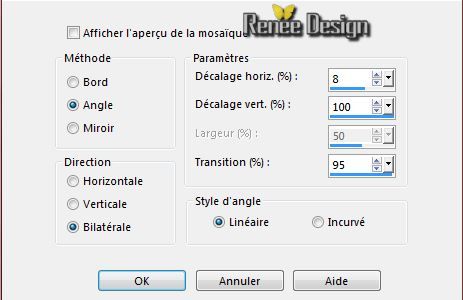
4. Effects- Plugins - Simple - Half Wrap
5. Layers- New Raster layer
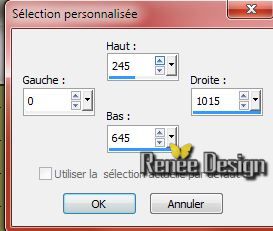
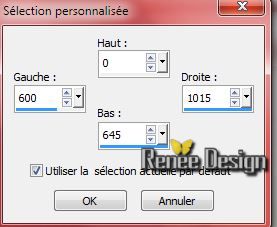
6. Selection Tool ( S ) Custom selection use settings below
- Activate Flood fill tool and fill the selection with the BG-Color
7. Selections-Modify-Contract 2 Pixels / Hit the Delete Key of your Keyboard

8.Layers- New Raster layer - Activate Flood fill tool and fill the selection with the FG-Color
Selections- Deselect All
9. Effects- Plugins - L and K's - Zitah
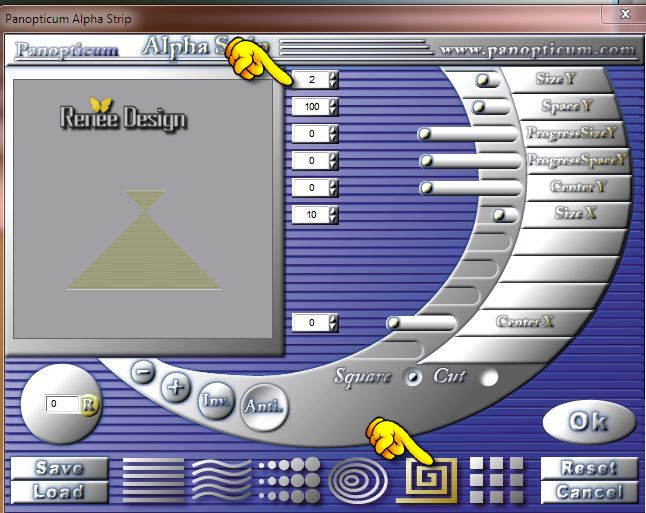
10. Effects- Plugins - Panopticum - Pan. Alplha Strip
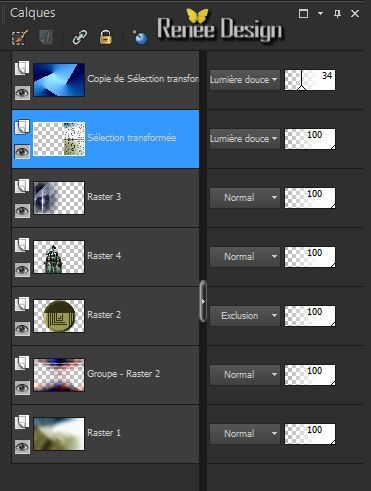
11.Layers- Merge- Merge- Down
- Layer Palette -Double click on this Layer and set the Blend Mode to "Exclusion"
12. Effects- Plugins - Unlimited 2.0
/ Render- Button Maker Round

13. Effects - 3D Effects - Drop shadow with these settings: 4/4/55/9 black
14. Repeat: Effects - 3D Effects - Drop shadow negative:
-4 / -4 /55 /9 black
15. Layer-Palette: activate layer underneath ( Group-Raster 2)
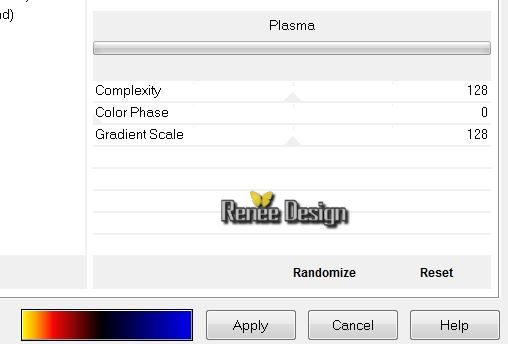
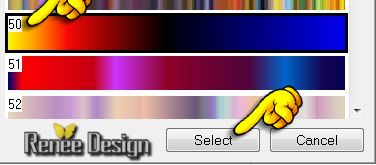
- Effects- Plugins -Unlimited 2.0 -
Render - Plasma - no 50 (click to select)
- Activate the top of the layer-Palette (Raster 2)
16
. Activate the tube ''light_in_the_dark_night_by_frozen_steampunk.pspimage''
-
Edit - Copy -Edit - Paste as new layer on your working area
17.
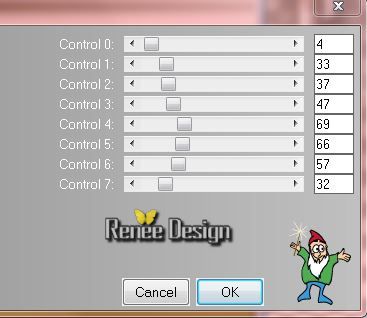
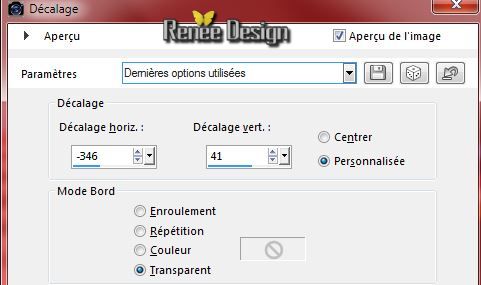
Effects-Image Effects-Offset use settings below
18.
Activate the tube
''MingYueGotiqueCircus_zps2963745c.pspimage''/Image
Resize 80%
- Edit/copy-Edit paste as a new layer on your working area . (erase the signature)
19.
With your move tool move to the left
20.
Layers- Arrange- Move Down
- Activate the bottom of the layer-Palette (Raster 1)
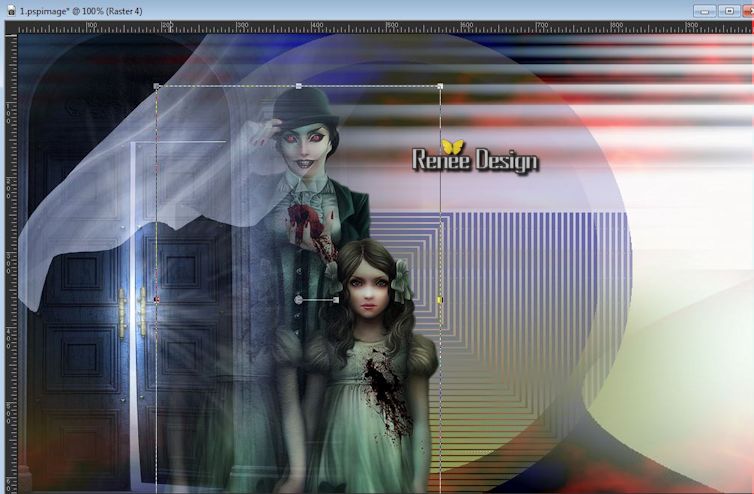
21.
Selection Tool ( S ) Custom selection use settings below
22.
Selections- Promote selection to layer
Selections- Deselect All
23.
Layers- Arrange- Bring to Top
24. Effects- Plugins - Unlimited 2.0
- Filter Factory Gallery E- Web settings at 128/0/127
25.
Layer Palette -Double click on this Layer and set the Blend Mode to "Soft Light "
26.
Layers- Duplicate
27.
Effects- Image Effects- Seamless Tiling use settings below
28.
Effects- Plugins - VM Instant Art -Three Cuts /
Default
29. Layer Palette -Double click on this Layer and set the Blend Mode to "Soft Light " and lower the opacity down to: 34 %
You are there in your work
- Layer-Palette: activate layer underneath(Promoted selection )
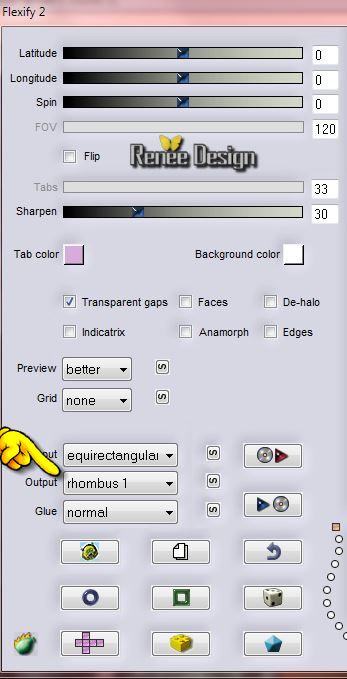
30.Effects- Plugins -Flaming Pear - Flexify 2
31.
Effects - 3D Effects - Drop shadow with these settings: 1/1/100/12 color black
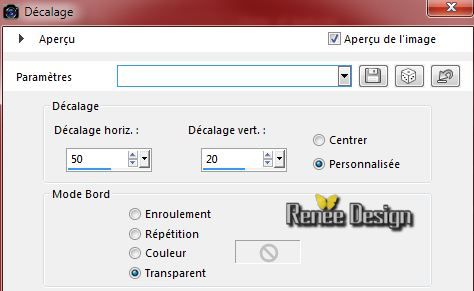
32.
Effects-Image effects-Offset use settings below
- Activate the top of the layer-Palette
33.
Activate the tube '' KRYSFANTASTIQUE-06-08-14-047.pspimage''
activate this layer of the tube (modifié pour ce tuto)
-Edit-Copy -Edit Paste as a new layer on your working area.
34.
Image Resize 75% (Resize all the layers not checked)
-With your move tool place it to the right side
35.
Layers- Arrange- Move Down 3 times ( under Raster 3)
36. Layer Palette -Double click on this Layer and set the Blend Mode to "Luminance " and lower the opacity down to: 83%
- Activate the top of the layer-Palette
37.
Activate the tube ''eclair_gothique6'' / Edit-Copy -Edit Paste as a new layer on your working area.
-With your move tool move to the upper left corner
38.
Layer Palette -Double click on this Layer and set the Blend Mode to "Difference" " and lower the opacity down to:
67
39.
Activate the tube ''chauffe_souris''
-Edit-Copy -Edit Paste as a new layer on your working area.With your move tool move to the upper left corner
40.
Effects - 3D Effects - Drop shadow with these settings: 1/1/100/12 Color white
41.
Material Properties: Foreground color no 5 -Background color to this color :#f1f2ed
42.
Text Tool - With the police: ''van-den-velde-script.font"
Size 150 points

Write "G'
-
Size 72 points
-Write ''othique''
Convert to Raster layer
-
With your move tool move to the left side - Blend Mode to "Soft Light "
43.
Activate the tube''gothique6_gouttes''
- Edit/copy-Edit paste as a new layer on your working area.. With your move tool move to the left side
44.
Layers- Merge- Merge- Visible

45.
Image - Add borders-Symmetric checked: 1 pixel Color 4
46.
Image - Add borders-Symmetric checked: 25 pixel Color 5
47.
Activate Magic Wand and click in the white border of 25
pixels
48.
Selections- Invert
49.
Effects- Plugins EyeCandy5 -Impact - Perspective
Shadow- tab Settings/User settings choose my preset: ''gothique_6_Perspectiveshadow''
50.
Selections- Invert
51.
Effects- Plugins - Adjust Variations
-Click 1x Original and 1x More Blue
Selections- Deselect All
52
Image - Add borders-Symmetric checked: 1 pixel Color 4
53.
Image - Add borders-Symmetric checked: 30 pixels Color 2
54.
Image Resize 995 pixels Width
55.
Adjust -One Step Photo Fix
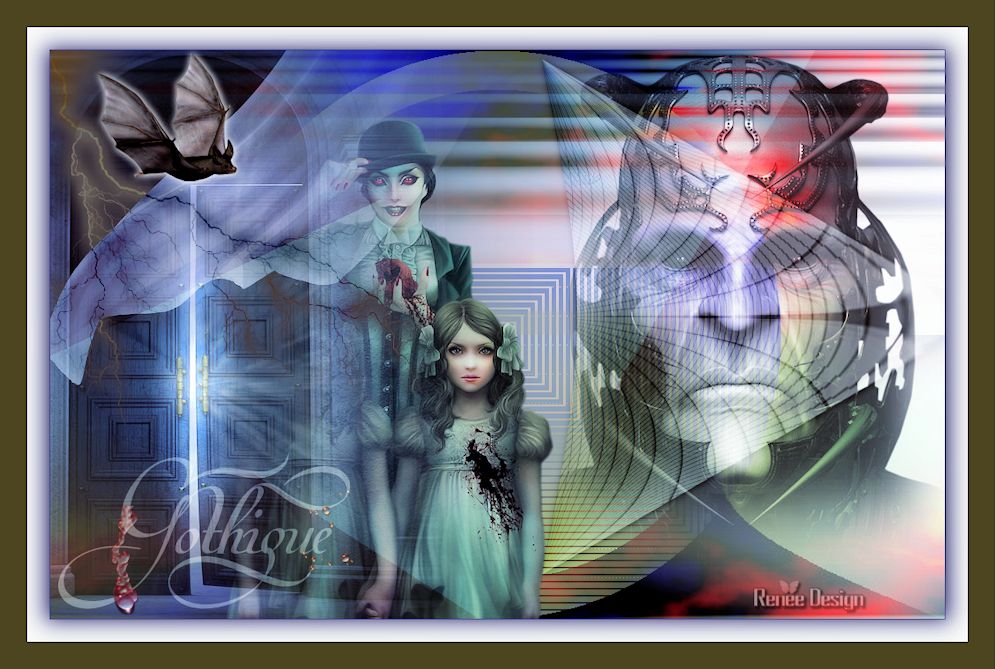
I hope you enjoyed this lesson
Renée
This lesson was written by Renée 26/08/2014
Created the
09/2014
*
Any resemblance with an existing lesson is merely a coincidence
* Don't forget to thank the people who work for us and with us. I named the tubeurs - Testers and the translators.
Thanks Renée.
|
 Translations


 All rights reserved