|
New
Translations here
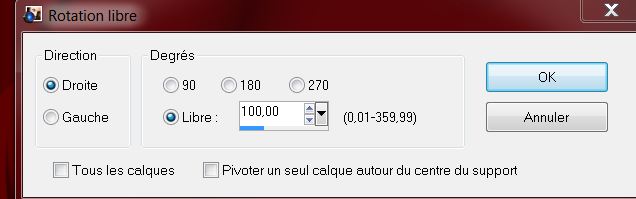
1. Open the Image fond ''gothique -fond1"Promote Backgroundlayer = raster 1' 2. Layers-Duplicate 3. Effects- Plugins - VM Instart – Tripolis Default- Repeat: Effects- Plugins - VM Instart – Tripolis Default 4. Layers-Duplicate 5. Effects- Geometric Effects -Circle /Transparent 6. Image Free Rotate 100°Right
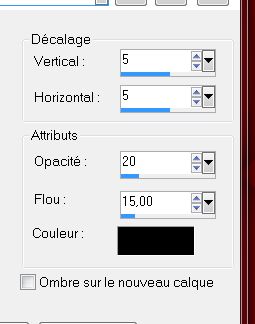
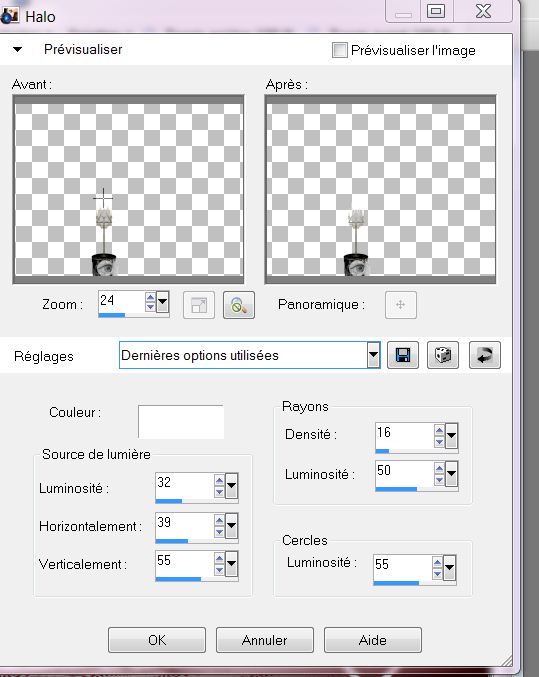
7. Effects - 3D Effects - Drop shadow use settings below
8. Repeat: Effects - 3D Effects - Drop shadow negative V -5/and H -5 9. Effects- Distortion Effects – Twirl on 100 - The result
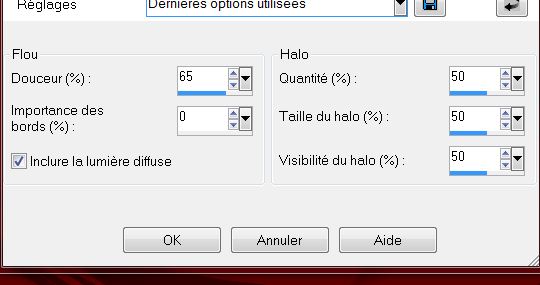
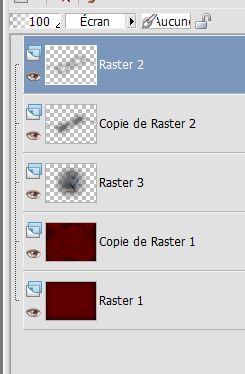
10. Activate the top of the layer-Palette. Layers - Merge- Merge Down - On this layer 11. Effects- Distortion Effects - Twirl on 720 12.Adjust-Softness-Soft Focus use the settings below
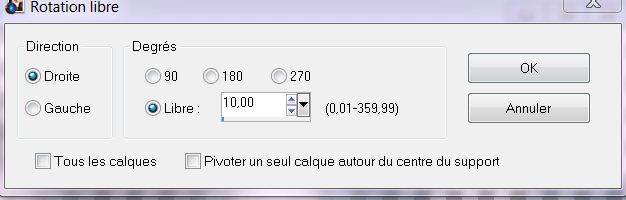
13. Effects - 3D Effects - Drop shadow with the same settings (point 7 and 8) positive and negative 14. Effects- User Defined Filter- Emboss_4 Default (In the zipfile ) 15. Open the tube ''Vanuza tube_248-misted-diversos'' Edit/copy-Edit paste as a new layer on your working area ( do not move it is in the right place ) 16. Effects- User Defined Filter- Emboss_4 Default 17. Open the tube ''gothique _image 1'' Edit/copy-Edit paste as a new layer on your working area and move 18. Image Free Rotate 10 degrees Right
19. Effects-Plugins - Mura's Seamless – Shift at wave use settings below
20. Layers- Duplicate 21. Effects- Plugins - Screenworks - Block Tile Default 22. Layers- Arrange- Move Down - Activate the top of the layer-Palette 23. Layer Palette -Double click on this Layer and set the Blend Mode to "Screen " - Your work look like this now
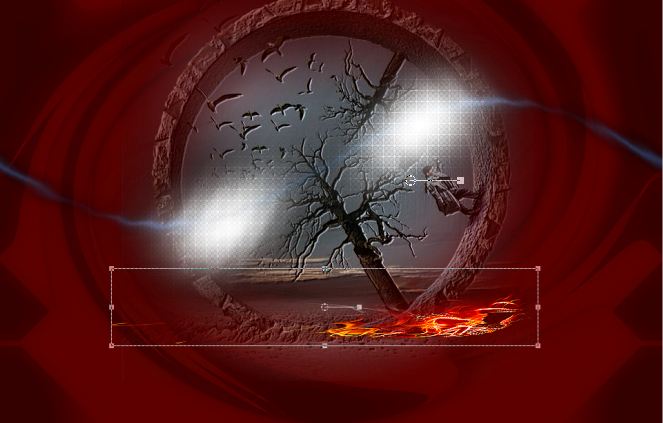
24. Open the tube ''gothique_image feu'' Edit - Copy -Edit - Paste as new layer on your working area .With your move tool place it to the right place as shown below
25. Layers- Duplicate 26. Image Mirror- Image Flip 27. Effects- Distortion Effects - Torsion on 325 28. Layer Palette -Double click on this Layer and set the Blend Mode to "Hard Light " and lower the opacity down to 75% 29. Open the tube ''gothique_image_ brouillard ''Edit - Copy -Edit - Paste as new layer on your working area.With your move tool place it to the right place 30. Open the tube ''SepiaMist-Wooden Fence 1'' activate raster 3 of the tube .Edit - Copy -Edit - Paste as new layer on your working area .With your move tool place it to the right place as shown below
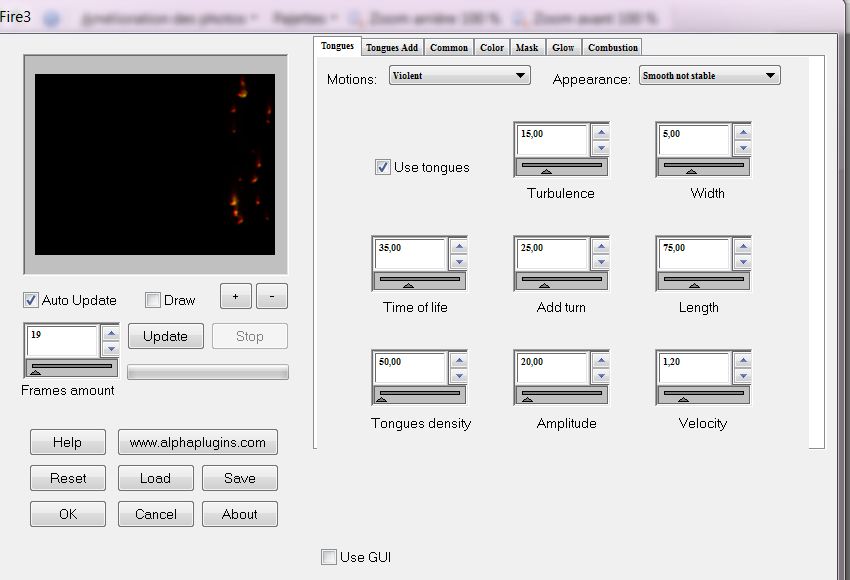
31.Open the tube ''TynaReagen2310 '' Image Mirror - Image - Resize 80% Edit - Copy -Edit - Paste as new layer on your working area .With your move tool place it to the right place 32. Layerpalette: Activate the layer with tube "Sepia mist wooden Fence 1(=raster6) 33. Open the tube ''gohique-renee_cordage_yeux ''- Image -Resize 80% Edit - Copy -Edit - Paste as new layer on your working area .With your move tool place it to the right place 34. Layers- Duplicate 35. Effects- Plugins -Panopticum -fire use settings below
it may be slightly different flames 36. Open the tube ''renee Lune ''Edit - Copy -Edit - Paste as new layer on your working area Layer Palette -Double click on this Layer and set the Blend Mode to "Hard Light " and lower the opacity down to: 71% 37. With your move tool place it to the left side (tube -Tyna reagan 2310 (the young woman) 38. Open the tube ''gothique_renee_chandelier '' /Edit - Copy -Edit - Paste as new layer on your working area and move 39. Effects-Illumination Effects- Sunburst use settings below
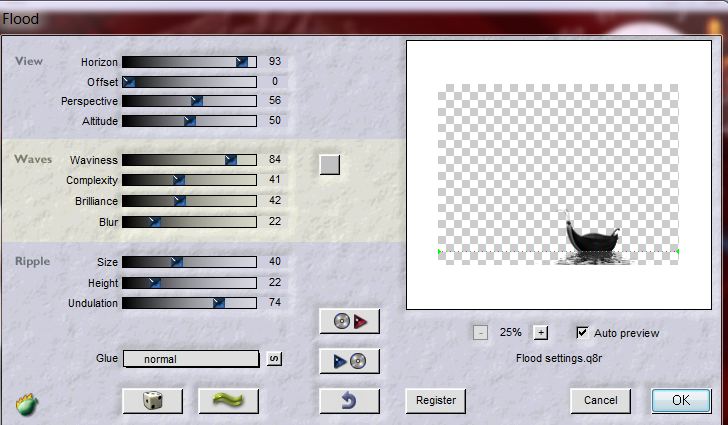
40- Open the tube ''LeafBoat-1Belle-Graphics'' .Edit - Copy -Edit - Paste as new layer on your working area .With your move tool place it to the right place 41. Effects- Plugins Flaming Pear- Flood -use settings below /adjust the setting horizon following the position of your tube
42.Open the tube ''corbeau_gothique'' Edit/copy-Edit paste as a new layer and move 43. Open the tube ''Gothic_cat_CibiBijoux'' Edit/copy-Edit paste as a new layer. With your move tool move to the right 44. Layers- Merge-Merge Visible 45. Image - add borders-Symmetric checked de 5 pixels en noir 46. Image - add borders-Asymmetric -color #57070a
47. Activate Magic Wand and click in the red border 48. Layers- New Raster layer 49. Open the tube ''grille_gothique'' Edit/copy-Edit paste into selection 50. Selections- Deselect All 51. Open the tube ''pigeon blanc Edit/copy-Edit paste as a new layer. With your move tool move to the left 52. Open the tube ''The -Book-CiBijoux'' Edit/copy-Edit paste as a new layer and move 53.Activate the Font ( in the zipfile) write your own text ore take mine. Save as JPG
I am part of Tutorial Writers Inc. My tutorials are regularly recorded
|
 Translations


 Let's start the lesson.