|
New
Translations here
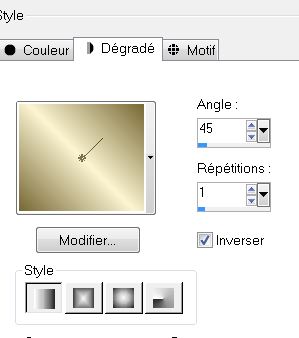
1. Open the background image ''renee_fond_how curious/-Promote Background Layer =Raster 1 2. Open the tube ''how curious_image 1/Edit/copy-Edit paste as a new layer on your working area Do not move it is the right place 3. Open the tube''Liza tube Time'' Image Resize 50% Edit/copy-Edit paste as a new layer on your working area and move 4. Layer Palette -Double click on this Layer and set the Blend Mode to Luminance Legacy 5. Effects-Plugins – Idecay/accident 128 6. Material Properties: Foreground color to this color: #fbf4d1 Background color to color #776834 7.Put your foreground on the linear gradient with settings below
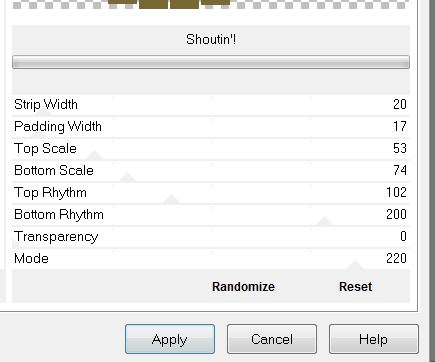
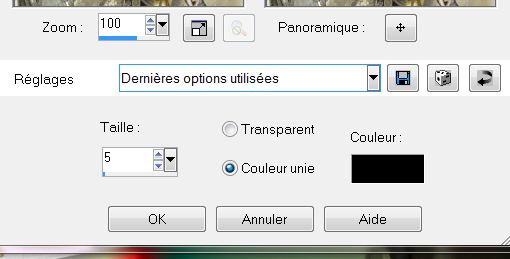
8. Layers - New raster layer/ Selections - load/save selection - load selection from disk and choose my selection: ''renee_How curious'' Activate Flood Fill Tool and fill the selection with the gradient 9. Selections- Deselect All /Layer Palette -Double click on this Layer and set the Blend Mode to Multiply 10. Layers - New raster layer / Activate Flood Fill Tool and fill the background color #776834 11. Effects- Plugins – Unlimited – Factory Gallery D / shoutin' !
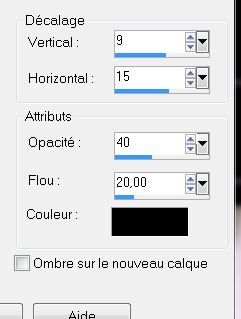
12. Effects - 3D Effects-Drop Shadow with these settings
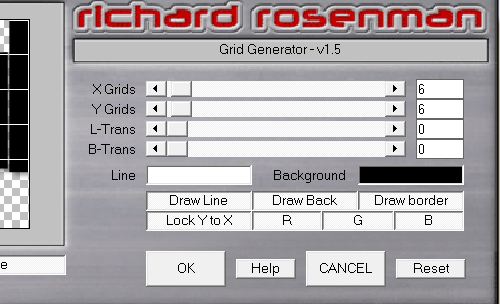
13. Effects- Plugins-Richard Roseman/Grid Generator
14. Effects- Plugins -Mura's Meister -Pespective Tilling
15. Layers- Arrange-Move Down under raster 3 Your layer palette looks like this
16. Activate the top of the layer-Palette 17. Open the tube ''Treagen_2757'' Edit/copy-Edit paste as a new layer on your working area and move
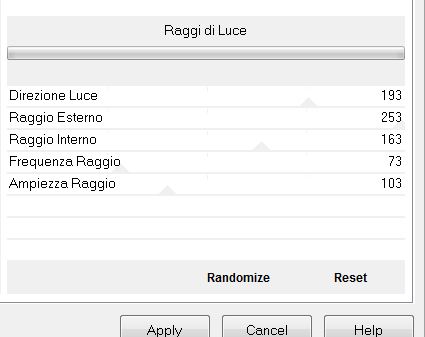
18. Effects- Plugins -Unlimited – Italian Editors – Raggi di Luce
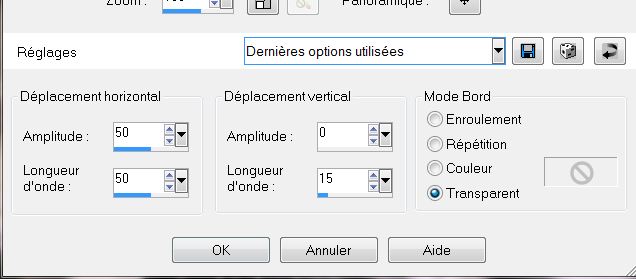
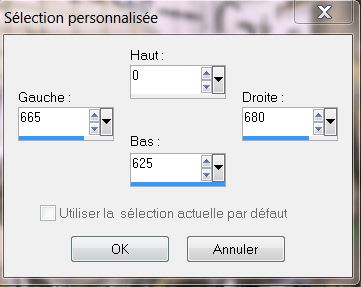
19. Layers- New raster layer 20. Selections - load/save selection - load selection from disk and choose my selection: ''renee_How curious1'' 21. Properties Foreground : Foreground color to this color: #fafafa /Pot of Paint: Change the opacity of the color to 62 % / Activate Flood fill tool and fill the selection with the foreground color 22. Selections- Deselect All 23. Effects- Distortion Effects-Wave with these settings
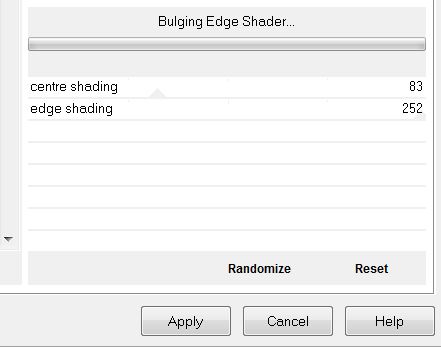
24. Layers- Duplicate / Image Mirror 25. Open the tube ''livre_L'' / Image Resize 50 % Edit/copy-Edit paste as a new layer on your working area and move 26. Effects- Plugins - Unlimited - Lumière Ambiance / Bulging Edge Shader
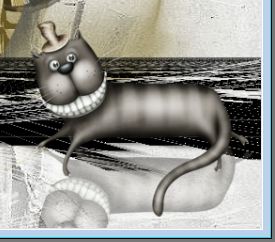
27. Open the tube ''chat_etrange_L'' Edit/copy-Edit paste as a new layer on your working area and move 28. Layers- Duplicate -Image Flip / Layers- Arrange-Move Down and move - Set the layer opacity of this layer to 44%
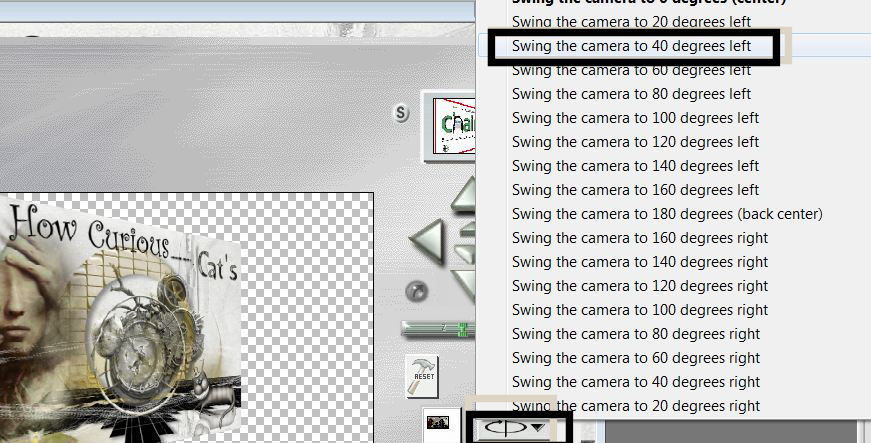
29. Layers- Merge-Merge Visible 30. Image - Resize 85% Resize all Layers not checked 31. Effects- Plugins - Andromeda - Perpective/Swing the camera to 40 degrees left
32. Edit/copy-Edit paste as a new layer on your working area and move to the left side 33. Effects-3D Effects- Drop Shadow 9/15/40/20 Black /Repeat- Drop Shadow: -9/-15 34. Layers- New raster layer 35. Seletions-Select All – Open the Image ''renee_fond_How Curious'' Edit/copy-Edit paste into selection 36. Selections- Deselect All 37. Layers- Arrange-Move Down 38. Effects- Plugins -Unlimited – Colors- Chrome using the default settings
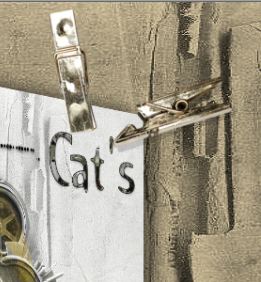
39. Open the tube ''pince_metallique_l
'' activate 2 pins Edit/copy-Edit paste as a new layer on your working area and move
EraserTool: Erase a little bit of the pins like this
40. Layer Palette: Activate the layer-with the clothespins - Effects - 3D Effects-Drop Shadow with these settings 5/5/15/0 Black 41. Open the tube ''Fantasy_cat_family_Cibibijoux'' Image Mirror -Image Resize 70% 42. Edit/copy-Edit paste as a new layer on your working area and move 43. Layers-Duplicate -Layers- Arrange-Move Down 44. Effects- Plugins -Unlimited – Distorsion Filters – Craked to 32 45. Layer Palette -Double click on this layer and set the Blendmode to Hard Light and set the layer opacity of this layer to 52% 46. Layers- New raster layer 47. Selection Tool ( S ) Custom selection use settings below
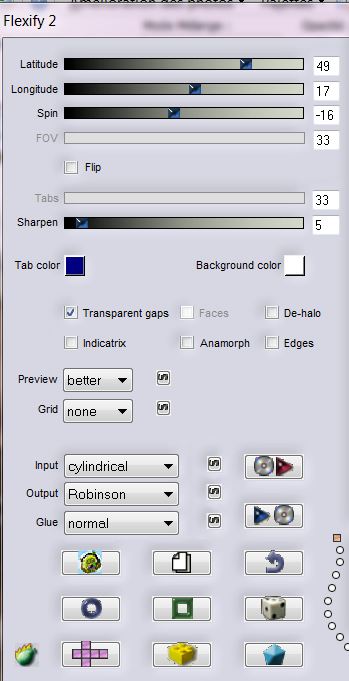
48. Activate Flood Fill Tool and fill the selection with this color #688c6b 49. Selections- Deselect All 50. Effects-Plugins - Flaming pear - Flexify 2
51. Effects- Plugins -Unlimited – Variations - Ripleyer/ using the default settings 52. Layer Palette -Double click on this layer and set the Blendmode to Hard Light 53. Open the tube ''how curious _image 2 '' Edit/copy-Edit paste as a new layer on your working area and move /Layer Palette -Double click on this layer and set the Blendmode to Luminance Legacy 54. Activate the bottom of the layer-Palette 55. Layers- New raster layer 56. Selection Tool ( S ) Custom selection use settings below
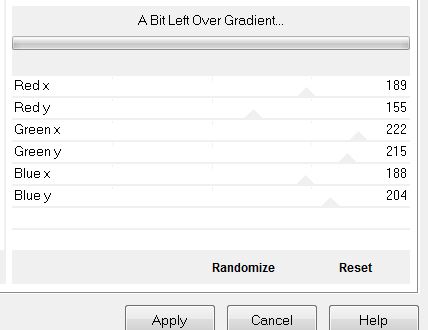
57. Activate Flood Fill Tool and fill the selection with this color #688c6b - Keep Selected 58. Effects- Plugins -Andrew's Filter Collection 56 – A bit Left Over Gradient
- Keep Selected 59. Effects-Plugins -Funhouse – Face Offset 70 60. Selections- Deselect All 61. Layers- Merge-Merge Visible 62. Image - Resize 85 % Resize all Layers not checked
63. Seletions-Select All –Selections - Float 64. Effects- 3D Effects- Chisel with these settings
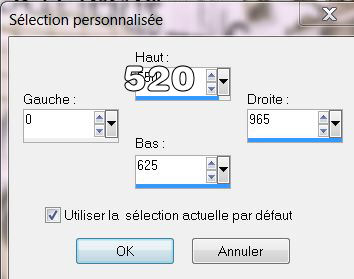
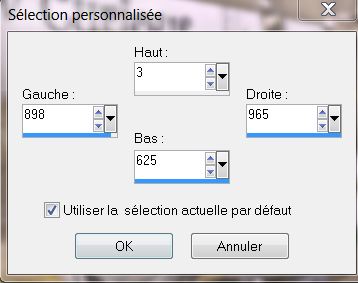
65. Selections- Deselect All 66. Layers- New raster layer – Layers-Arrange-Move Down 67. Seletions-Select All /Open the image ''image_fond_eau ''Edit/copy-Edit paste into selection 68. Selections- Deselect All 69. Activate the top of the Layer-Palette 70. Selection Tool ( S ) Custom selection use settings below
71. Coller le tube ''how_curious_image 3 ''Edit/copy-Edit paste into selection 72. Selections- Deselect All
73. Effects- Plugins Eyecandy 5 –
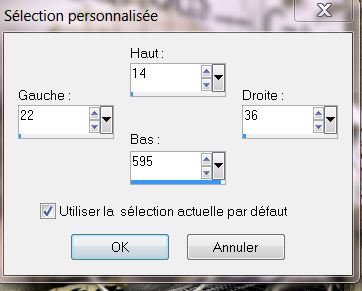
Extrude 74. Layers- New raster layer 75. Selection Tool ( S ) Custom selection use settings below
76. Activate Flood Fill Tool and fill the selection with this color #e7e7e5
77. Effects- Plugins - Eyecandy 5 extrude
-
78. Effects-Plugins - EyeCandy 5 – Black
light 79. Selections- Deselect All 80. Layer Palette -Double click on this layer and set the Blendmode to Hard Light and set the layer opacity of this layer to 66% 81. Image - Add borders-Symmetric checked: 2 pixels color #e7e7e5 82. Image - Add borders-Symmetric checked: 50 pixels color #677352 83. Magic Wand : click with your magic wand in the border of 50 pixels 84. Open the Image ''image 190 ''Edit/copy-Edit paste into selection 85. Selections- Deselect All 86. Image - Add borders-Symmetric checked: 5 pixels color #e7e7e5 87. Open the tube '' chat _2 ''Image Resize 35 % Edit/copy-Edit paste as a new layer on your working area and move 88 .Open the tube Text / Edit/copy-Edit paste as a new layer on your working area .Ore write your own text
*
I am part of Tutorial Writers Inc. My tutorials are regularly recorded. ReneeGraphisme_All rights reserved
*
|
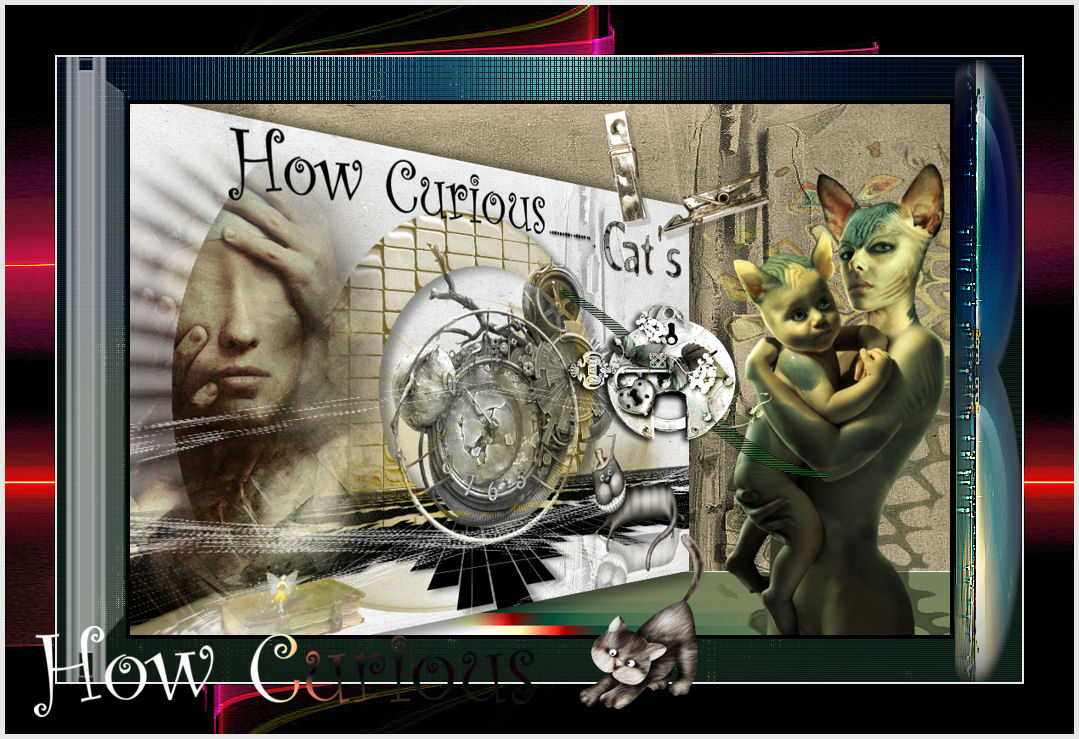
 Translations


 Let's start the lesson.