|
Let's begin
1. Open your background''fond_le_parfum_des_memoires.jpg''/Window/ Duplicate/ we will work with this. Close original.
2. Adjust-Blur-Radial Blur 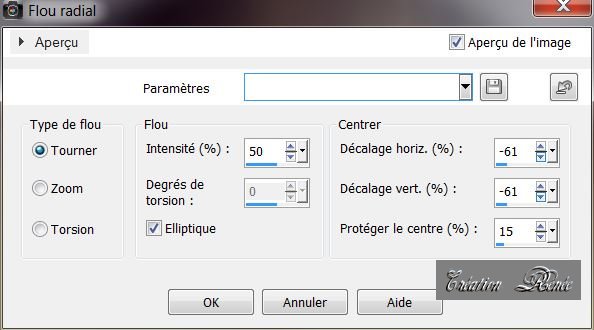
3. Material Properties: Set foreground to color #2b2c36 and background to
#b1cdd9
4. Layers - New raster layer
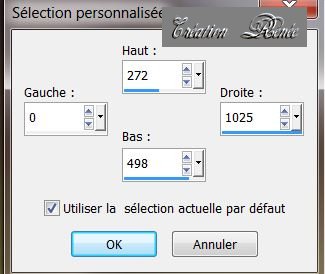
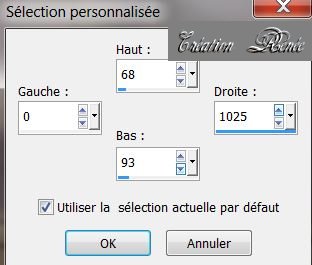
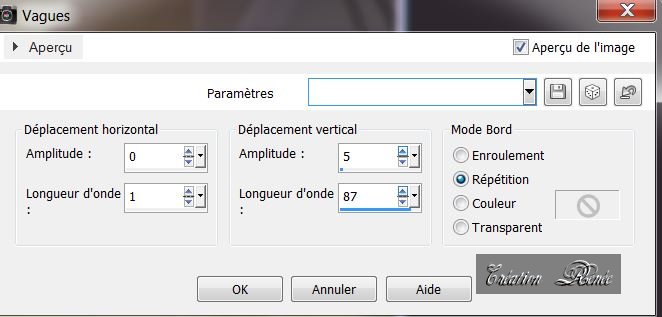
5. Selection tool - Custom selection with these settings
6. Flood Fill tool : fill the selection with your foregroundcolor
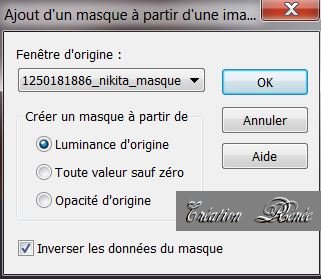
7. Layers-New mask layer from image''1250181886_nikitamasques.jpg''
8. Layers-Merge-Merge group- Selections- select none
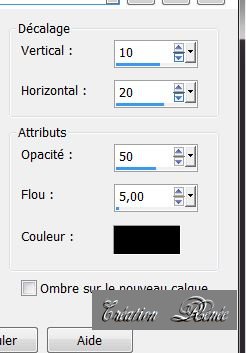
9. Effects - 3D Effects-Drop Shadow:
10. Layers-New Raster Layer
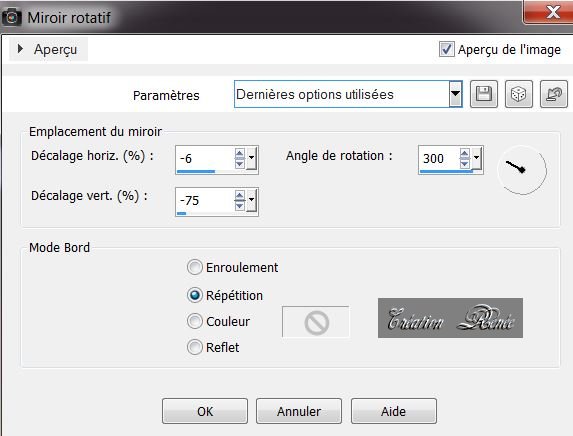
11. Effects - Reflection -Rotating Mirror
12. Layers-New Raster Layer/Image Mirror
13. Layers-Merge-Merge Down
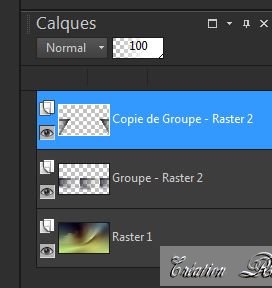
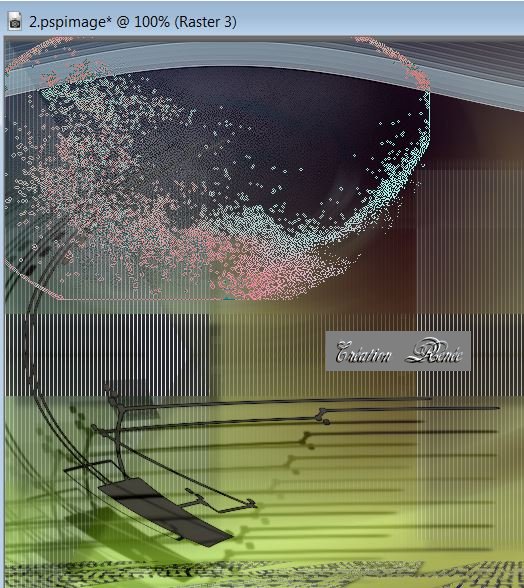
Your layer palette should look like this now
14. Layers-Merge -Merge Down
15. Effects -Plugins
Simple - 4Way average
16. Effects
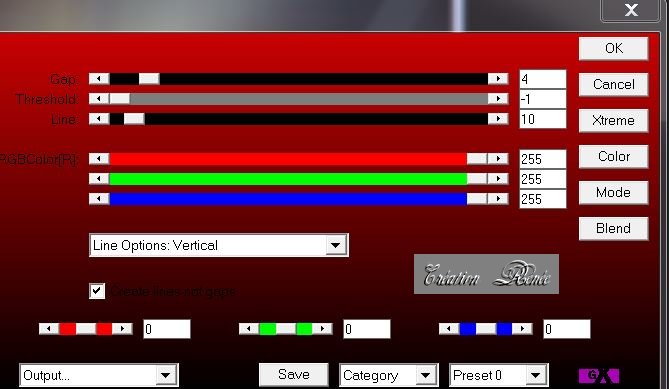
-Plugins AP01 (Innovation) / Lines Silverling
18. Effects -Plugins
EyeCandy 5 Impact - Perspective shadow-Preset
''parfum_memoires_1''
19. Layers-New Raster Layer
20. Selections - load/save selection - load selection from disk and choose ''parfum_memoire_1'' Flood Fill Tool: Fill the selection with your foregroundcolor
21. Selections-Select none
22. Layers-New Raster Layer
23. Effects-Plugins Eyecandy 5 /
Blacklight /Preset ''parfum_memoire_light''
24.
Blend Mode of this layer" Difference" and lower the Opacity to 44%
25. Layers-New Raster Layer
26. Selection tool - Custom selection with these settings
27. Flood Fill Tool -Opacity to 80%. Fill the selections with your backgroundcolor
28. Selections-Select none
29. Effects-Plugins Mura's Meister - Copies

30. Effects - Distortion Effects-Wave
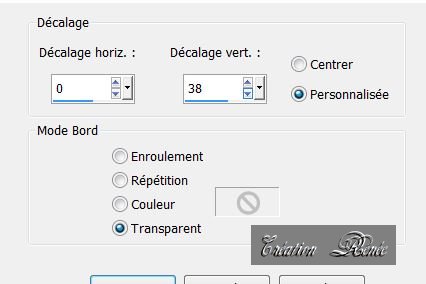
31. Effects - Image Effects-Offset
32. Lower the Opacity to 71%
33. Activate the bottom layer of the Layers palette
(raster 1)
34. Selections - load/save selection - load selection from disk and choose ''parfum_memoires_2''
35. Selections - Promote-selection To Layer
36. Effects- 3D Effects-Drop Shadow:

Repeat Drop Shadow 0/ and -5
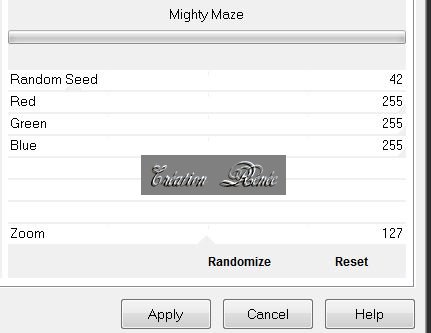
37. Effects - Plugins VM
1-Mighty Maze-Zoom a 127
38. Selections-Select none
39. Effects -Plugins Unlimited 2.0 /
Pshychosis / Acid Litho 14/14/14
40. Effects- Plugins Mura's Meister /
Perspective Tilling
41. Effects - Edge Effects-
Enhance
42. Aktivate the top of the Layers palette
43. Layers-New Raster Layer
44. Open your Brush ''pinceau_parfum_memoires ''
In your psp> -File -Export- Custum Brush
/Give a name ''pinceau_parfum_memoire''
45. Open your Brush
-''pinceau_parfum_memoires '' with these settings

46 . In the color palette / Set foreground to color white- Stamp 4 to 6 times see Example
47. Effects - Edge Effects-Enhance
Activate the bottom layer of the Layers palette (raster
1)
48. Open the tube ''effet_Flash'' Edit/copy-Edit/paste as a new Layer
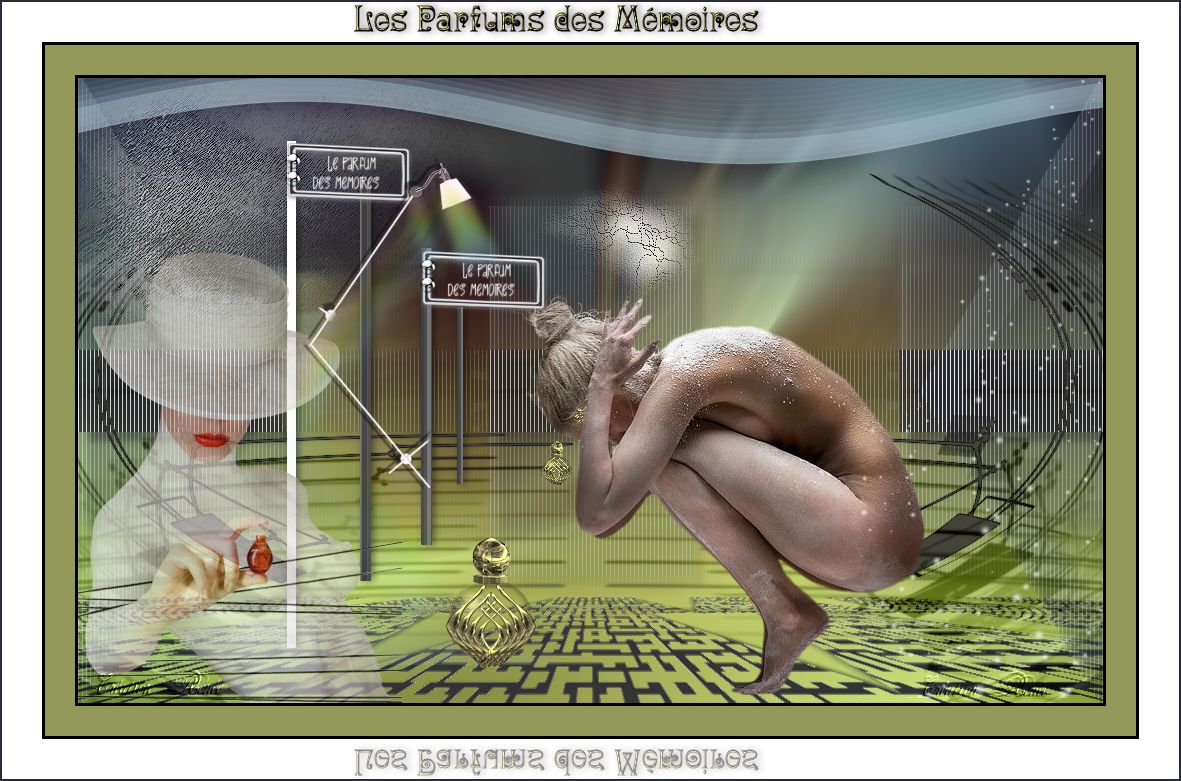
49. Good place like this
52.
Blend Mode of this layer" Difference" and lower the Opacity to 44%
53. Aktivate the top of the Layers palette
54. Open the tube
''parfum_memoires_barres '' Edit/copy -Edit/paste as a new Layer
55. Effects - Image Effects -Offset: H= - 211 and V = - 5
56. Open the tube
''parfum_memoires_petit_cadre '' Edit/copy -Edit/paste as a new Layer
Layers-Duplicate
and place
57. Layers-Merge-Merge Down
58. Layers-New Raster Layer/In the color palette / Set foreground to color white
59. Open Brush '''pinceau_les_parfums_des_memoires''- In your psp> -File -Export- Custum Brush
-Give a name .Stamp 2 times into the 2 Frames see Example
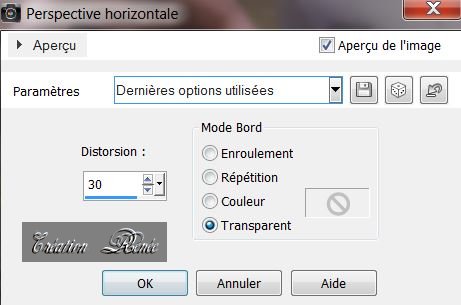
60 For the two frames take a new layer for each brush. Layers-Merge -Merge Down.Effects-Geometric Effects - Perspective Horizontal
61. Open the tube ''renee_clous'' Edit/copy-Edit/paste as a new Layer and place. Layers -Duplicate. Place them on the other signboard/ Layers-Merge Merge Down
62.
Blend Mode of this layer" Hard Light "
63. Open the tube
''woman226-ByHebe'' Edit/copy-Edit/paste as a new Layer and place
64. Open the tube
''calguisbodypaint719'' Edit/copy-Edit/paste as a new Layer
65. Place left and lower the Opacity to 63%
66. Open the tube
''Renee_parfum_2011''/ (Activate your tube layer 2) Edit/copy-Edit/paste as a new Layer
67. Effects
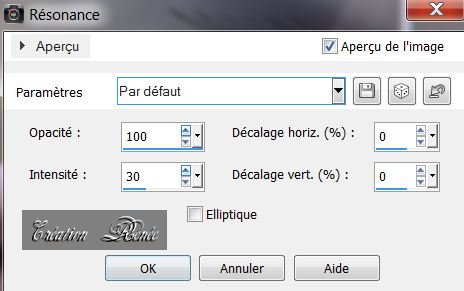
-Reflection Effects -Feedback
68. Everything is at the right place
69. Layers-Merge-Merge Visible
70. Open the tube
''parfum_memoires_lampe'' Edit/copy-Edit/paste as a new Layer and place
71. Open tube ''parfum_memoires_carquelures'' Edit/copy-Edit/paste as a new Layer and place
72. Layers - New Raster Layer
73.Selections - load/save selection - load selection from disk and choose ''parfum_memoires_4''
74. Color palette: Forgroundcolor: white. Flood Fill Tool - Opacity to 30 % / Food-Fill-Tool : click 2 x with your foregroundcolor into the selection
75. Selections-Select none
76. Layers-Merge-Merge Visible
77.Image - Add Borders - Symmetric checked 3 pixels in black
78.Image - Add Borders - Symmetric checked 30 pixels #92995a
79. Image - Add Borders - Symmetric checked pixels in black
80.Image - Add Borders - Symmetric checked 40 pixels in blanc
81.Image - Add Borders - Symmetric checked 2 pixels in noir
Layers-Merge-Merge All ( Flatten )
I hope you enjoyed this lesson
This lesson was written by Renée at
22/09/2013

| 
 Translations