|
Let's start the lesson
1.
Open the Image '' fond _ma_planete" - Promote Background Layer=raster 1
2.
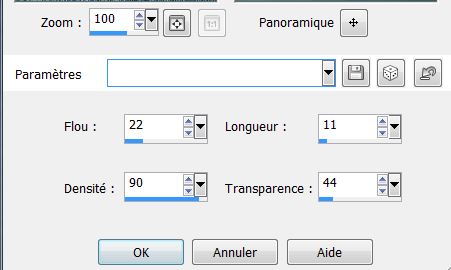
Effects -Textur Effects- Fur/use settings below
Layer-Duplicate
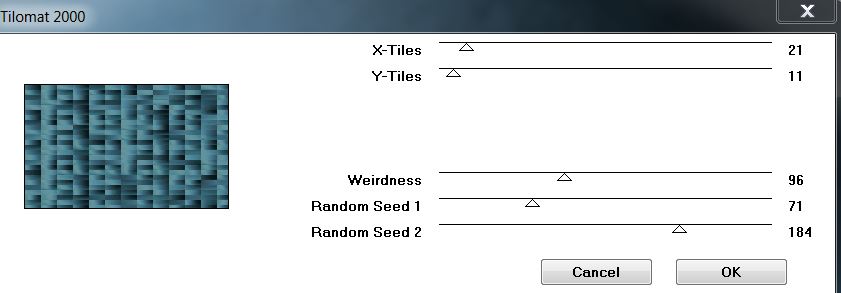
3. Effects-Plugins - VM Distorsion- Tilomat/use settings below
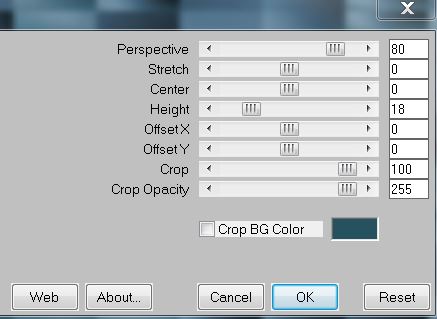
4. Effects-Plugins Mura's Meister - Perspective
Tilling/use settings below
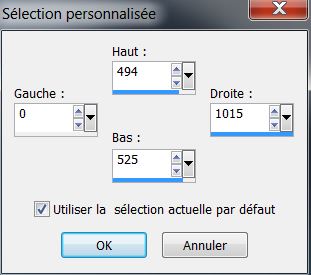
5.Selections-Custum Selection /use settings below
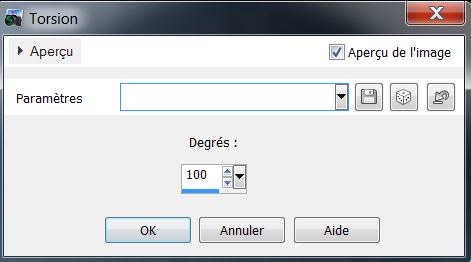
6.Effects-Distortion Effects -Twirl 320
7. Selections-Deselect All
8.Effects-Distortion Effects- Twirl 100
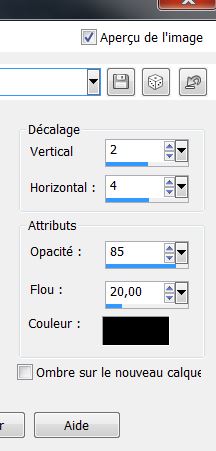
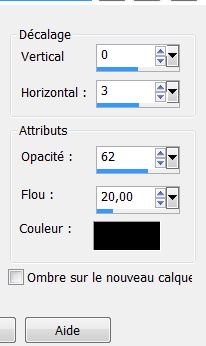
9.Effects - 3D Effects - Drop shadow//use settings below.
10. Open ''tube_1'' Edit-Copy-Edit Paste as a new layer
11. Effects/Image Effects/Offset/use settings below

12. Effects-Plugins -Filtre Buz Pro.3
Click twice to open the Insert Two windows are opened and select Simplifier three- OK
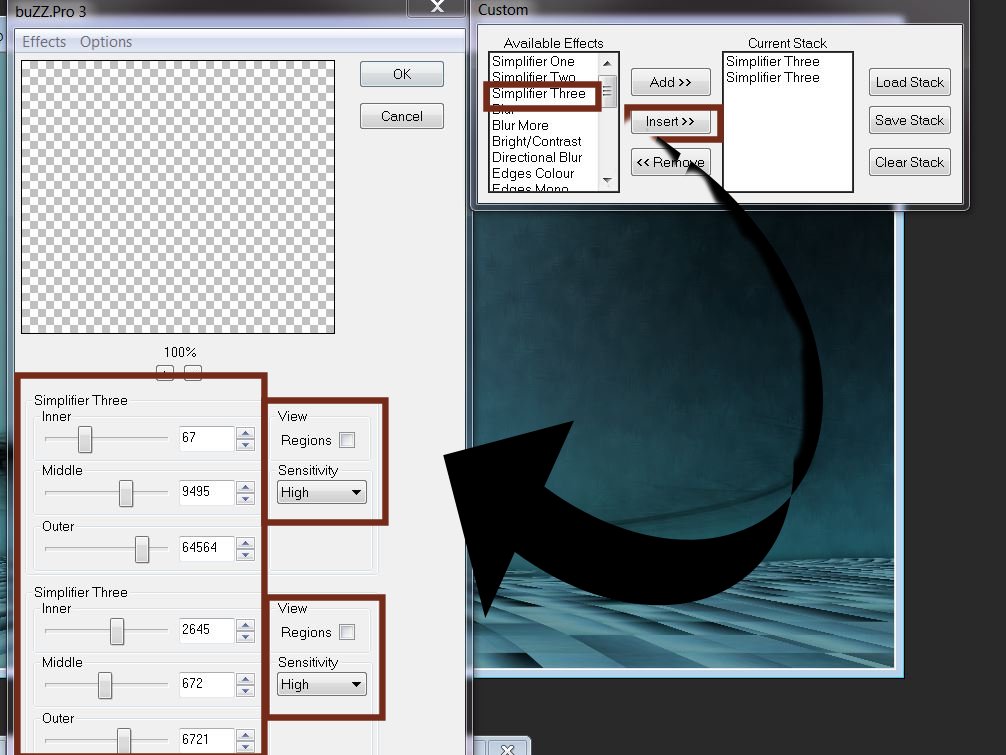
The filter will be applied with the parameters of the first table
Repeat the same filter with the parameters of the second table
13. Effects-Edge Effects-Enhance
14. Layers - add a new raster layer
/Flood fill tool:fill it with white
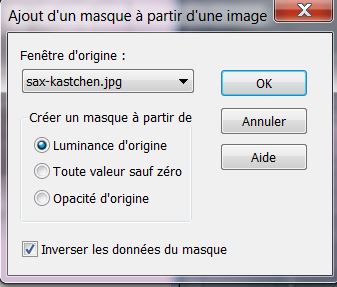
15. Layers-new mask layer from image and select: ''sax-kastchen''/
check invert mask data
16. Layers-Merge- merge group
17. Effects-Distortion Effects-Warp use setting below
18. Effects-User Definined Filter- Emboss
3 - Default
19. Layers- New raster layer
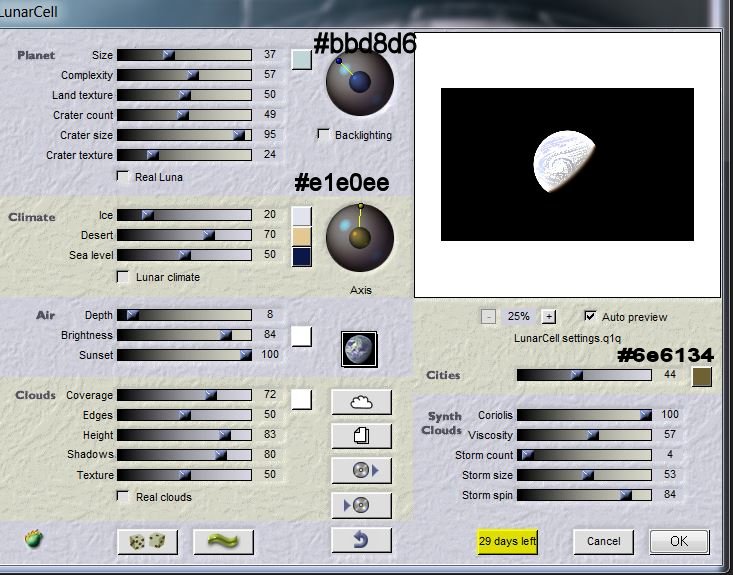
20. Effects-Plugins Flaming Pear / Lunar Cell /use settings below
21. Effects-Plugins Transparency - Eliminate
Black
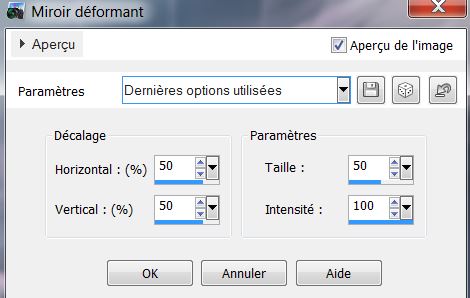
22. Layers-Duplicate/ Image-Mirror
/Image -Flip
23. Opacity of this Layer to 26
( Copy of Raster 3)
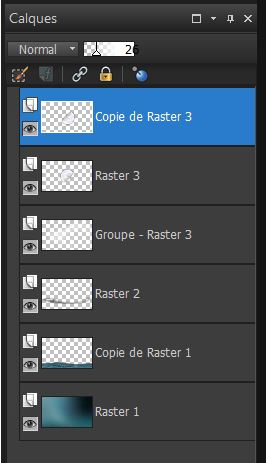
24. Layer Palette look like this now:
25. Layers-Merge-Merge Down
26. Image Resize 75 % Resize all Layers not checked
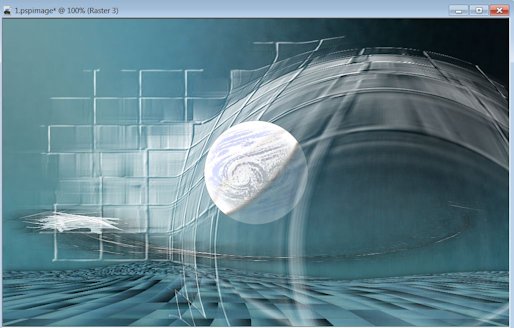
27. Your work look like this now:
28.Effects - 3D Effects - Drop shadow:
1/1/85/14 color black
29. Layers - add a new raster layer
30. Selections - load/save selection- load selection from disk and select my file:
''ma_terre_1 ''/Activate flood fill tool and fill the selection with color white
31. Selections- Deselect all
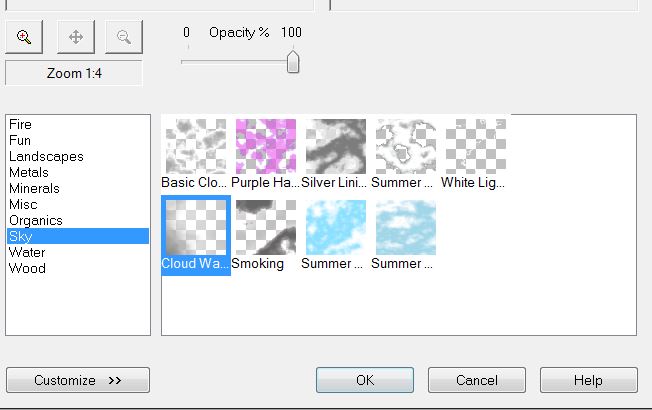
32. Effects-Plugins Xe Xtras Elemental -Sky
- Cloud wave
33. Open tube ''flaque_eau''
Edit - Copy -Edit - Paste as new layer on your working area
34. Layers-Duplicate -With your move tool move to the left
35. Layers-Merge-Merge Down
36. Open tube ''textura ''
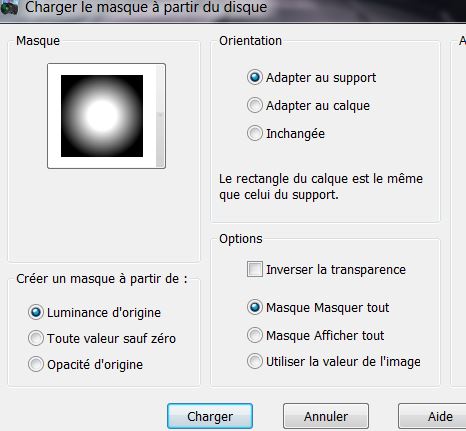
On this tube: Layers-Maske- Load/Save Mask -Load Mask From Disk and choose: ''masque
20/20''
37. Layers-Merge-Merge group/
Edit - Copy -Edit - Paste as a new layer
38. Do not Move !!!!/Set the Layer Opacity of this Layer to 59%
39. Open the tube '' The PuppetsDoll-UKA-Sassy'' /
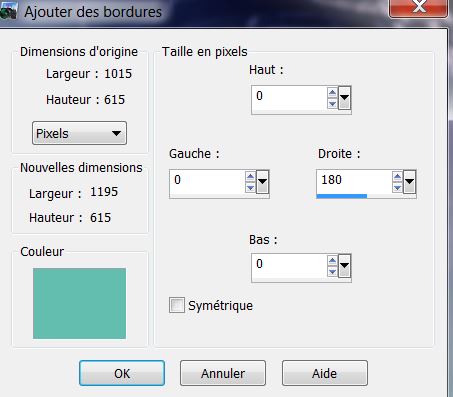
Image Resize 56 % Edit - Copy -Edit - Paste as a new layer
40. And Place/ Change the Blend mode to "Luminance" /Set the Layer Opacity of this Layer to 67
41. Layers - add a new raster layer
42. Selections - load/save selection- load selection from disk and select my file: ''ma_terre_2'' Flood Fill Tool: fill the selection with this color #263b42
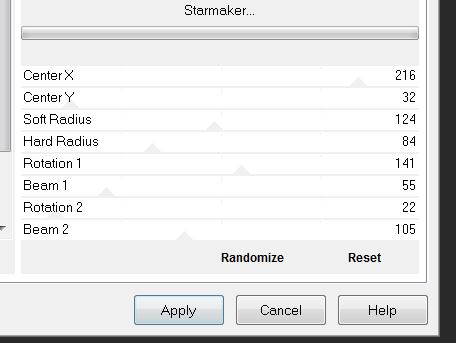
43. Selections - Deselect all
44. Effects-Edge Effects-Enhance More
45. Layers-New raster layer
46. Selections - load/save selection- load selection from disk and select my file: ''ma_terre_3'' Flood Fill Tool: fill the selection with this color #263b42
47. Effects-Plugins - ICnet Filters - Special effect 2- Puzzle (scaled)
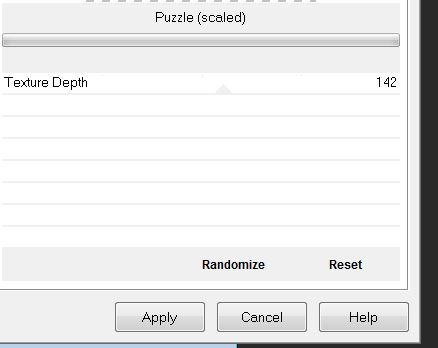
48.Keep Selected
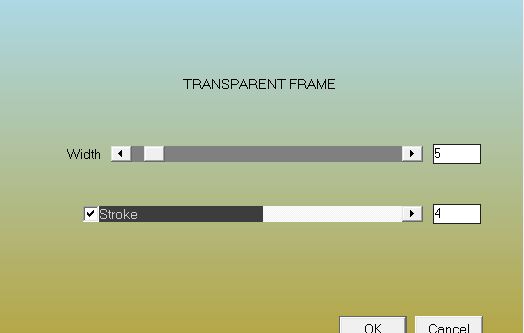
49. Open the tube ''1901dwtubes'' Edit - Copy -Edit - Paste as new layer on your working area and move
50.Place like this
51. DELETE
52. Selections - Deselect all/ Layers- Arrange- Move down
53.
Layer Palette -Double click on this Layer and set the Blend Mode to "Luminance" and set the Layer Opacity of this Layer to 67 %
54. Activate the top of the layer-Palette
55. Layers - add a new raster layer
56. Selections - load/save selection- load selection from disk and select my file: '' ma_terre_4'' Activate flood fill tool and fill the selection with color white
57. Selections-Deselect All
58. Layers-Merge Merge Visible
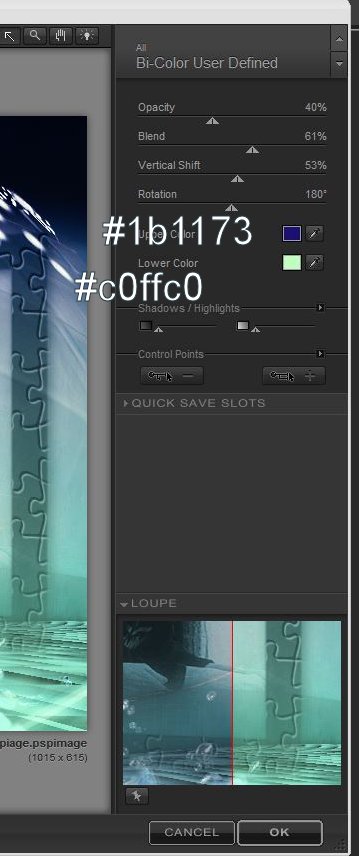
59. Effects-Plugins
Nick Color Pro.3 - Bi -Color User Defined
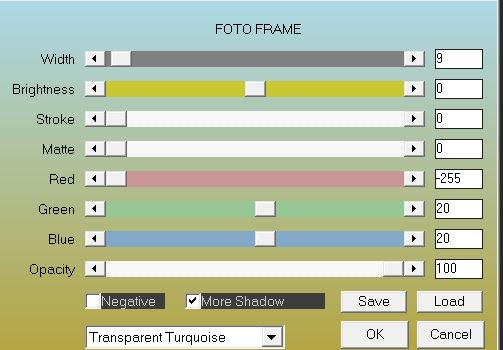
60. Effects-Plugins AAA Frame - Foto Frame
61. Image Add-Borders-Asymmetric -with color #63beb0
62. Select the 180 pixels border with the magic wand .
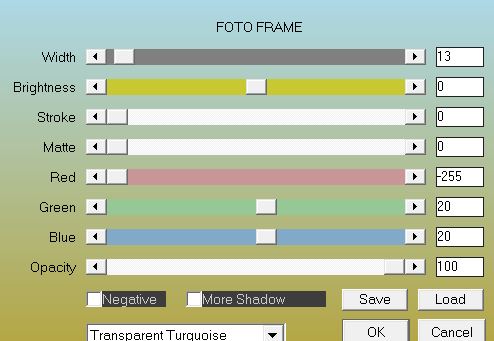
63 Effects-Plugins AAA Frame - Foto Frame
64.Selections- Deselect all
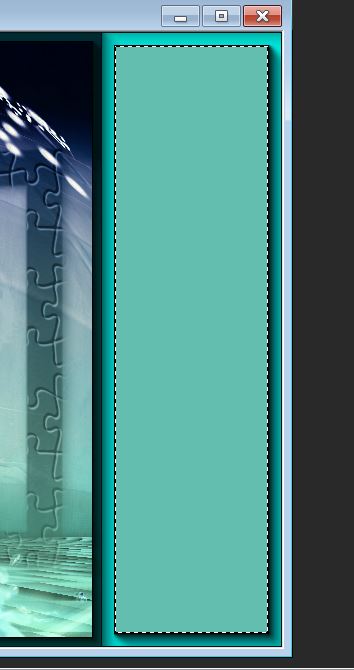
With the magic wand or selection rectangle (S) tool select this part
65. Effects-Plugins VM Natural - Starmaker /use settings below
66. Selections- Deselect all
67. Open the tube ''yoka-Vogel-met-vis-23062011'' Image resize 55% and 75 %/ Image Mirror
68.
Edit - Copy-Edit - Paste as new layer on your working area and move to the right side:/ Change the Blend mode" to "Luminance"
69. Effects - 3D Effects - Drop shadow//use settings below.
70.Image - Add Borders - Symmetric checked 10 pixels color white
71. Effects-Plugins AA Frame - Transparent Frame
72.Activate Text Tool-Font: ''Kismet Normal ''write or paste the title to your taste
I hope you enjoyed this lesson
Thanks !
This lesson was written by Renée the 21/08/2013

|


 Translations