|
New
MELODIE Translations
Filtres
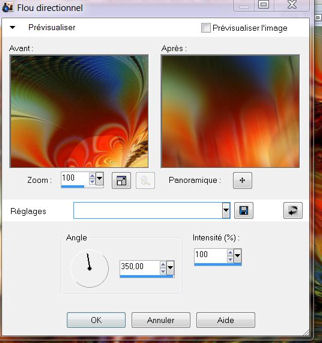
Let's start the lesson. 1. File-Open a new transparent image of 850 x 650 pixels 2. Selections- Select All 3.Open the '' image fractales2'' Edit-Copy-Edit Paste into selection 4. Selections- Deselect All 5. Effects- Image Effects- Seamless Tiling user the default settings 6. Adjust- Blur- Motion Blur with these settings
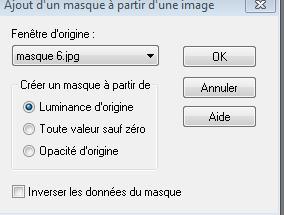
7. Repeat : Adjust- Blur- Motion Blur with these settings: Angle = 94 and Strength = 100 8. Layers- Duplicate 9.Layers- New Mask layer from Image and choose Mask: « masque 6 »
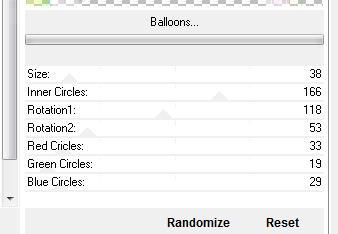
11. Effects- Edge Effects- Enhance -More 12. Effects- Plugins -Unlimited2.0 - &<Bkg Designer fs10 I/ Balloons
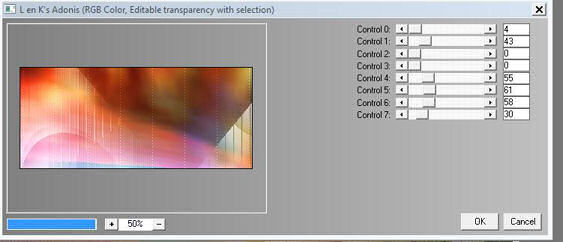
13. Layer Palette - Double click on this Layer and set the Blend Mode to "Luminance "-Set the layer opacity of this layer to 79% 14. Layers- Duplicate 15. Effects- Geometric Effects /Perspective Horizontal -Distorsion =100 Repeat checked 16. Layer Palette - Double click on this Layer and set the Blend Mode to "Screen "-Set the layer opacity of this layer to 79% 17. Layers- Merge- Merge Visible 18. Selections –load/save selection –load selection from disc and choose my selection: @renee -melodie1 19. Effects- Plugins - L en K's /Adonis use settings below
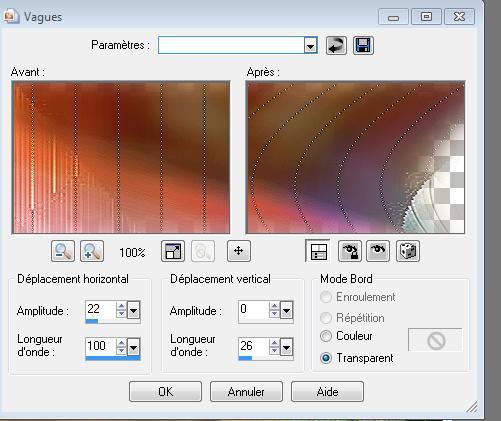
20. Selections- Promote selection to Layer 21. Effects- Edge Effects- Enhance 22. Effects- Distortion Effects- Wave with these settings
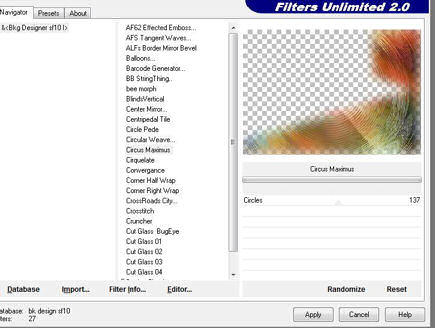
23. Selections- Deselect All 24.Layer Palette - Double click on this Layer and set the Blend Mode to "Luminance- Legacy "-Set the layer opacity of this layer to 87% 25. Effects- User Defined Filter - Emboss 4 using the default settings - **Preset Emboss 4 ››C:\Users\YourName\Documents\My PSP-files\extract in to the folder preset -Included into the zipfile ** 26. Activate the bottom of the Layer Palette (merged) 27. Selections –load/save selection –load selection from disc and choose my selection:''@renee-melodie2'' 28. Selections- Promote selection to Layer 29. Selections- Deselect All 30. Effects- Plugins -Unlimited 2.0 - &<Bkg designer sf10 /Circus Maximus a 137
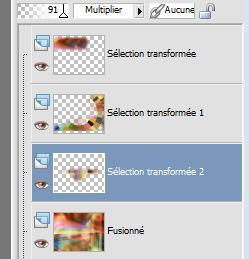
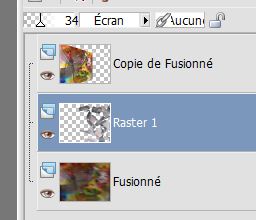
31. Effects- Edge Effects- Enhance -Stay on this Layer 32. Effects- Plugins -Unlimited 2.0 -Factory Gallery J /cicle cell 11/66 33. Effects- User Defined Filter emboss 4 using the default settings 34. Layer Palette - Double click on this Layer and set the Blend Mode to "Hard Light "-Set the layer opacity of this layer to 67% 35. Activate the bottom of the Layer- Palette ( Merged) 36. Selections –load/save selection –load selection from disc and choose my selection: ''@renee-melodie3'' 37. Selections- Promote selection to Layer 38. Effects- Plugins - Birgits chaos /Embroidery 255/255/255/255/0 39. Selections- Deselect All 40. Layer Palette - Double click on this Layer and set the Blend Mode to "Multiply "-Set the layer opacity of this layer to 91% Layer palette look like this now
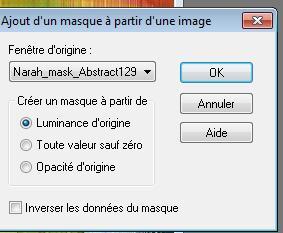
si vous trouvez la couleur trop clair appliquer le filtre adjust variation - clic sur darker pour obtenir une meilleur couleur-moi je l'ai fait 43. Layers- New Raster Layer 44. Color-palette:Set your foreground color to color #e7d4ca -Activate Flood Fill Tool and fill the layer with the foreground color #e7d4ca 45.Layers- New Mask layer from Image and choose Mask: Narah_mask_ Abstract129
46. Effects- Edge Effects- Enhance More 47. Layers- Merge- Merge Group 48. Image Mirror(CTRL + B ) 49. Effects- 3 D Effects- Drop Shadow with these settings- Color black
50. Layers- Duplicate 51. Open the tube « kikirou 1380 » Edit/ Copy-Edit - Paste as new layer on your working image 52. Effects- Image Effects- Offset with these settings
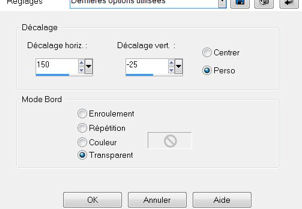
53. Open the tube « jh hanna _300 » -Image resize to 80% (your choise) -Edit/ Copy-Edit - Paste as new layer on your working image 54. Effects- Image Effects- Offset with these settings
- Move on the left as shown in the example below-Make sure you use the right settings
55. Layer Palette - Double click on this Layer and set the Blend Mode to "Luminance -Legacy "-Set the layer opacity of this layer to 69% 56. Layers- Merge- Merge Visible 57. Layers- Duplicate 58. Effects- Plugins - Andromeda perspective - Side walls - It open close
- To replace the top of the layer palette ( copy of merged layer ) 59. Effects- Plugins-EyeCandy5 -Impact /blaclight --tab Settings/User settings choose my preset "renee melodie blacklight" 60. Activate the bottom of the layer palette (Merged Layer) 61. Adjust- Blur- Motion Blur with these settings: Angle = 110 and Strength = 100 62. Effects- Plugins -Vanderlee/ Unplugged X / TV RGB Settings - transparency = 0 >> difference checked
63. Open the tube « partitions « Edit/ Copy-Edit - Paste as new layer on your working image 64. Effects- Image Effects- Offset with these settings
65. Layer Palette - Double click on this Layer and set the Blend Mode to "Screen "-Set the layer opacity of this layer to 34% 66. Effects- User Defined Filter Emboss 4 using the default settings - Layer palette look like this now
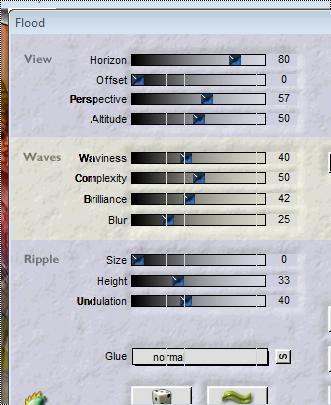
67. Activate the bottom of the layer palette (Merged Layer) 68. Effects- Plugins- Flaming pear - Flood use settings below
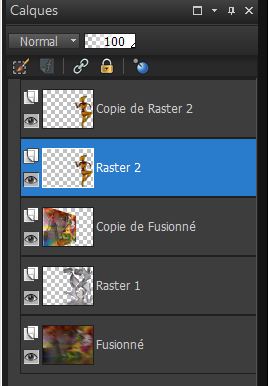
69. In the Layer Palette- Make Raster 1 active -Effects- Plugins- Flaming pear - Flood with the same settings 70. Open the tube « alien -tube -by -thafs / Image Resize to 80% 71. Edit/ Copy-Edit - Paste as new layer on your working imageand move to the right side 72. Layers- Duplicate - Activate the layer underneath = (raster 2)
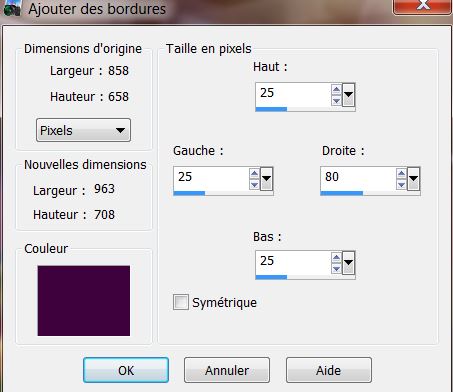
73. Effects- Plugins - Eyecandy5 - Impact /blacklight --tab Settings/User settings choose my preset "renee melodie blacklight" 74. Layer Palette - Double click on this Layer and set the Blend Mode to "Difference "-Set the layer opacity of this layer to 14% 75. Is all in place? 76. Image - Add borders-Symmetric checked: 2 pixels #e7d4ca 77. Image - Add borders-Symmetric NOT checked: #40003f
78. Click on your Text Tool/-(Font included in the zip ) Write your Text Save as JPEG
I hope you enjoyed this lesson
My tutorials are registered regularly ReneeGraphisme_All rights reserved
|
 Translations