11. Layers- New raster layer
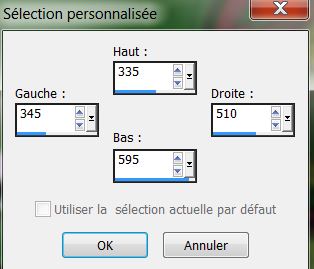
12. Selections - load/save selection - load selection from disk and choose my selection ''renee-moments_1''
13. Open image ''szefze: ''Edit/copy- Edit/ paste into selection
14. Selections- Deselect All
15. Effects- Plugins - EyeCandy 5-Impact -Extrude-tab Settings/User settings choose my preset: ''reneemoments_extrude''
16. Effects- Plugins - Flaming Pear Flexify 2
17. With the magic wand -select
inside like this
18. Layers- New Raster layer
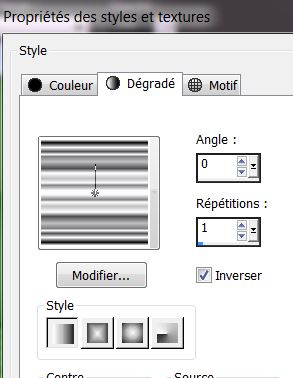
19. Flood Fill Tool: fill the selection with the linear gradient
: Angle: 130 Repeats =
2/ Invert not checked
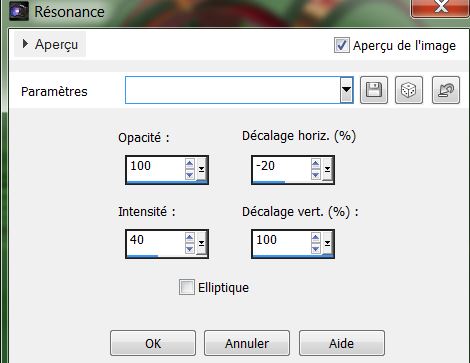
20. Effects- Plugins Sapphire Filters 13/Sapphire
Plugin_1264/ Factor at 47
21. Open the plugins Virtual Painting
with this settings
*Filter /Gothic oil painting/ click on image 1
(dog image ) and choose 2 >>and OK
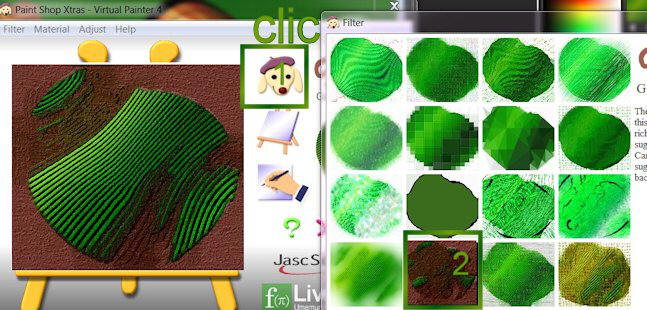
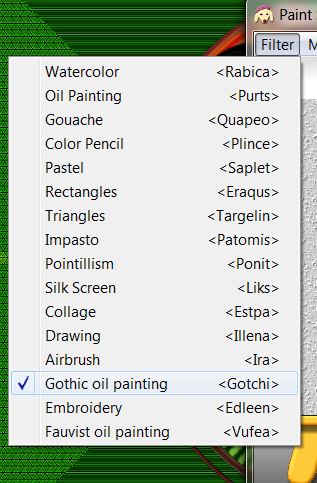
* If the filter does not work. There is a tube in the zip. Edit /copy-Edit-paste into selection
22. Selections- Deselect All
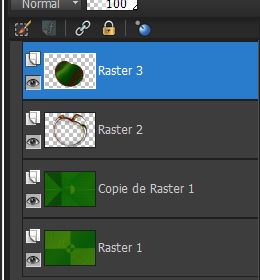
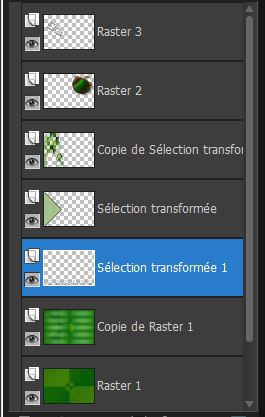
23.
Layer Palette look like this now
24. Selections- Deselect All
25.Layers- Merge- Merge Down(raster 3
with raster 2)
26. Image Resize 60% Resize all Layers not checked
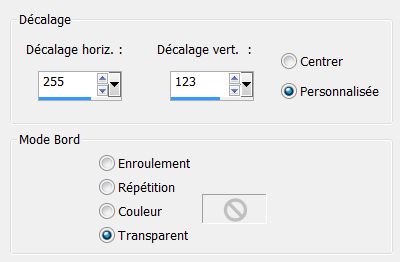
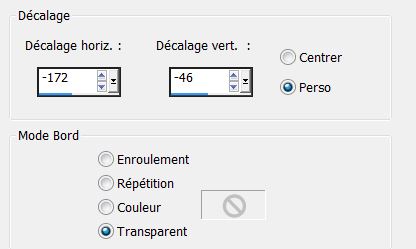
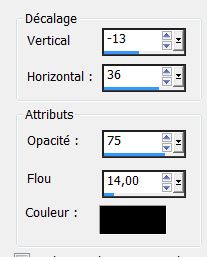
27. Effects- Image Effects- Offset with these settings
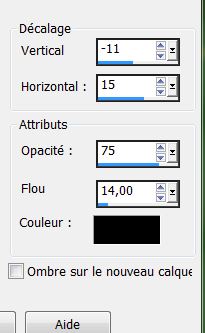
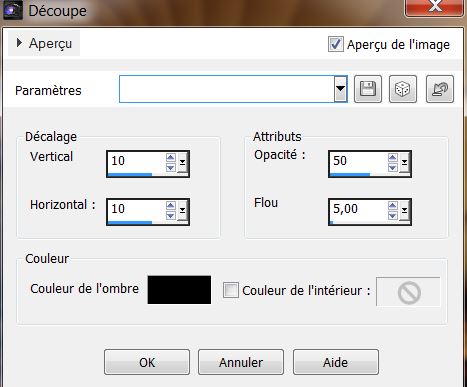
28. . Effects - 3D Effects - Drop shadow with these settings: 10/10/50/5 black .Repeat: Effects - 3D Effects - Drop shadow negative: -10/-10
Layer Palette: activate this layer (copy of Raster 1)
29. Selections - load/save selection - load selection from disk and choose my selection ''renee-moments_2''
30. Selections- Promote selection to layer
31. Layers- New Raster layer
32. Properties Foreground: FG color white Flood Fill Tool: fill the selection with color white
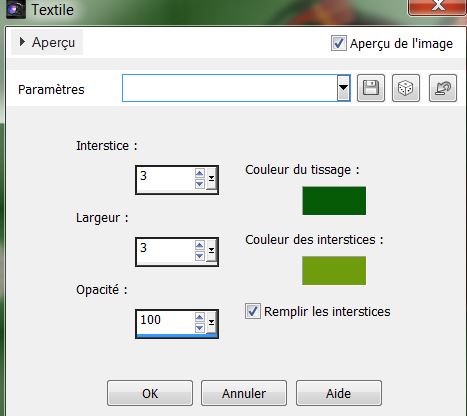
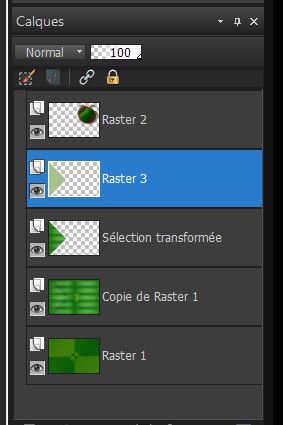
33. Effects Texture Effects-Weave use settings below-FG-color -#095b09. BG-color #6f9c0f
Layer Palette look like this now
Selections- Deselect All
34. Layers- Merge- Merge Down (raster 3
with layer promoted selection)
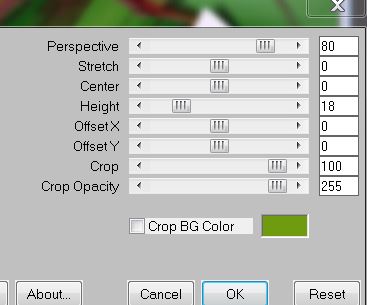
35. Effects- Plugins -EyeCandy5-Impact -perspective-
tab Settings/User settings choose my ''Preset -renee_moment_perps''
36. Layers- Duplicate
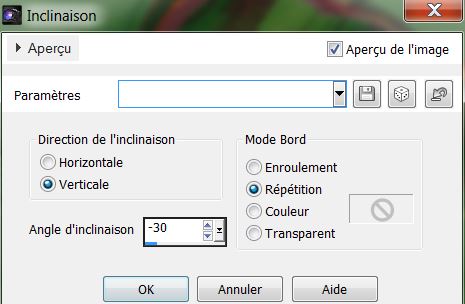
37. Effects- Geometric Effects-Skew with these settings
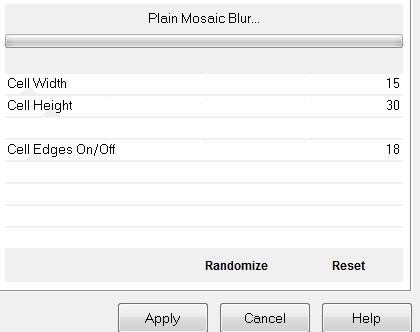
38. Effects- Plugins -Toadies -Plain mosaic blur
39. Effects- Reflection Effects-Feedback
40. Activate the top of the layer-Palette
41. Layers- New Raster layer
42. Selections - load/save selection - load selection from disk and choose my selection
''renee_Moments_3'' Activate Flood fill tool and fill the selection with this color: #e9f5ee
43. Effects- Plugins - Eyecandy 5- glass ''-
tab Settings/User settings choose my
preset
renee_moments_glass''
44. Effects - 3D Effects - Drop shadow with these settings:
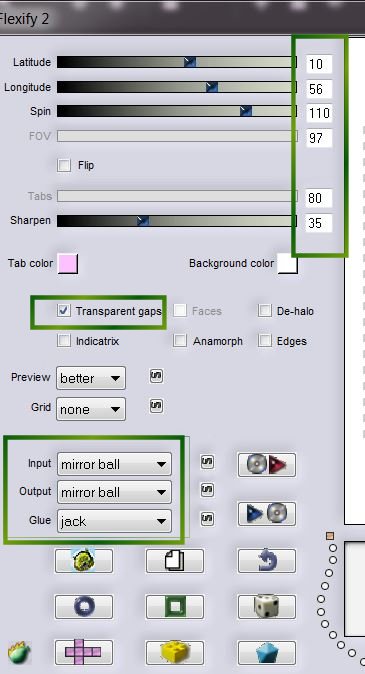
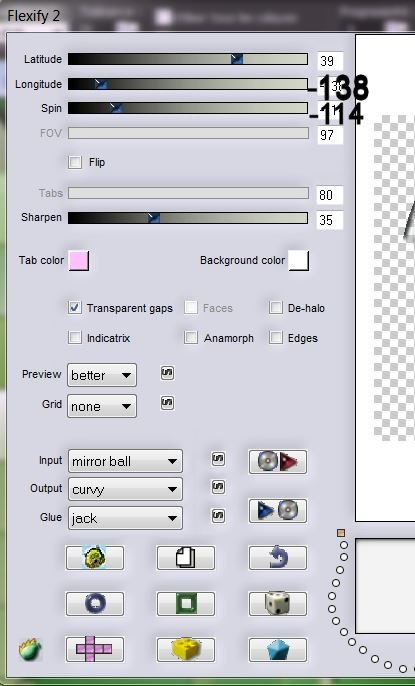
45. Effects- Plugins – Flaming Pear -Flexify 2 with these settings
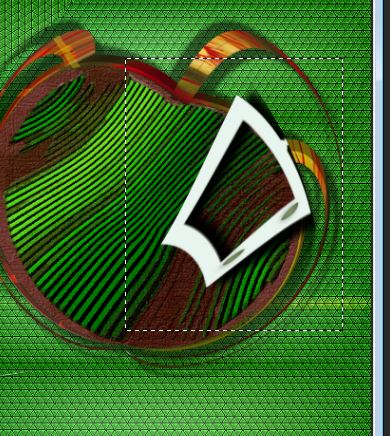
46. Activate Selection Tool-(S) -Rectangle - select this part
47. Selections- Promote selection to layer
Keep selected
48.Layer Palette: activate this layer raster 3
/ Delete
49. Selections- Deselect All
50. Activate the top of the layer-Palette
51.Layer-Arrange-Move Down under
(promoted selection 1)
52. Effects- Plugins Mura's Meister -perspective
tilling
Layer Palette look like this now
54.Layer Palette -Double click on this Layer and set the Blend Mode to"Hard Light "
55.Effects - 3D Effects - Drop shadow with the same settings:
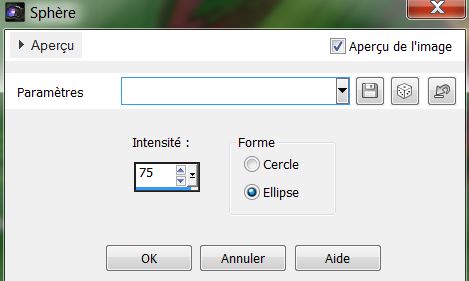
56. Effects- Geometric Effects-Spherize use settings below
57. Activate the top of the layer-Palette
58. Open the tube
'Betsie51-2013'' Edit - Copy-Edit - Paste as new layer on your working area
/ Image Mirror/ and move
59.Layer Palette -Double click on this Layer and set the Blend Mode to"Hard Light "
60.Open the tube ''image_1''
Edit - Copy-Edit - Paste as new layer on your working area
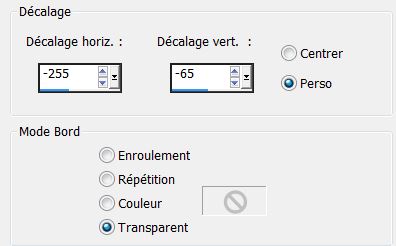
61.Effects-Image Effects-Offset use settings below
62. Layer Palette -Double click on this Layer and set the Blend Mode to"Burn "
63. Layers- New Raster layer
64. Selections - load/save selection - load selection from disk and choose my selection ''renee-moments_4''
65. Properties Foreground:
Properties Foreground: Open the Gradient-Argent
Prepare a linear gradient configured with this settings:
67. Selections- Deselect All
68. Effects- Plugins EyeCandy 5-Impact – perspective
shadow- tab settings and choose -Preset -Drop shadow low
69. Layers- New Raster layer
70. Selection Tool ( S ) Custom selection use settings below
71. Effects- 3D Effects-Cutout with these settings
72. Layers- New Raster layer
73. Open the tube
''woman_1092_tubesd_by_thafs''/merged visible raster 1 and calque 1)
74. Edit-Copy- Edit paste into selection
75. Layers-Arrange -Move Down
76. Layer Palette : activate the layer above ( Cutout)
77.Layers- Merge- Merge Down
Keep Selected
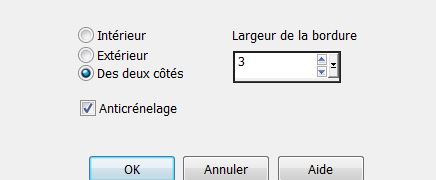
78. Selections-Modify-Select-Selection Borders with this settings
79. Layers- New Raster layer / Flood Fill Tool: fill the selection with the gradient
80. Selections- Deselect All
81. Layers- Merge- Merge Down
82. Layers- Arrange- Move Down under raster 3
83. Layers- Duplicate
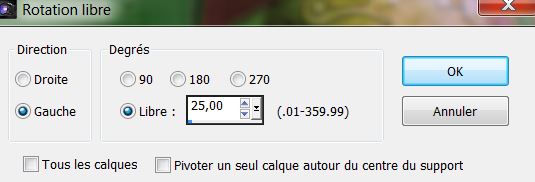
84. Image Free Rotate-25 degrees Left
85. Effects-Image Effects-Offset use settings below
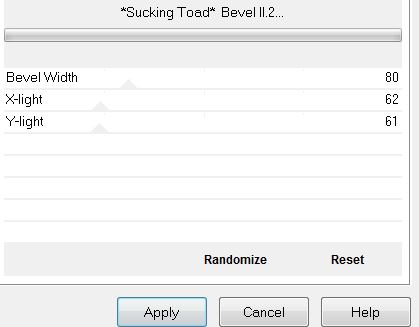
86. Effects-Plugins Toadies /Sucking Toad Bevel II
...2
87.
Layers- Merge- Merge-Visible
88. Edit-Copy !!!
89.Image - Add borders-Symmetric checked: 2 pixels color black
90.Image - Add borders-Symmetric checked: 60
pixels color white
91. With the magic wand -select the border of 60 pixels
92. Edit - Paste into Selection /Image is still in your PSP memory
93. Adjust-Blur-Gaussian Blur: Radius: 55%
94.Selections-Invert
95. Effects - 3D Effects - Drop shadow with these settings:
96. Selections- Deselect All
* Don't forget to thank the people who work for us and with us.
Thanks Renée.


 Translations