|
Let's start the lesson
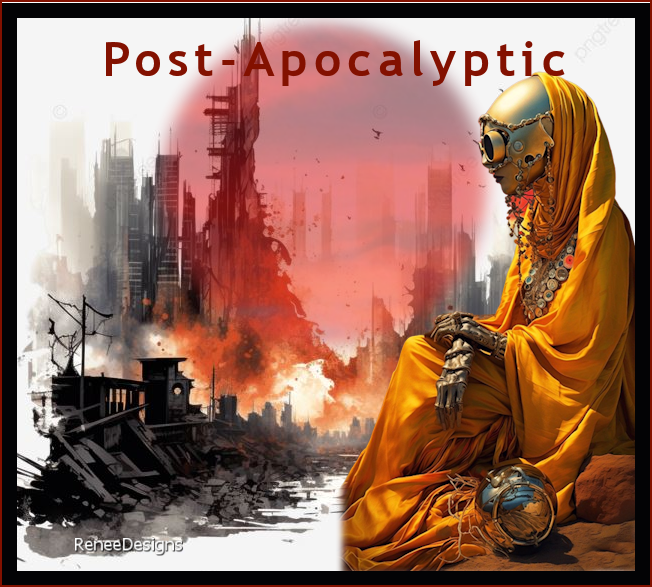
Post-Apocalyptique
-
Preparation
-Material Properties: Set your Foreground color to color
#9db888=color 2 – Set your Background color to color
#385254= 3

-
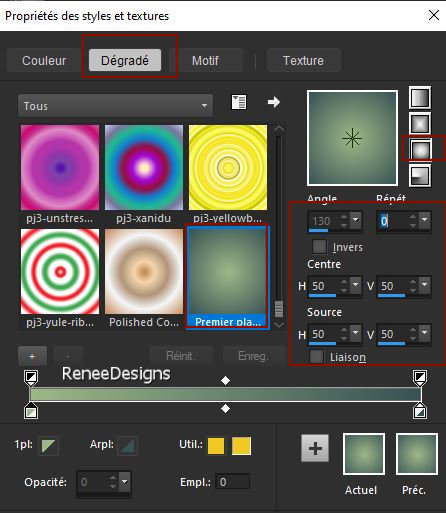
Replace your Foreground color with a Foreground/Background
Sunburst Gradient configured like this
1.
File-Open a new transparent image in this size : 1050 x 675 Pixels
2.
Flood Fill Tool
 –
Fill the layer with the gradient –
Fill the layer with the gradient
3.
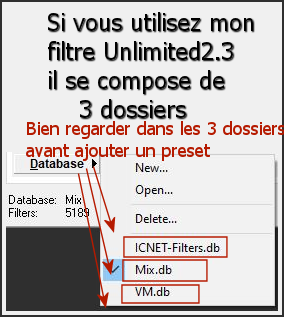
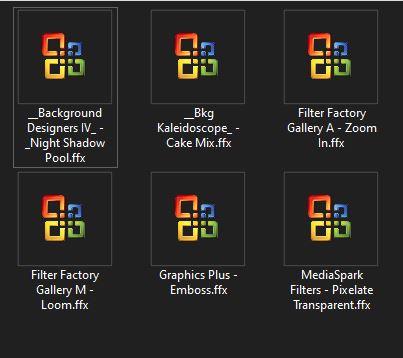
Effects- Plugins - Filters in Unlimited 2.0 - &<Bkg
Kaleidoscope> - Cake Mix : 169 /169
4.
Selections –load/save selection –load selection from
disc and select my selection: ‘’
Post-Apocalyptique-1’’
5.
Selections-Promote Selection to Layer

6.
Layers-Properties-Set the Blend Mode to " Lighten" -Reduce
the opacity of this layer to 18%
7.
Effects- Plugins – Simple – Diamonds
8.
Layers- Duplicate
9.
Effects- Plugins - Filters in Unlimited 2.0 -
MediaSpark Filters - Pixelate Transparent : 164
10.
Layers-Properties-Set the Blend Mode to " Hard Light "
-Opacity of this layer to 100%
11.
Layers- Merge- Merge Down
12.
Layers-Properties-Set the Blend Mode to " Hard Light " -Reduce
the opacity of this layer to 61%
13.
Effects – Distortion Effects – Wave use the settings
below
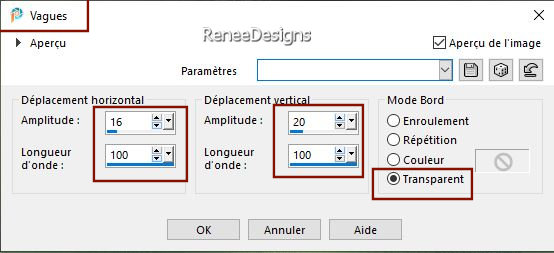
14.
Effects- 3D- Effects- Drop Shadow with these settings: 0 / 0/ 60 / 50
color black
15.
Effects – Texture Effects – Blinds with these settings-
Color white
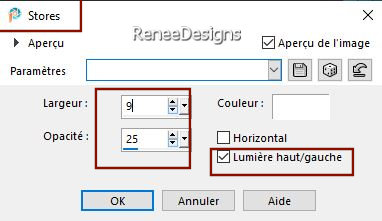
16.
Effects- Plugins - Filters in Unlimited 2.0 –
Graphic Plus – Emboss using the default settings ( all
to zero)
17.
Open the tube ‘’ Image-Post-Apocalyptique-fond’’
-Edit - Copy- Activate your work -Edit - Paste as
new layer
18.
Effects- Plugins – Simple - Blintz
19.
Effects- Plugins – Simple - Half Wrap
20.
Effects- Plugins - Filters in Unlimited 2.0 -
Filter Factory Gallery A – Zoom In with these settings: 65/ 106 / 186 /255
21.
Effects-Reflection Effects-Rotating Mirror using the
default settings
22.
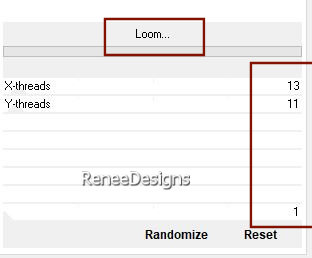
Effects- Plugins - Filters in Unlimited 2.0 -
Filter Factory Gallery M – Loom with these settings
23.
Effects- Plugins - Filters in Unlimited 2.0
&<Background Designers IV> @Night Shadow Pool –
using the default settings
-
Color Palette: Set your Foreground color to Gradient and
select :Fading Foreground
(Corel_06_028)
Style:
Linear with these settings
24.
Layers- New Raster Layer
25.
Selections –load/save selection –load selection from
disc and select my selection: ‘’ Post-Apocalyptique-2’’
26.
Flood Fill Tool
–
Fill the selection with the gradient
27.
Layers-Properties-Reduce the opacity of this layer to 48
%
-
Layers- Merge- Merge Down
28.
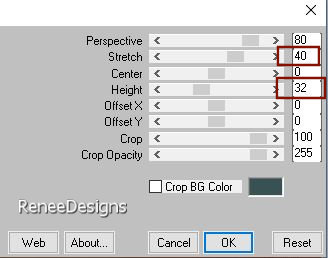
Effects- Plugins – Mura’s Meister – Perspective
Tiling use the settings below
29.
Layers-Properties-Set the Blend Mode to " Hard Light "
30.
Effects- 3D- Effects- Drop Shadow with these settings:
-24/3/78/100 color black
-
Activate Raster 1 in the layer palette
31.
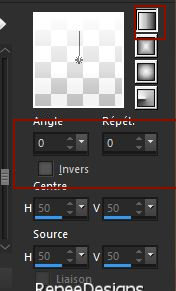
Effects – Illumination Effects -Sunburst use the
settings below- Color 4
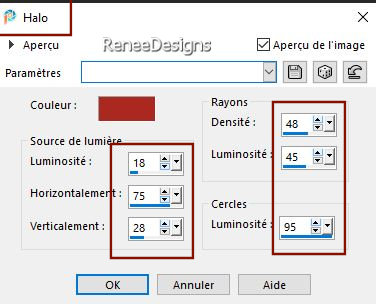
Edit-
Repeat Sunburst
-
Activate the top of the layer palette
32.
Open the Tube : ‘’Post-Apocalyptique- Image 1’’ - Edit -
Copy- Activate your work -Edit - Paste as new layer
33.
Image - Resize 74%- Resize all layers not
checked
It is well placed
-
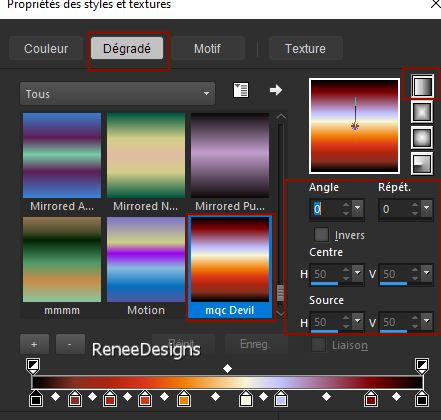
Color Palette: Set your Foreground color to Gradient and
select : ‘’mqc Devil ‘’– Style: Linear
34.
Layers-New Raster Layer
35.
Selections –load/save selection –load selection from
disc and select my selection: ‘’
Post-Apocalyptique-3’’
36.
Flood Fill Tool
–
Fill the selection with the gradient
37.
Adjust-Blur- Gaussian Blur-Radius 4%
38.
Effects – Distortion Effects – Warp use the
settings below
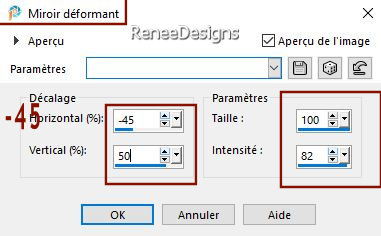
39.
Layers- Duplicate
40.
Image - Mirror - Mirror Horizontal (Image - Mirror in
older versions of PSP)
41.
Layers- Merge- Merge Down
42.
Layers - Duplicate
43.
Image – Rotate Right
44.
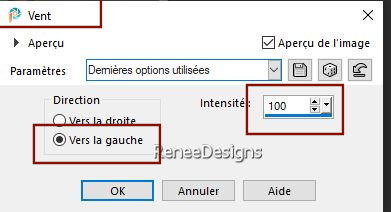
Effects - Distortion Effects - Wind - From Left checked
- Wind Strength:100
45.
Image – Rotate Left
46.
Layers-Properties-Set the Blend Mode to "Multiply "
47.
Layers-New Raster Layer
48.
Selections –load/save selection –load selection from
disc and select my selection: ‘’
Post-Apocalyptique-4’’
49.
Effects- Plugins – Creativity – Splatter –
Clouds
* click on CLOUD
* Click on SMALL
 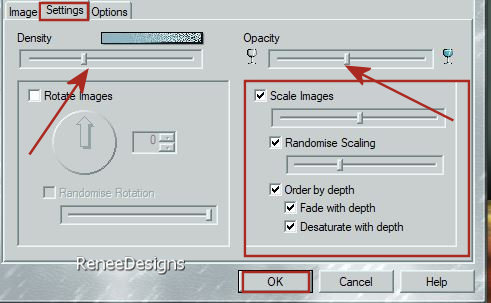
*
Under Settings tab set values (they're approximate -
play with the sliders until you're satisfied with the
result)
Density :
Place the cursor
Opacity :Place the cursor
Scales Image :
checked
Randomise Scaling :
Place the
cursor
Order by Depth :
check all the
options
and OK
50.
Layers-Properties-Set the Blend Mode to "Screen "
51.
Open the Tube
‘’Post-Apocalyptique- Image 2’’
-Edit - Copy- Activate your work -Edit -
Paste as new layer
52.
Pick Tool: (K) on your keyboard -Enter these parameters
on the Toolbar
 720 / 159
Press
( M ) to close the Tool
53.
Effects- Plugins – FM Tile Tools – Saturation
Emboss using the default settings
54.
Effects- 3D- Effects- Drop Shadow with these settings:
-55 /0 / 55 / 77 color white
55.
Open the Tube
‘Post-Apocalyptique- Image 3’’
-Edit - Copy- Activate your work -Edit -
Paste as new layer
-
Move the tube in the right place ( see finished image)
56.
Open the Tube:
‘’Post-Apocalyptique-Texte.png’’ - Edit - Copy-
Activate your work -Edit - Paste as new layer
-
Place to your liking
-
Activate Raster 2 in the layer palette (that of the soil
( point 28 MM)
57.
Selections –load/save selection –load selection from
disc and select my selection: ‘’
Post-Apocalyptique-5’’
58.
Selections-Promote Selection to Layer
59.
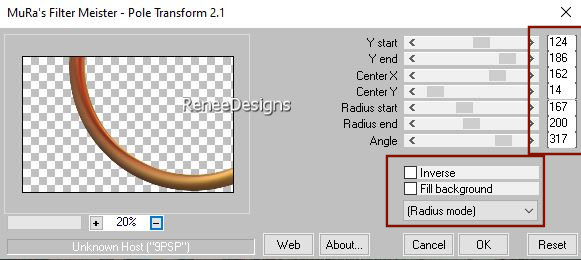
Effects-Plugins– Mura’s Meister – Pole
Transform use the settings below
60.
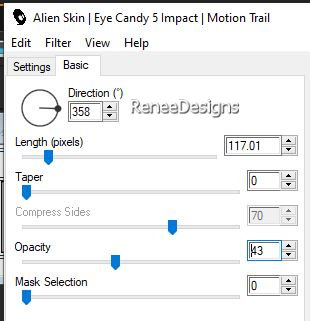
Effects- Plugins - Alien Skin EyeCandy 5 –
Impact – Motion Trail use the settings below
61.
Layers-Properties-Set the Blend Mode to "Hard Light "
62.
Layers- Duplicate
63.
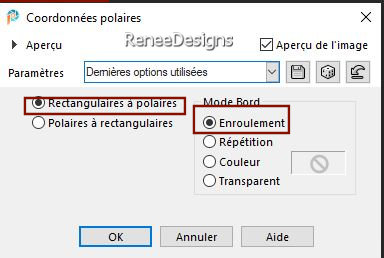
Effects – Distortion Effects – Polar
Coordinates-Rectangular to Polar-Wrap checked
64.
Layers-Properties-Set the Blend Mode to " Hard Light " -Reduce
the opacity of this layer to 55%
65.
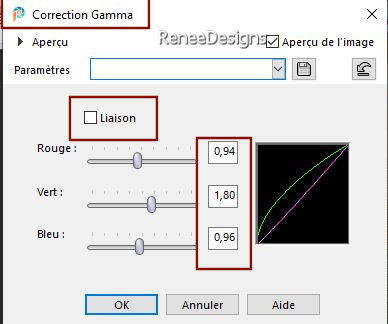
Gamma Correction (on your keyboard, press Shift +G) to
open this tool/ Uncheck connection
-
Set measurements( adapt if you
use other colors)
-
Activate the top of the layer palette
66.
Layers- New Raster Layer
67.
Selections –load/save selection –load selection from
disc and select my selection: ‘’
Post-Apocalyptique-6’’
68.
Color Palette -Set your Foreground color to color #ffffff=1
Flood Fill Tool
–
Fill the selection with #ffffff=1
67.
Effects- Plugins – L & K’s – Sanne : 0 /
170
68.
Effects – Geometric Effects – Circle –
Transparent
69.
Layers-Properties-Set the Blend Mode to "Screen " –
Reduce the opacity of this layer to 26%
70.
Activate Tube ‘’ Post-Apocalyptique- Image 4’’
-
Image - Resize 45 %
-
Edit - Copy- Activate your work -Edit - Paste as new
layer
-
Place on the left (see finished image)
71.
Effects- Plugins – FM Tile Tools – Saturation
Emboss using the default settings
72.
Activate the Text Tool- Font- ''badabum'' - Size 36 -
Write with white in the foreground - Apocalyptique
73.
Effects- 3D- Effects- Drop Shadow with these settings:
0/0/100/2 color black
-
With
the Selection Tool (s)--Rectangle - Select a part of the
word - Take a foreground color '' green for example ''.
-
Take
a foreground color '' green for example ''.
- Clicking
with the ''Color Changer'' tool ‘’
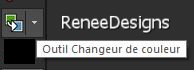
-
click in
the selected area
-
Repeat by selecting other colors - other parts of the
text
When
you're satisfied with the result
74.
Effects- 3D- Effects- Drop Shadow with these settings:
0/0/100/0 color black
75.
Open the Tube ‘’
Post-Apocalyptique- Image 5’’ - Edit -
Copy- Activate your work -Edit - Paste as new layer
76.
Objects – Align -Left
77.
Leave - Blend Mode "Overlay " – Reduce the opacity
of this layer to 63%
78.
Image - Add Borders-Symmetric checked: 1 Pixel -Color
white
Image
- Add Borders-Symmetric checked: 5 Pixel -Color= 2
Image
- Add Borders-Symmetric checked:1 Pixel -Color white
Image
- Add Borders-Symmetric checked: 1 Pixel -Color= 3
Image
- Add Borders-Symmetric checked: 45 Pixels -Color white
Image
- Add Borders-Symmetric checked:1 Pixel -Color =4
Image
- Add Borders-Symmetric checked: 5 Pixel -Color white
Image
- Add Borders-Symmetric checked:1 Pixel -Color =6
79.
Layers - Add a new layer and decorate with your chosen
logos
Deco-Frame- is created with the font provided by
entering numbers ( your choice)
-
Paste the author's watermark on your work and your own
watermark
80.
Layers- Merge- Merge All ( flatten)
81.
Image - Resize - to 1005 Pixels width
82.
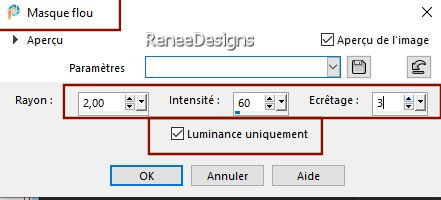
Adjust – Sharpness - Unsharp Mask (Not mandatory)
Save as JPG
I hope you enjoyed this lesson
Renée
This lesson was written by
Renée 21 /08/2024
Edited and Update
in 2024
*
*
Any resemblance with an
existing lesson is a coincidence
* Do not forget to thank the people who work with us and
for us - I have appointed the tubeurs and translators
Thanks
|
 Translations