|
New
Translations here
Rêves de Femmes
1.Open the background image "fond 1" Window - Duplicate (or shift+D) - Close the original and proceed on the copy 2. Layers- New Raster Layer 3. Selections Select All 4. Open the tube « claudiaviza-fantasia-76 -Edit/Copy-Paste into selection 5. Selections- Deselect All 6. Effects- Plugins - FMTiles tools /Saturation emboss /using the default settings 7. Layers- Merge- Merge Visible 8. Effects- Plugins - Tramage /Tow the line with these settings
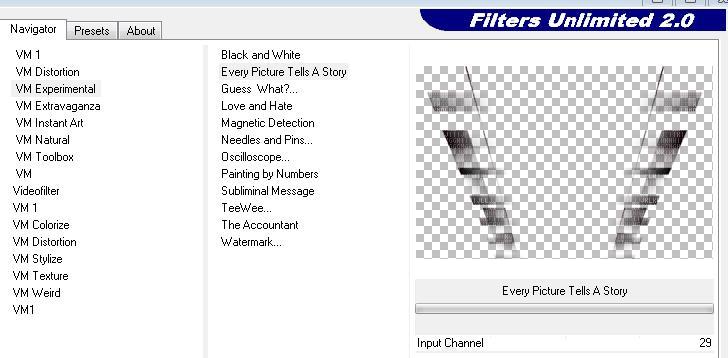
9. Open the tube « element 1 " Edit/copy- Edit/ paste as new layer on your working image (do not move it is in the right place) 10. Effects- Plugins - VM Experimental /Every picture tells a story
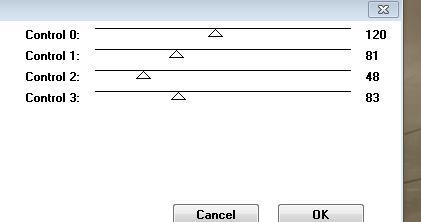
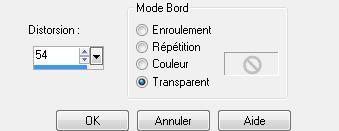
11. Effects- Geometric Effects- Perspective- Vertical with these settings
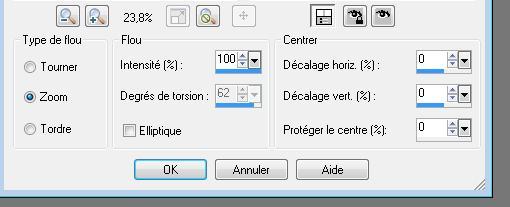
12. Layers- Duplicate 13. Layers- Merge- Merge Visible 14. Layers- Duplicate 15. Layer-palette: activate the layer underneath= (Merged Layer) 16 Adjust- Blur- Radial Blur use settings below
17. Activate the top of the layer palette ( Copy of merged) 18. Image Resize to 60% resize all layers not checked 19. Selections- Select All-Selections - Float Selections – Defloat- Selections-Modify-Contract with 5 pixels 20. Layers- New Raster Layer/ Activate Flood Fill Tool and fill the selection with :#a40f2a 21. Selections- Deselect All 22. Layers- Merge- Merge- Down 23. Effects- Plugins- AV BROS 2.2 with these settings
24. Effects-Image Effects- Offset use settings below
25. Layers -Duplicate /Image Mirror 26. Activate the bottom of the layer palette ( Merged Layer) 27. Open the tube" image 7 "Edit/copy- Edit/ paste as new layer on your working image-Set the layer opacity of this layer to 61% -Your Layer- Palette look like this now-You should have this result
28. Open the tube » image8 « Edit/copy- Edit/ paste as new layer on your working image and move to the bottom - Layers- Arrange- Bring to Top 29. Open the tube « diivhsk-2011-110 »Image Resize to 45% - Edit/copy- Edit/ paste as new layer on your working image and move 30. Effects- 3 D Effects- Drop Shadow with these settings
-Repeat Drop Shadow -negative -10/-5 31. Open the tube fleur /Edit/copy- Edit/ paste as new layer on your working image / placed perfectly around the previous tube Double click on this Layer and set the Blend Mode to "Exclusion" -Set the layer opacity of this layer to 53% 32. Open the tube « sissyklok « - Edit/copy- Edit/ paste as new layer on your working image /Set the layer opacity of this layer to 91% 33. Layers- Merge- Merge Visible 34. Open the tube « cadre 9 « Edit/copy- Edit/ paste as new layer on your working image (do not move it is in the right place) 35. Layers- Merged- Merged All 36. Effects- Plugins - Andromeda perspective /sit walls / Preset - it open 37. Layers- New Raster Layer/ 38. Layers- Arrange- Move Down 39. Selections- Select All- Open te tube « fond 1 » Edit/Copy-Paste into selection /Selections- Deselect All 40. Layers- New Raster Layer/ Activate Flood Fill Tool and fill the selection with : #772028 41. Layers- New Mask layer from Image and choose Mask: "empty -1400x1050.jpg"
42.Effects- Edge Effects- Enhance Layers- Merged- Merged Group -Your Layer- Palette look like this now
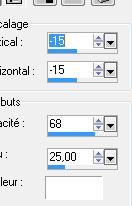
44. Open the tube « calqguisditavantees3129» Image Resize to 65% -Edit/copy- Edit/ paste as new layer on your working image 45. Effects- Plugins -Eye candy 5 perspective /Preset -drop shadow higher 46. Open the tube '' femme couchée ''- Edit/copy- Edit/ paste as new layer on your working image -Layers -Duplicate- Make copy of raster 4 active /Effects - Distortion Effects - Wind - From Left checked - Wind Strength: 100 and repeat this effect 47. Layers- Arrange- Move Down -Activate the top of the layer palette 48. Open the tube « calguisdance939 » - Edit/copy- Edit/ paste as new layer on your working image and move to the right -Double click on this Layer and set the Blend Mode to "Overlay " -Set the layer opacity of this layer to 16% 49. Layers- Merge- Merge All 50. Edit/Copy!!! 51. Open the ''image encadrement final ''-select the red part- 52. Layers- New Raster Layer 53. Edit-Paste into selection 54. Selections- Deselect All 55. Effects- 3 D Effects- Drop Shadow with these settings 15/15/68/25 #ffffff /Repeat Drop Shadow -negative -15/-15
56. Image - Add borders-Symmetric checked: 5 pixels #772028 57. Image - Add borders-Symmetric checked: 40 pixels #000000 58. Open the tube ''guitare lights 1949 TBS''- Edit/Copy -Edit paste as new layer on your working image (do not move it is in the right place) 59. Open the tube « calguisglamour191111 » /Image Mirror /Edit/copy- Edit/ paste as new layer on your working image 60. Open the tube « sissy-klok « Edit/copy- Edit/ paste as new layer on your working image and move to the right side Activate your Pick Tool (K) stretch on the both sides if necessary -Double click on this Layer and set the Blend Mode to "Screen "-Set the layer opacity of this layer to 79% Save as JPG
I am part of Tutorial Writers Inc. My tutorials are regularly recordedt ReneeGraphisme_All rights reserved
*
|
 Translations


 Let's start the lesson.