|
Let's start the lesson. Open your color palette in PSP
- Material Properties: Foreground color:#e0d3b1 Background color: #696c5b
1.
File - New - Transparent - New Image
1015 x 645 pixels
2. Effects-Plugins - Medhi- Wavy lab

3. Layers - New Raster layer
4. Selections- Select All
-Activate the tube
''KRYSSTEAMPUNK-09-O7-14-075.jpg''/Edit - Copy -Edit - Paste into selection.
Selections- Deselect All
5. .Effects-Image Effects-Seamless Tiling -Default
6. Adjust-Blur-Radial Blur use settings below
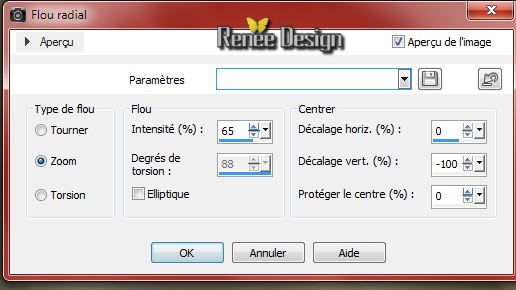
7. Effects- Plugins Unlimited 2.0 /
&<Bkg Kaleidoscope/ Kaleidoscope Butterfly / 255
and 215
8.
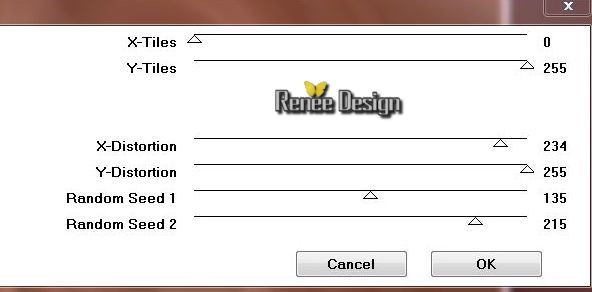
Effects-Plugins - VM Distorsion (
not that of Unlimited) /Vision impossible
9. Effects-Edge Effects- Enhance More
10.
Selections - load/save selection - load selection from disk and choose my selection: ''steampunk18_1''
11.
Selections- Promote selection to layer
12.
Selections-Modify-Feather selection 18
13
Selections-Invert - Delete
 Push 4x the delete button
Selections- Deselect All
14.
Effects - 3D Effects - Drop shadow use settings below
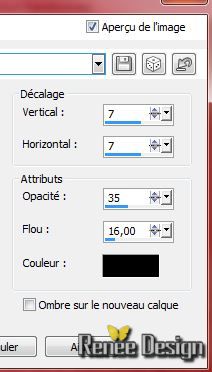 Repeat Drop Shadow negative H -7 and V -7 Repeat Drop Shadow negative H -7 and V -7
15.
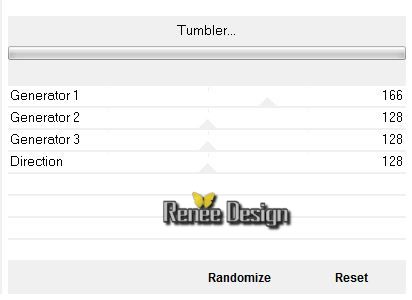
Effects-Plugins - VM Distorsion - Trumbler
16
Repeat Drop Shadow with te same settings (Point 14) + and -
17.
Activate the tube ''eugene_peters-winter_in_de_stad.pspimage''
Edit - Copy- Edit - Paste as new layer
-
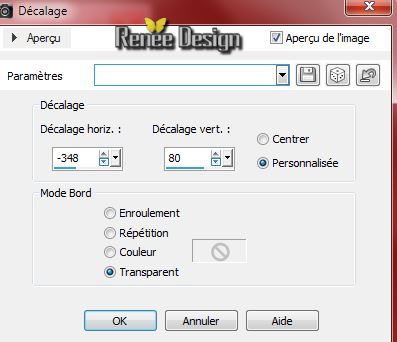
Effects- Image Effects-Offset with these settings: H= - 42 and V = 35
18.
Effects- Plugins - FM Tiles Tools - Blend Emboss
Default
Change the background color into color #48535a
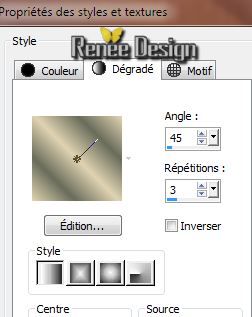
19. Put your foreground on the foreground/background radial gradient with settings below
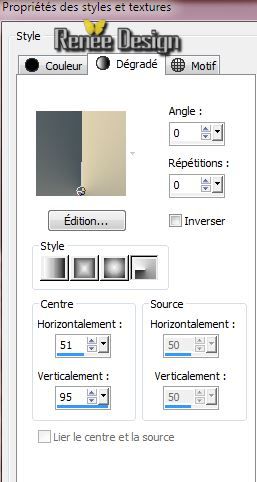
20.
Layers - New Raster layer /Flood Fill Tool: fill the layer with the gradient
21.
Effects- Plugins Unlimted 2.0 - Funhouse -Loom
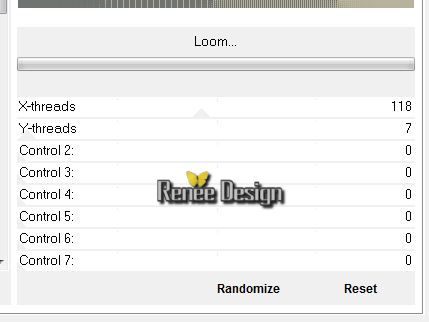
22. Effects- Plugins Unlimited 2.0
- Funhouse - Chaos Mirror/ Chaos Mirror / 255
-
Layer Palette :Double click on this Layer and set the Blend Mode to "Hard Light"
23.
Layers-Duplicate
24.
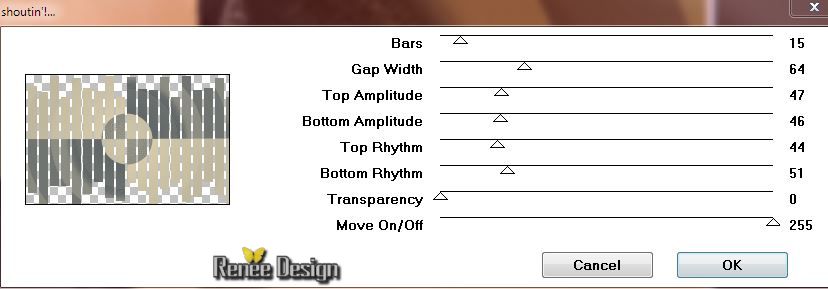
Effects-Plugins - VM Extravanga - Shoutin !
25.
Effects - 3D Effects - Drop shadow: 1/1/28/12 color black
26.
Effects-Plugins - Mura's Meister - Perpsective
Tilling

27.
Layers- Duplicate
-
Layers- Merge-Merge- Down
-
Layer Palette :Double click on this Layer and set the Blend Mode to "Luminance "
28.
Selections - load/save selection - load selection from disk and choose my selection: ''steampunk18_2"
-
Selections-Modify-Feather 12 / Delete
Push 3x the delete button
Selections- Deselect All
-
Layer Palette: activate raster 4
/Layers-Arrange-Move Down
Your Layer Palette look like this now:
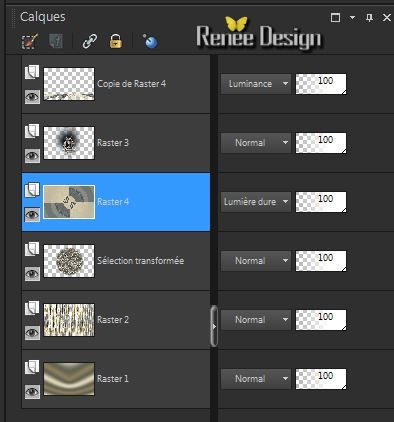
-Activate the top of the layer-Palette
29.
Activate the tube ''KRYSSTEAMPUNK-09-O7-14-075.pspimage''/Image-Resize75%/Image Mirror/Edit - Copy- Edit - Paste as new layer
30.
Effects- Image Effects-Offset use settings below
Material Properties:Foreground color: #e0d3b1 Background color: #696c5b
-
Put your foreground on the foreground/background linear gradient with settings below :
31.
Layers - New Raster layer
32.
Selections - load/save selection - load selection from disk and choose my selection: ''steampunk18_3'' / Flood Fill Tool: fill the selection with the gradient
33.
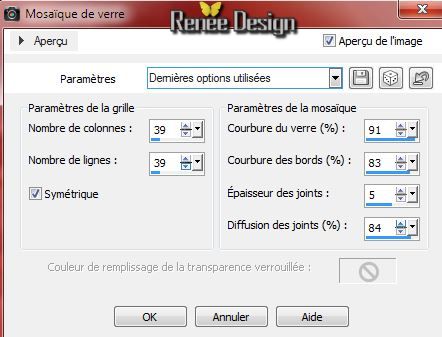
Effects- Texture Effects-Mosaic-Glass with settings below
Selections- Deselect All
34.
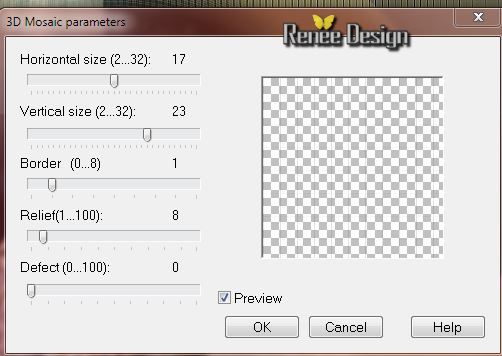
Effects- Plugins - Picture Man Collection- 3 D
Mosaic parameters
35.
Effects-Edge Effects- Enhance More
36.
Layer Palette -Double click on this Layer and set the Blend Mode to "Overlay" /Layers- Duplicate/Layers- Merge-Merge- Down
37.
Selections - load/save selection - load selection from disk and choose my selection:
''steampunk18_3''/ Selections-Invert / Push the delete button
Selections- Deselect All
38.
Activate the tube '917475KRYSSTEAMPUNK12O514056''/Image
Mirror- Image-Resize 60% -Edit - Copy- Edit - Paste as new layer .With your move tool move to the right
39. Effects- Plugins - EyeCandy 5 - Impact- Perpective shadow in tab Settings/User Settings and choose my Preset ''steampunk18_shadow"
40.
Layers - New Raster layer
41.
Selections - load/save selection - load selection from disk and choose my selection: ''steampun18_4''/ Flood Fill Tool: fill the selection with color #696c5b
Selections- Deselect All
42.
Effects - 3D Effects - Drop shadow: 1/1/28/12 color black
43.
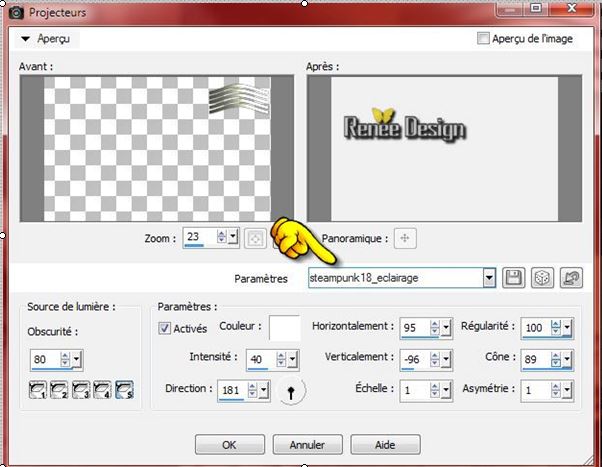
Effects-Illumination Effects-Lights/select my file:''Preset_Lights_steampunk18_eclairage''(manual settings see screen)
44.
Activate the tube ''steampunk18_triangle'' /Edit - Copy - Edit - Paste as new layer. With your move tool place it to the top right corner
-
Layers- Arrange-Move Down
-
Activate the top of the layer-Palette
45.
Activate the tube''texte''/Edit - Copy - Edit - Paste as new layer. With your move tool place it to the top right corner
46.
Activate the tube''steampunk18_image1.pspimage''/Edit - Copy - Edit - Paste as new layer .With your move tool move to the left
(Place this image against the tube in such a way that nose and chin fit etc (see large example).
Pay attention to the top and the bottom, they too have to fit nicely.
If you use a tube of your own everything has to fit nicely as well
-Activate the person’s tube.: Selections- All-
Selections Float-
Selections Defloat-
Selections-Invert
-
Activate your image and place it against the tube . Push the delete button on the image
Make sure that the person’s tube and the image are free from lines or edges -
47.
Layers- Merge-Merge- Visible
48.
Image - add borders-Symmetric checked 1 pixel color black
49.
Image - add borders-Symmetric checked 50 pixels color #6c0802
50.
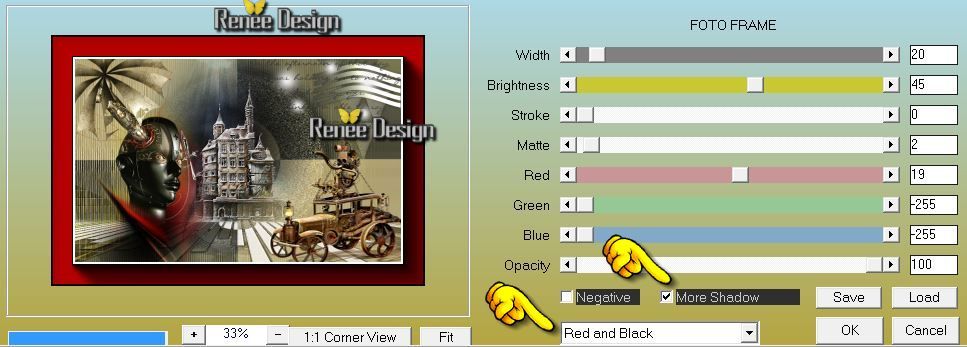
Effects-Plugins - AAA Frame - Foto Frame
51.
Image - add borders-Symmetric checked 1 pixel color black
52.
Activate the tube "Titre steampunk 18" Edit - Copy - Edit - Paste as new layer and move. Or write your own text
Using my text? Double click on this Layer and set the Blend Mode to "Luminance"
53.
Layers - Merge -Merge all layers
I hope you enjoyed this lesson
Renée
This lesson was written by Renée the 11/07/2014
Created the
le 07/2014
*
Any resemblance with an existing lesson is merely a coincidence
*
* Don't forget to thank the people who work for us and with us. I named the tubeurs - Testers and the translators.
Thanks Renée.
|

 Translations


 All rights reserved