|
Steampunk_20
-
Let's start the lesson. Open your color palette in PSP
- File - New - New Image:1025
x 685 pixels -Transparent
- Material Properties:
- Properties foreground: FG-Color: #cec8b9 Properties background: BG-Color: #868b87
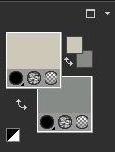
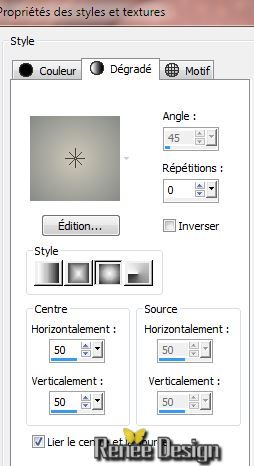
1. Put your foreground on the foreground/background radial gradient with these settings

2. Activate Flood fill tool and fill the layer with the gradient
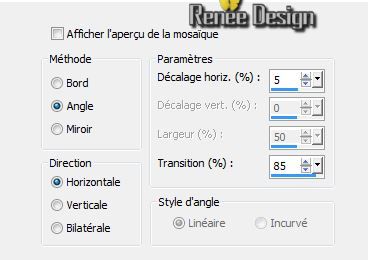
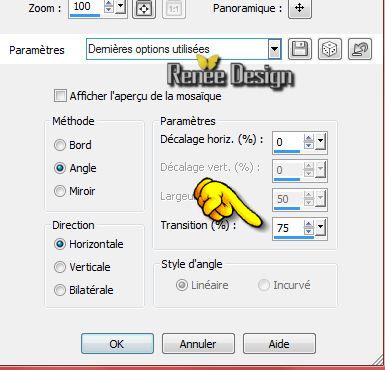
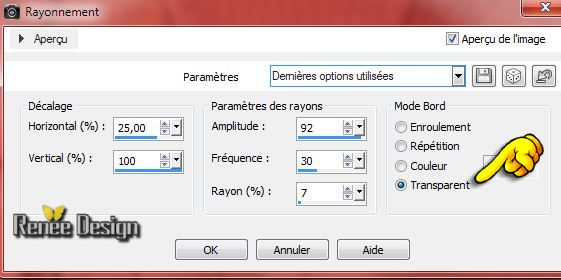
3. Effects-Image Effects-Seamless Tiling use the settings below
4. Effects- Plugins -Unlimited 2.0
/ &<Bkg Kaleidoscope> @ Blue Berry Pie
5.
Effects-Edge Effects- Enhance More
6.
Layers-Duplicate
7.
Image Mirror
8. Effects- Plugins - Unlimited 2.0
/ &<Bkg Kaleidoscope>/ 4 QFlip Upper L
9.
Effects-Edge Effects- Enhance More
-
Layer Palette -double click on this Layer and set the Blend Mode to "Hard Light " and lower the opacity down to:
59%
10.
Layers- Merge- Merge Down
11.
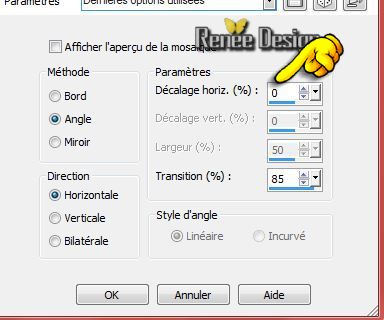
Effects-Image Effects-Seamless Tiling use the settings below
12.
Layers- New raster layer
13.
Selections - load/save selection - load selection from disk and choose my selection: ''steampunk_20-2''
- Activate Flood fill tool and fill the selection with the gradient
14.
Adjust-Blur- Gaussian Blur: Radius: 48
15.Effects - 3D Effects - Drop shadow with these settings: 1/1/30 /29
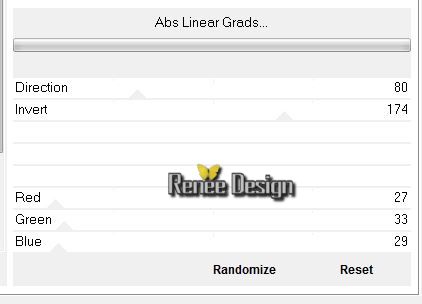
16. Effects-Plugins -Unlimited
-Alf's Power Grads - Abs Linear Grads
17.
Adjust-One Step Photo Fix
Selections- Deselect All
18.
Layers- Duplicate
-
Image - Mirror - Image Flip
-
Layers- Merge- Merge Down
19.
Effects-Image Effects-Seamless Tiling use the settings below
-
Layer Palette -double click on this Layer and set the Blend Mode to "Hard Light "
- Activate the bottom of the layer-Palette (Raster 1)
20.
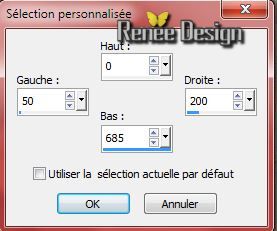
Selection Tool ( S ) Custom selection use settings below
21.
Promote selection to layer
22.
Effects - 3D Effects - Drop shadow with these settings: 1/1/30/29
color black
23.
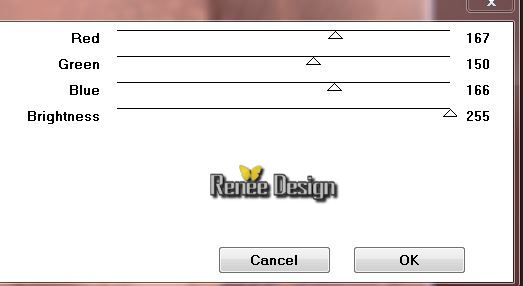
Activate the top of the layer-Palette
24. Effects- Plugins - Unlimited2.0 -
Teph's Tricks/ Slide Y 50%
Selections- Deselect All
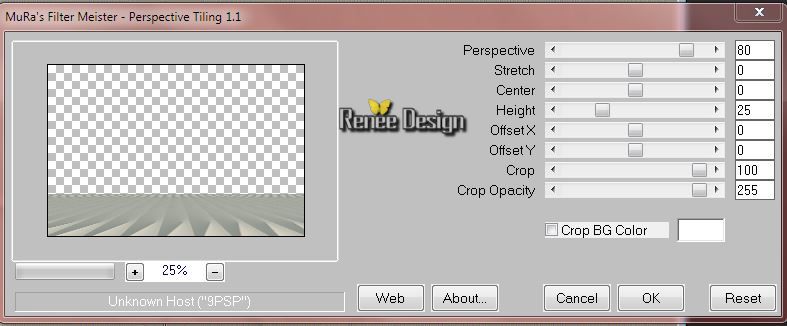
25. Effects-Plugins- Mura's Meister - Perspective Tilling
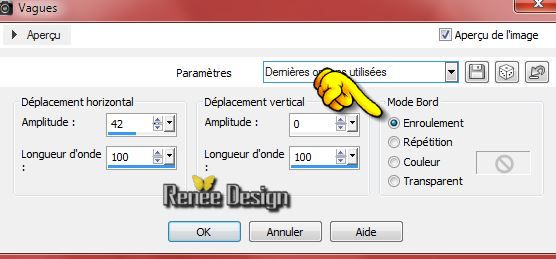
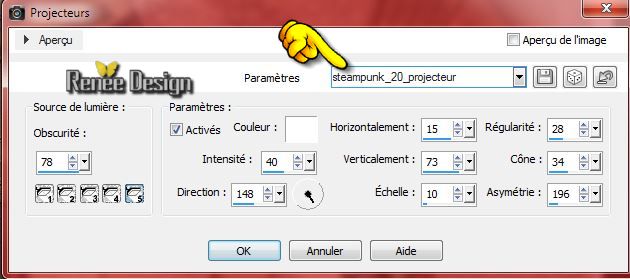
26.Effects- Distortion Effects- Wave use settings below
27.
Effects-Distortion Effects-Twirl setting 65
28.
Effects - 3D Effects - Drop shadow with these settings:1/1/45/36 color black
29.
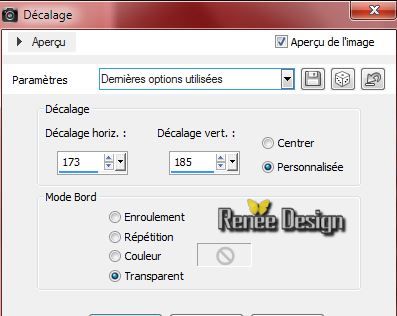
Effects- Image Effects-Offset with these settings: H = 0 and V= -100
- Activate the bottom of the layer-Palette=raster 1
30.Layers- New raster layer
31.Selections - load/save selection - load selection from disk and choose my selection: ''steampunk_20_1''
- Activate Flood fill tool and fill the selection with the gradient
32.
Adjust-Blur- Gaussian Blur: Radius: 38
33. Effects- Plugins - Unlimited 2.0/
Filter Factory Gallery S/ Colour Metalizer settings: 56/0/0/51
Selections- Deselect All
34.
Effects- Distortions Effects-Polar Coordinates-Polar to rectangular
-
Layer Palette :Double click on this Layer and set the Blend Mode to "Luminance Legacy "
- Activate the top of the layer-Palette
35.Layers- New Raster layer
36.
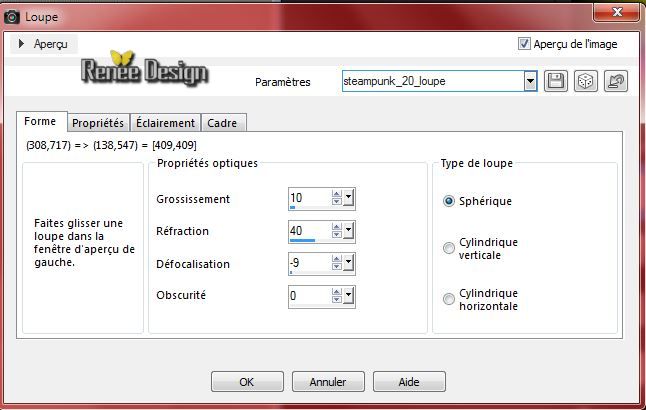
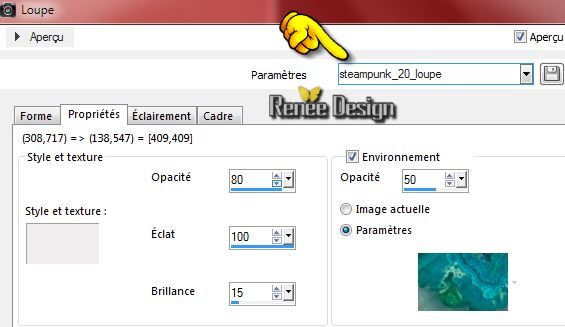
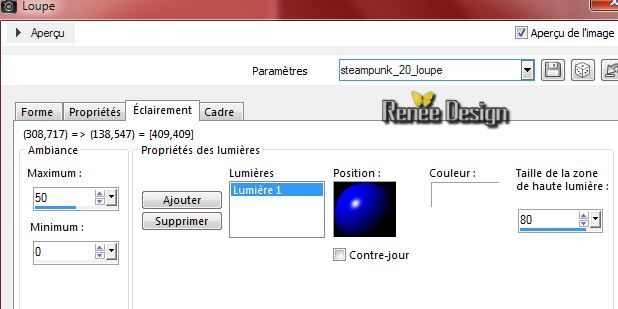
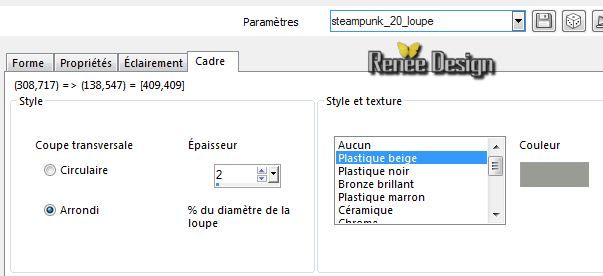
Effects- Artistic Effects-Magnifying Lens-select my file- ''Preset_MagnifyingLens_steampunk_20_loupe'' (In the zip file)

********************************************************************************************************
Effects-Magnifying Lens= Screenshot for those who do not know to put the preset. Or set it manually
*****************************************************************************************************************************************************
37.
Image Resize - 65 % Resize all Layers not checked
38.
Effects- Image Effects-Offset with these settings:
- Activate Raster 3 in the layer-Palette
39.
Activate the tube "Ville_steampunk_20.pspimage''- Edit-Copy -Edit Paste as a new layer on your working area. Do not move !!
-
Layer Palette -Double click on this layer and set the Blend Mode to "Hard Light "
-
Activate the top of the layer-Palette (Raster 4 -Magnifying Lens)
40.
Selections – Select all.
Selections - Float
Selections – Defloat.
41.
Selections-Modify-Contract 10 pixels
42.
Layers-New raster layer
43.Flood fill tool opacity 60%
- Activate Flood fill tool and fill the selection with the foreground color #cec8b9
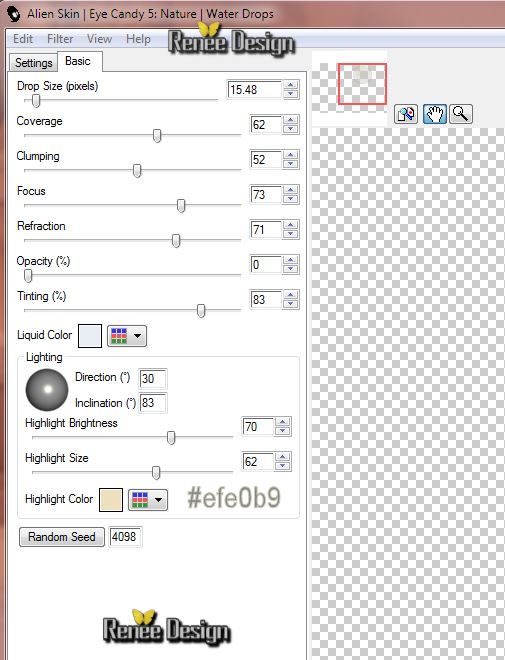
44. Effects- Plugins - EyeCandy 5-Nature - Water Drops
This effect can also be made in EyeCandy 3.1
Selections- Deselect All
45.
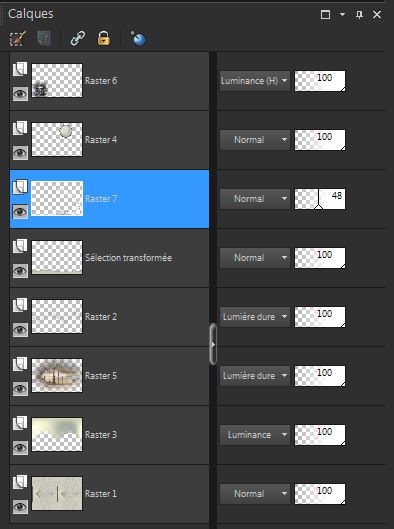
Layers- Merge- Merge Down
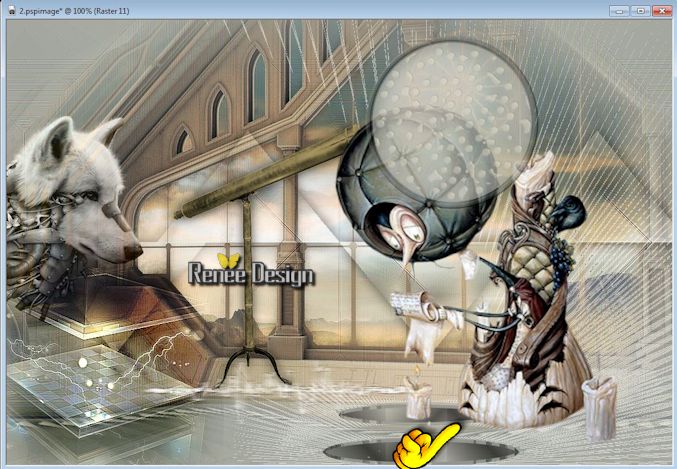
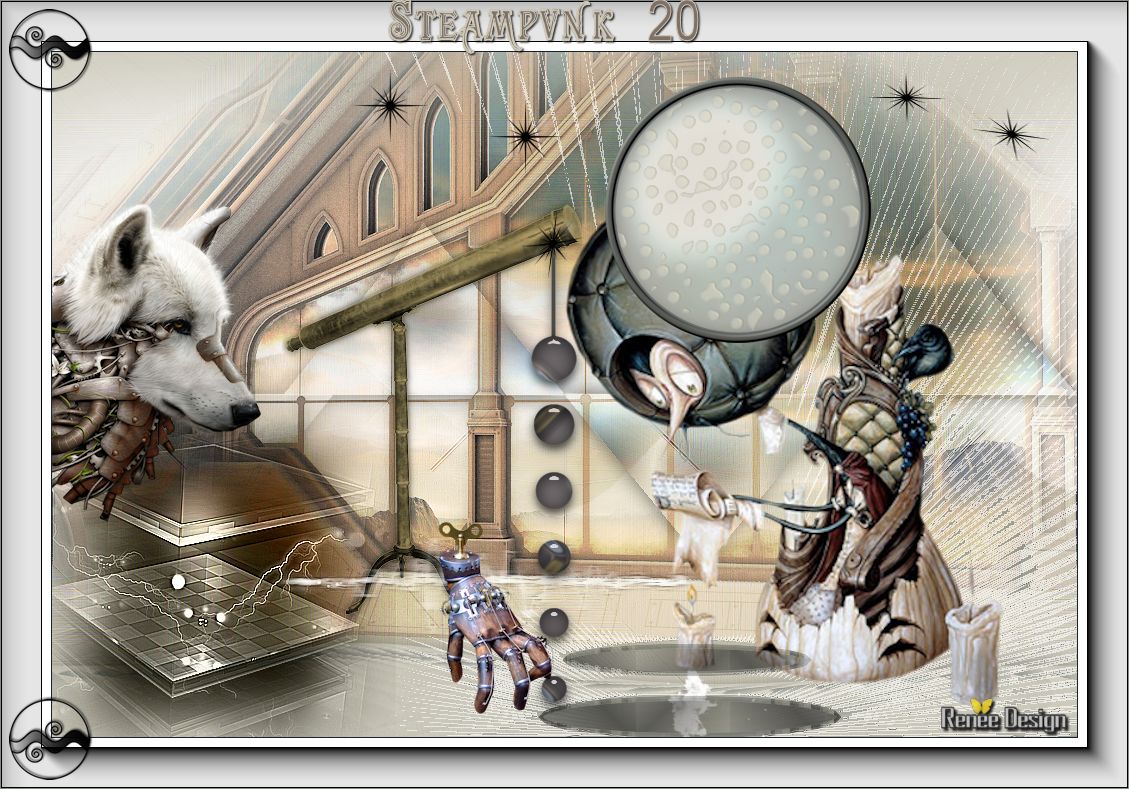
This is what you should have now
46.
Activate the tube ''plaques_steampunk_20''/Edit/copy-Edit paste as a new layer on your working area
-
Layer Palette :double click on this Layer and set the Blend Mode to "Luminance Legacy "
-
With your move tool place it on the left side like this
47.Layers- New raster layer
48.Selections - load/save selection - load selection from disk and choose my selection: ''steampunk_20_3''
-
Properties of the foreground: Put your foreground on the foreground/background sunburst gradient with these settings
-
Activate Flood fill tool and fill the selection with the sunburst gradient
Selections- Deselect All
49.Effects-Distortions Effects-Spiky Halo use settings below
50.
Effects- Edge Effects-Enhance More
51.
Layers-Arrange-Move 2x Down(under raster 4)
-
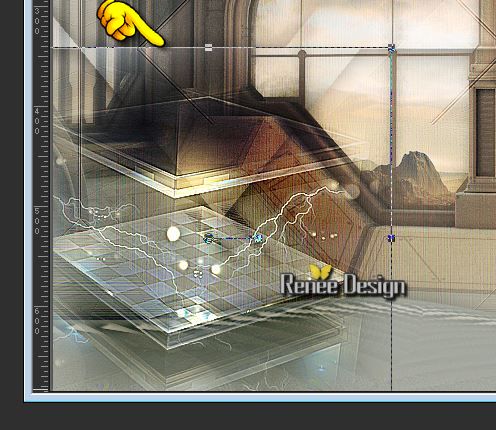
And lower the opacity down to: 48%
This is what you should have now
- Activate the top of the layer-Palette
52.
Activate the tube ''Steampunk Wolf - tubed by A PSP
Devil.pspimage''/Image Mirror - Image Resize with 45%
-Edit - Copy -Edit - Paste as new layer on your working area .With your move tool place it on the left side
53.
Activate the tube '' lunette_steampunk_20'' / -Edit - Copy -Edit - Paste as new layer on your working area. With your move tool place it on the left
54.
Effects- Plugins - Graphic plus - Colorize
55.
Layers- New raster layer
56.Selections - load/save selection - load selection from disk and choose my selection: '' steampunk_20_4"
-
Activate Flood fill tool and fill the selection with the sunburst gradient.Flood fill tool opacity 60%
57.
Effects-Plugins- Tramage - Glass
Pyramides setting: 162
58.
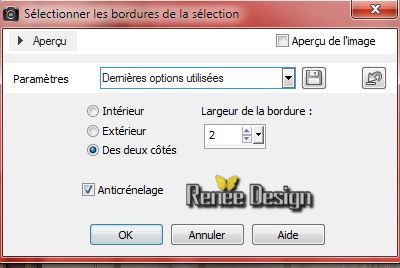
Selections- Modify-Select Selections Borders - Both sides
Activate Flood fill tool and fill the selection with the sunburst gradient.
59.
Effects- Plugins -L and K's - Raisa

Selections- Deselect All
- Layer Palette -double click on this Layer and set the Blend Mode to "Multiply " and lower the opacity down to: 69%
60.
Activate the tube ''surrealiste Chris creation.pspimage''
(Erase the signature) /Edit/copy-Edit paste as a new layer on your working area . With your move tool place it on the right side like this
61.
Layers- Arrange- Move Down under Raster 4 (Magnifying Lens)
62.
Properties Foreground: foreground color to color: #e8dedd
- Activate the top of the layer-Palette
63.
Activate the tube ''pinceau_steampunk_20_1'' File- Export Custom Brush and give it a name "steampunk 20-1"
64.
Layers- New raster layer
65.
Activate the brush tool and choose the brush:"steampunk 20-1"use settings below (B) -Size 228 Rotation 180°

-
Stamp with the foreground color see example
-
Place like this
66.
Layers- Arrange- Move Down
67.Effects- Illumination Effects-Lights and choose my ''Preset_Lights_steampunk_20_projecteur''
Activate the top of the layer-Palette
68.
Properties Foreground: foreground color white
69.
Layers- New raster layer
70.
Activate the tube''pinceau_steampunk_20_2.pspimage''
File- Export Custom Brush and give it a name "steampunk 20-2"
71.Activate the brush tool and choose the brush: "steampunk 20-2" with these settings

Stamp with the foreground color white see example
72.Effects- Distortion Effects- Wind from left 15° Repeat:
-Effects- Distortion Effects- Wind from right 15°
73.
Effects- Edge Effects-Enhance More
74.Layers-New Raster layer
-Open Preset Shape Tool (P)/ Select a star to your taste
-
Draw a star in the upper right corner
-
Convert to Raster layer
-
Edit- Copy
- Edit Paste as a new selection
(repeat as many times as you would ) (
It is still in memory)
-
You will in the end only one layer of your tube creates
-
On this layer:
75.
Effects - 3D Effects - Drop shadow with these settings/color white
-
Repeat : Effects - 3D Effects - Drop shadow with these settings -14/ and 18
76.
Effects- Distortion Effects-Warp use settings below
77.
Activate the tube ''KRYSSTEAMPUNK24-O7-14-083.pspimage''
/Image Resize with 32%
--Edit - Copy -Edit - Paste as new layer on your working area .With your move tool place it on the left
(Erase the signature)
78. Activate the tube
''steampunk_20_boules'' - Edit - Copy -Edit - Paste as new layer on your working area and move (Place under layer effect brush 2)
79. Layers- Merge-Merge Visible
80.Image - Add borders-Symmetric checked: 1 pixel with the dark color
81.Image - Add borders-Symmetric checked 50 pixels color white
82.
Effects-Plugins- AAA Frame - Foto Frame

83.Image - Add borders-Symmetric checked: 1 pixel with the dark color
84.
Activate the tube ''steampunk_20_deco '' two layers !!: Edit /Copy-Edit Paste as a new layer and place
If you take my text Image- Free Rotate
90° right .Edit /Copy-Edit Paste as a new layer and place
(
If you want to write a text- font is included into the zip file )
Save als JPG
I hope you enjoyed this lesson
Renée
This lesson was written by Renée 08/08/2014
Created the
09/2014
*
Any resemblance with an existing lesson is merely a coincidence *
* Don't forget to thank the people who work for us and with us. I named the tubeurs - Testers and the translators.
Thanks Renée. |
 Translations


 All rights reserved