|
New
Translations here
*
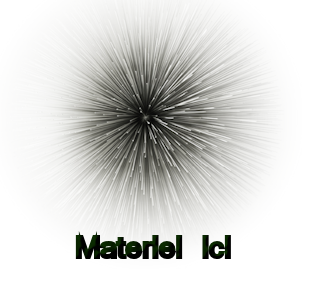
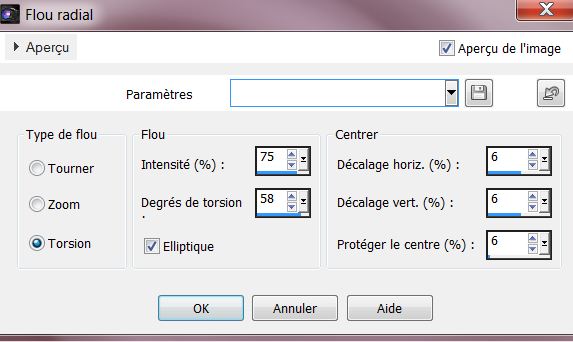
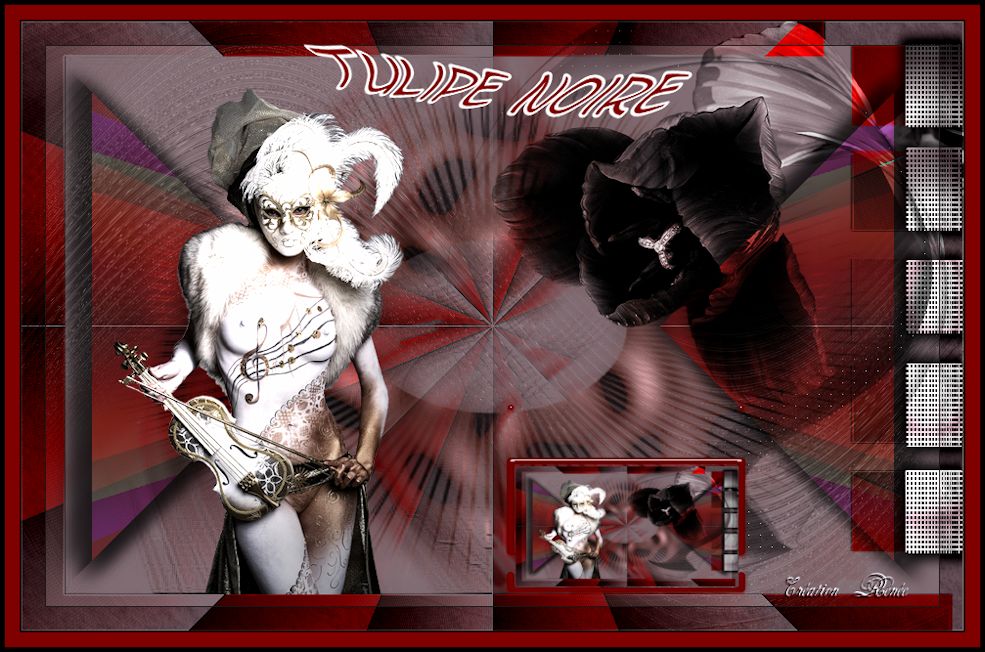
Let's start the lesson. 1. File - New - New tranparent image: 965 x 625 pixels 2. Activate Flood Fill Tool and fill the layer with this color: #826d74 3. Layer- New raster layer 4. Selections- Select All 5. Open the tube ''fond_1_tulipe noir '' Edit/copy-Edit paste into selection 6. Selections-Deselect All 7. Adjust-Blur-Radial Blur with these settings
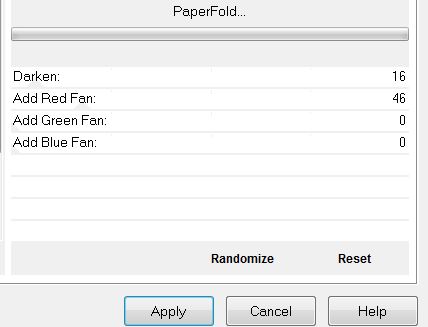
8. Effects- User Defined Filter - Emboss 3 using the default settings 9. Effects- Plugins -Two Moon – Paper Fold
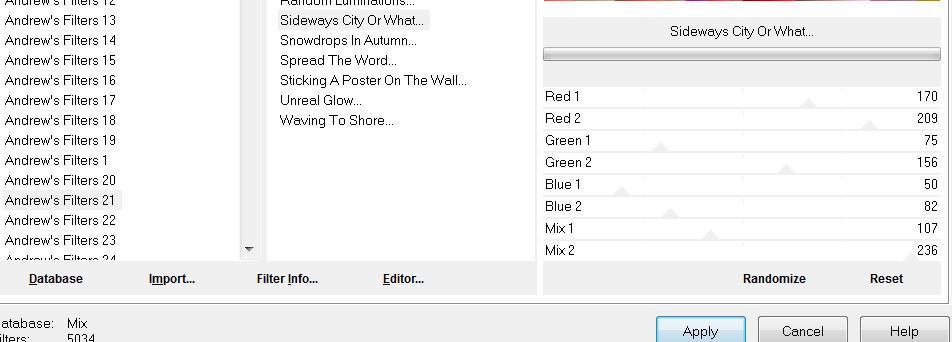
10. Layers- Duplicate 11. Effects- Plugins – Unlimited - Andrew's 21- Sideways City Or what
12. Image Resize 85% Layer Palette -Double click on this layer and set the Blendmode to Multiply 13. Effects-3D Effects-Drop Shadow with these settings : 9/9 /94/22 black -Repeat Drop Shadow- negative -9/-9 - Layer Palette: Activate Raster 2 /Double click on this layer and set the Blendmode to Multiply Your Layer Palette look like this now:
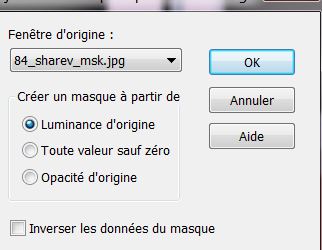
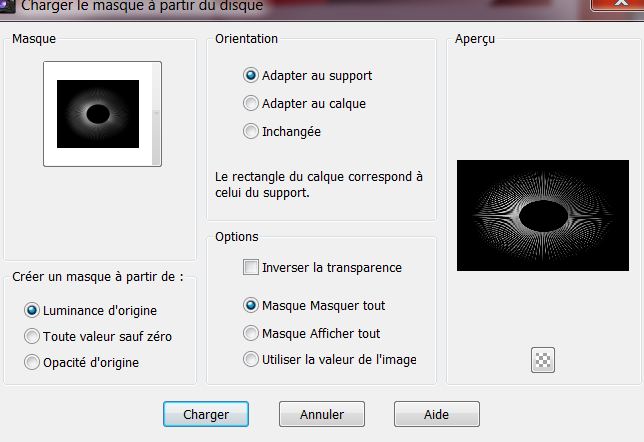
14. Close Copy of Raster 2 for convenience and to better see your work - In the layer palette: activate Raster 2 15. Layers- Load/Save mask-Load Mask from Disk and select: ''ouvrir 84_sharev_msk''
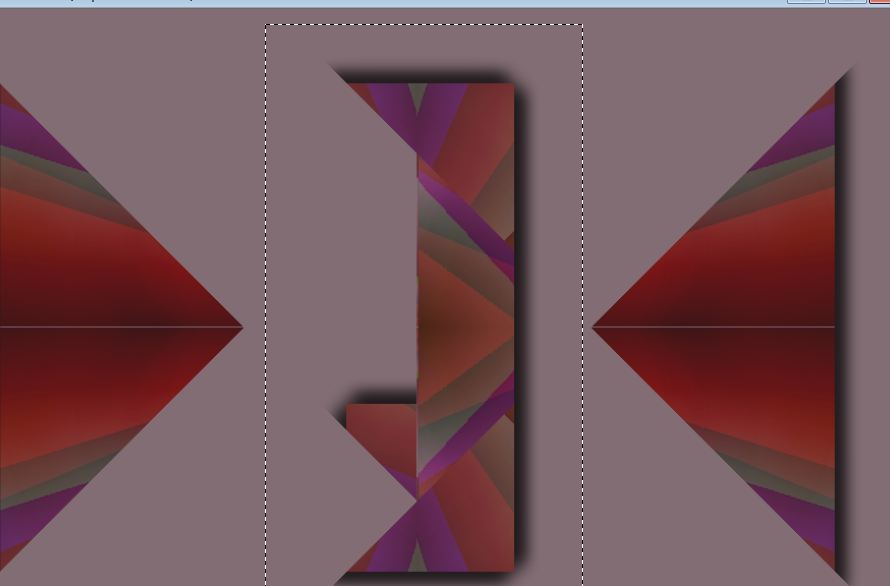
16. Layers- Merge-Merge Group 17. Effects- Edge Effects-Enhance More - Layer Palette: activate copie of raster 2 /open the layer 18. Effects-Plugins -Simple -Pizza Slice Mirror - and repeat Selection Tool: draw a selection like this (I closed the layer to see it better)
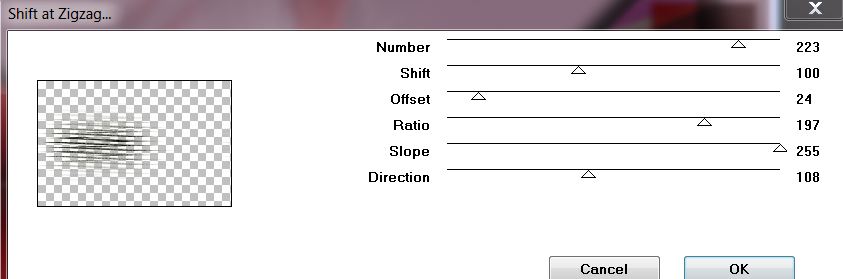
19. Delete 20. Effects-3D Effects-Drop Shadow with these settings : 9/9 /94/22 black-Repeat Drop Shadow -negative -9/-9 - Set the layer opacity of this layer to 79% 21. Open the tube ''Drevers_deco_28'' Edit/copy-Edit paste as a new layer on your working area 22. Image Resize 65% resize all layers not checked 23. Effects-Plugins - Mura's Seamless -Shift and zigzag with these settings
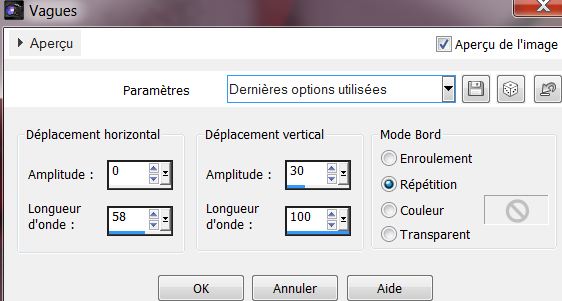
- Repeat: Effects- Plugins -Mura's Meister -Shift and zigzag with the same settings 24. Effects-Distortion Effects- Wave with these settings
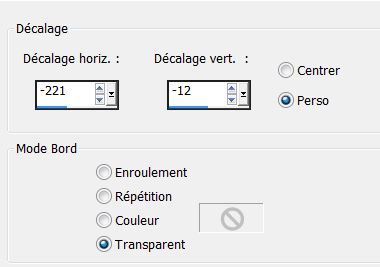
- Layer Palette -Double click on this layer and set the Blendmode to Hard Light and set the layer opacity of this layer to 38% If you can not to do this part (Effects-Illumination Effects-Lichts-Color #c0c0c0) take raster 4 of the tube 'Drevers_woman_99 '' Edit/copy -Edit paste as a new layer and then skip the next step. 25. Open the tube ''Drevers_woman_99 '' Edit/copy-Edit paste as a new layer on your working area// Image Resize 65 % resize all Layers not checked 26. Effects-Image Effects-Offset with these settings
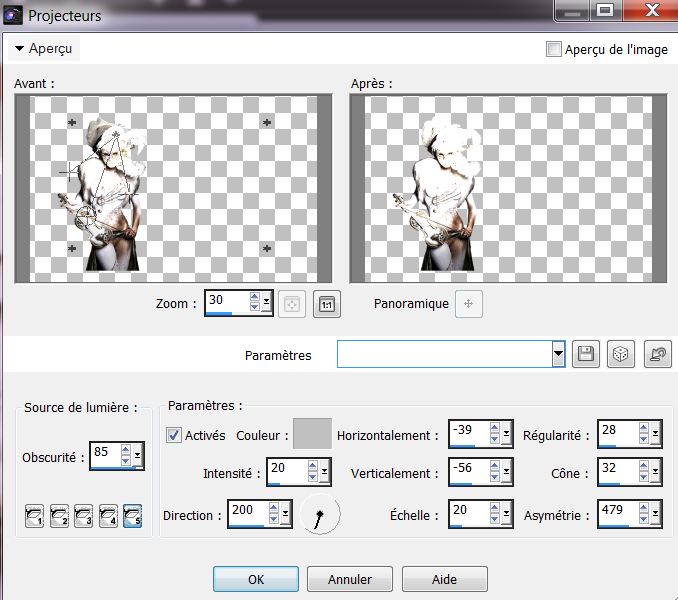
27. Effects-Illumination Effects-Lichts-with these settings -Color #c0c0c0
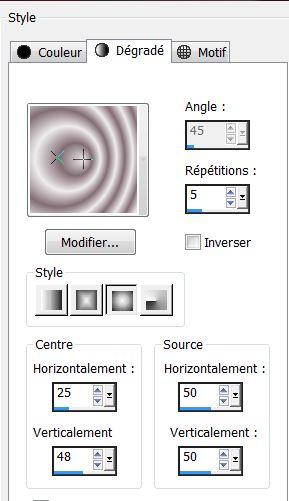
- If you have trouble with the lights activate (raster 4 of the tube 'Drevers_woman_99 28. Activate the top of the Layer Palette 29. Layers- New raster layer 30. Selections - load/save selection - load selection from disk and choose my selection: ''renee_ la femme au violon _1'' 31. Material Properties: Foreground color to this color: #eeecec -Background color to this color: #826d74 - Prepare a sunburst gradient configured like this.
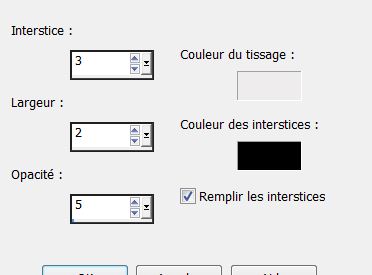
32. Activate Flood Fill Tool and fill the selection with the gradient 33. Effects- Texture Effects -Weave with these settings color black
34. Selections -Deselect All 35. Effects- 3D Effects- Drop Shadow with these settings: 6/6/100/18 black-Repeat Drop Shadow negative -6/-6 36. Effects- Geometric Effects - Cylinder Vertical - Strength 30 37. Effects- Plugins - Graphics Plus – Cross shadow with these settings
- Activate the top of the Layer Palette 38. Layers- New raster layer /Activate Flood Fill Tool and fill the layer with color black 39. Layers-Load/Save Maske- Load Mask from Disk and select Mask:''Narah_mask_0186''
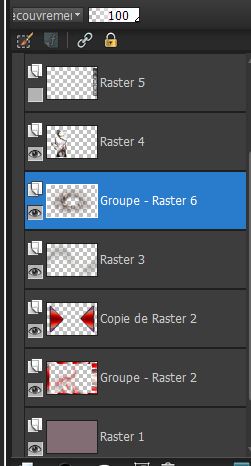
40. Layers- Merge-Merge Group 41. Layers- Arrange- Move 2x Down Your Layer Palette look like this now:
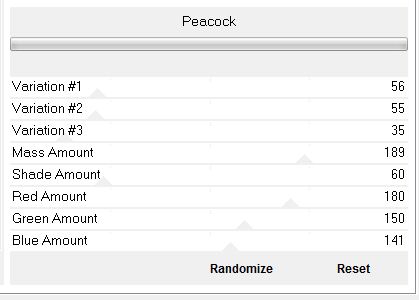
42.Effects- Plugins - Unlimited - Graphic plus -Peacok
- Layer Palette -Double click on this layer and set the Blendmode to Overlay 43. Open the tube ''Drevers_deco_32 '' - Image Resize 75 % - Image Free Rotate 90° to the left - Edit Copy !! - In the Layer Palette -activate -Group of Raster 2 / Edit/copy-Edit paste as a new layer on your working area - Layer Palette -Double click on this layer and set the Blendmode to Luminance Legacy - With your move tool place it to the right side like this
44. Activate the top of the Layer Palette 45. Layers- New raster layer 46. Selections - load/save selection - load selection from disk and choose my selection: ''renee_tulipe noire_1'' 47. Properties Foreground: foreground color to color black - Pot of Paint: Change the opacity of the color to 54 % Tolerence 20
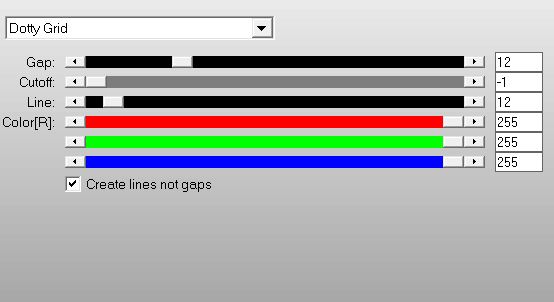
- Activate Flood Fill Tool and fill the selection with the foreground color black Pot of Paint: Change the opacity of the color to 100 % 48. Selections- Deselect All 49. Effects- Plugins -AP01[Innovation] - Lines -Silverling -Dotty grid
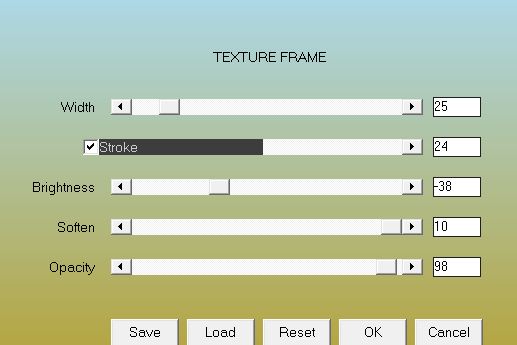
50. Layers- Merge- Merge Visible 51. Effects- Plugins -AAA Frames/ Texture frame
52. Edit -Copy !! 53. Layers- New raster layer 54. Selection Tool (S) Custom Selections with these settings
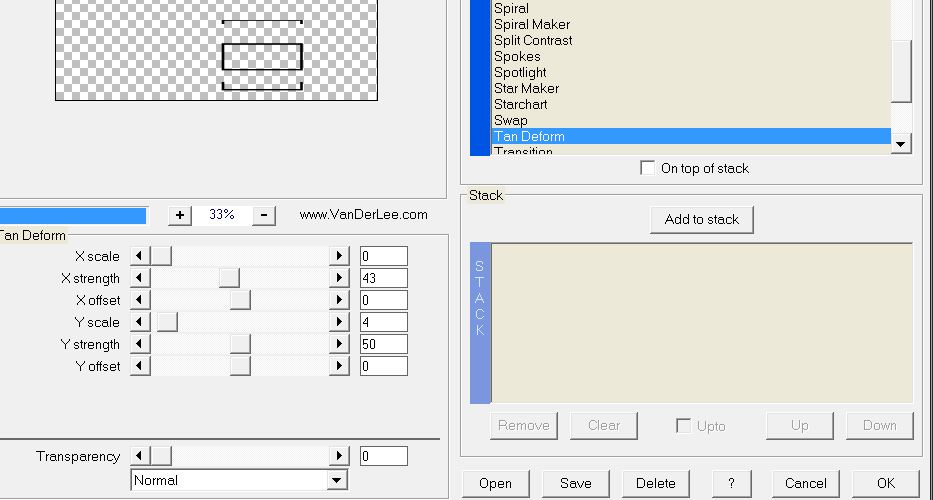
- Activate Flood Fill Tool and fill the selection with color black 55. Selections - Modify- Contract de 8 pixels 56. Delete - 57. Selections- Deselect All 58. Effects-Plugins -Vanderlee Unplugged- Tan Deform
59. Effects- Plugins - EyeCandy 5 - Glass –
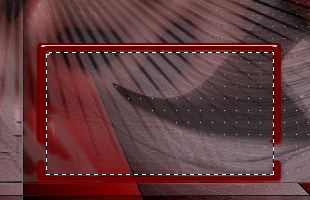
60. Activate Selection Tool (S)-Rectangle-draw a rectangle like this
61. Layers- New raster layer 62. Edit-Paste into selection (it is still in cache). 63. Selections- Deselect All 64. Layers- Merge- Merge All 65.Image - Add borders-Symmetric checked: 1 pixels black 66. Image - Add borders-Symmetric checked: 15 pixels #800000 67. Image - Add borders-Symmetric checked: 5 pixels black 68. Activate the tube "text "/Edit/copy-Edit paste as a new layer on your working area / Ore write your own text
Save as JPG
I am part of Tutorial Writers Inc. My tutorials are regularly recorded. ReneeGraphisme_All rights reserved
*
|
 Translations