|
New
Translations here
TYPE We create the way Photoshop does
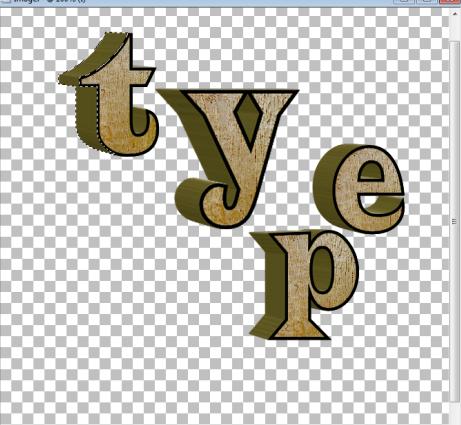
Let's start the lesson. - OPEN IMAGE DE 650X 700 PIXELS TRANSPARENT
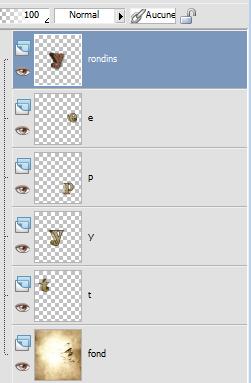
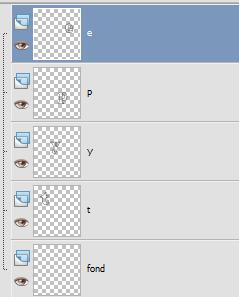
Place each letter on a different layer/you may write them yourself but do not take more then 4 letters for this job - Open the tube with the letters - Select them one by one and paste them on a new layer - -Your layer palette looks like this >rename the layers as I did
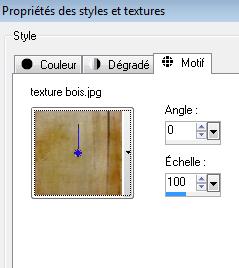
2. We will give each letter a special effect -Open texture wood (bois) in your PSP program -Configure Pattern (Motif) like this
- With the magic wand tool >> select the inside of each letter - we start with the letter = P
-Activate your Flood Fill Tool-
Fill with the pattern ''texture wood (bois)'' /
- Do this for each letter >> Y – P - E 3.Ready for the next effect - Apply following plugin on each letter - Effects-Plugins -Eye Candy /extrude ''tab-settings-User/settings and select - preset ' @_renee-type_3''sur chaque lettre - Resize letter Y to 125% all layers unchecked - This is your result
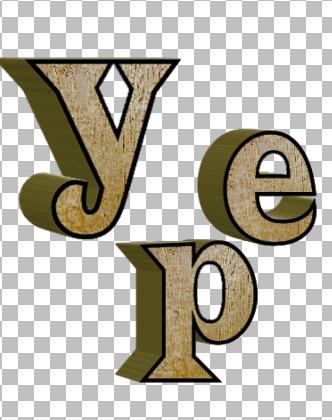
- - For the letters Y -P - E with the magic wand tic in the center and tic delete to obtain my result
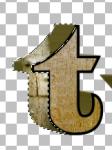
- Place the cursor on any letter on the T for example = T -Activate the Magic Wand-Select the part colored in green (see image below) - Layers - New raster layer - Open the tube ''tronc arbre cottage 'Edit/copy -Edit -paste in selection/Selections-Deselect All / Layers - Merge Down - This is the result
- Do this for all letters >>> Select the green part from letter Y - add a new layer - Activate the tube ''tronc arbre cottage '' 'Edit/copy -Edit -paste into selection /Selections-Deselect All - - Layers - Merge Down and proceed the same way to finish the other letters ok ------------------------------------------------------------------------------------------------------------------------------------------------------------------------------------------------- 3 . We work on the Background (fond) now
- Selections -Select All /Open the tube ''renee-type-3d,jpg'' Edit/copy-Edit paste into selection /Selections- Deselect All **choose a background matching the theme you chose for this work** -Place the letters as you like best 4 ..We will know create the blocks to dress the Y or another letter of your choice - resize at 125%
-Layers - New raster layer ''renee-type-3d'' - Open the tube ''renee-type-3d-tranche de bois '' Edit/copy-Edit-paste into selection .Selections-Deselect All - Effects-Plugins -Eye Candy /extrude ''tab-settings-User/settings and select - preset @ _renee_type_3d_tronc'' - Edit - Copy/ Edit - paste as a new layer (you can keep it as a tube) - To make placing easier I changed the Blend Mode to Luminance - You can duplicate/resize to your choice to put the pieces of wood on their place on letter Y and add more tubes ''renee-type-3d-tranche de bois'' to create a natural effect - When all is arranged to your choice/Merge all block layers to one single layer - Effects-Plugins -Eye Candy /perpective /drop shadow blury -Change Blend Mode to Normal - your layer palette looks like this now
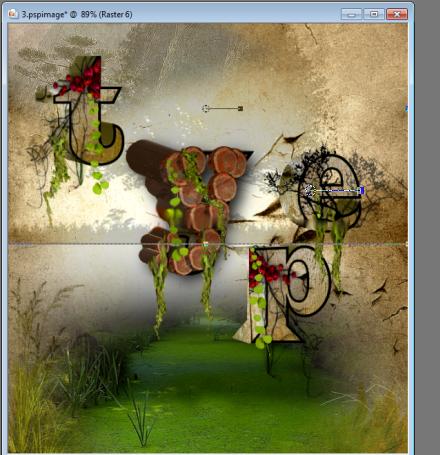
- We continue to dress up our letters with leaves and organic ornaments to make our work look great **I add a map with elements to dress up your letters, you can also use different tools (Eraser - clone tool)votre goût** Dress up your work, but remember too much can be too much To see better you can close the eye from the bottom layer
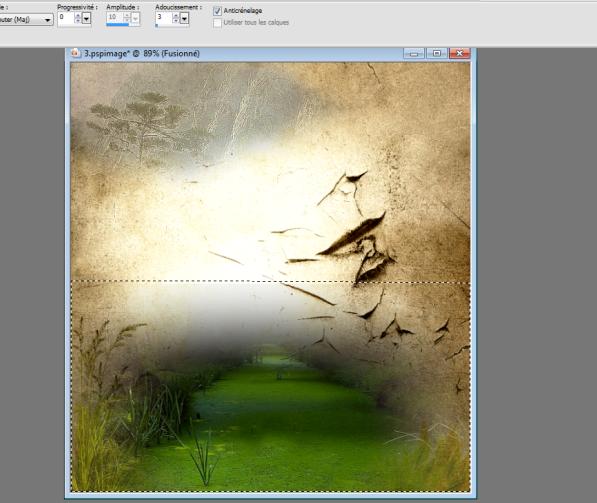
---------------------------------------------------------------------------------------------------------------------------------------------------------------------------------------------------- 5. Now we will dress up the background layer to make our work to a piece of art - Background is important, but so is the foreground. So compare those two and ask yourself is adding stuff in empty spaces is an amelioration or not
--So we continue - Open the tube ''renee-type-3d-herbes'- Edit/copy -Edit paste as a new layer on your working area / I have duplicate and used Blend Mode to Hard Light- Set the layer opacity of this layer to 36 % - Open the ''graminée'' Edit/ Copy-Edit - Paste as new layer on your working area and move- Layers Duplicate and move - Open the tube ''15_09_2006_landscape_01_git '' Edit - Paste as new layer on your working area and place on the top left- Set the layer opacity of this layer to 46% -Open the tube ''sentier '' Edit - Paste as new layer on your working area and place see print screen - Make a selection like this
- And with color # bababa / and brush with this configuration
-Layers-New raster layer - and correct the gray zones to give depth by using the brush like this
-Adjust - Blur -Gaussian Blur Radius: 52 /Selections-Deselect All - Open the tube ''8f80f803.png '' Edit-copy– Edit - Paste as new layer on your working area-watch the horizontal line from the other tube and make sure they match
- Double click on this layer and set the Blendmode to Luminance Legacy-Set the layer opacity to 24 - Effects-Plugins -Flaming Pear /flood with these settings as below
- Open the tube ''nuage-ciel '' -Edit/copy-Edit paste as a new layer and move on the top and at the right - Double click on this layer and set the Blendmode to Hard Light -Set the layer opacity to 83% - Open the tube « « a777f651,png'' /Image Resize a 50% -Edit/ copy-Edit - Paste as new layer on your working area and move - Open the tube ''elan'' -Edit/ copy-Edit - Paste as new layer on your working area and move/Image Mirror - Open the tube ''loup blanc'' /Image Resize a 35% - Edit/ copy-Edit - Paste as new layer on your working area and move -Opent the tube ''cas_tubes12_12dieren17182011 » »Image Resize a 50% and 70% Edit/ copy-Edit - Paste as new layer on your working area and move -Erase Tool-erase the bottom - Open the tube ''renee-type-3d-escargot '' -Edit/ copy-Edit - Paste as new layer on your working area -Move Tool-place on the edge of the letter >> P - Image - Add borders-Symmetric checked: 5 pixels black. Save as JPG
I hope you enjoyed this tutorial . Renée edited and update
on 2008 * Any resemblance with an existing lesson is merely a coincidence *
* Don't forget to thank the people who work for us and with us. I named the tubeurs - Testers and the translators.
Thanks Renée.
I am part of Tutorial Writers Inc.
My tutorials are regularly recordedt
ReneeGraphisme_All rights reserved *
*
|

 Translation


 Selections-Deselect All