|
Let's start the lesson
Pluie ou Soleil ……Rain or
sunshine……
-Preparation
-Material Properties:Set the color of your Foreground to
color 1 –Set the color of your Background to color 2

1. File-Open a new
transparent image in this size :1050
x 700 Pixels
2. Flood Fill Tool
 –
Fill the layer with the Foreground color number 1 –
Fill the layer with the Foreground color number 1
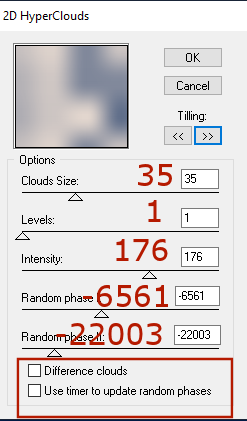
3. Effects-Plugins – Render – 2 D HyperClouds
using the settings below
4. Adjust- Blur-Gaussian
Blur-Radius 25%
5. Layers-New Raster Layer
6. Selections- Select All
7. Open the tube:
‘’Renee-TUBES-Pluie-ou-Soleil-17’’ -Edit - Copy -
Activate your work - Edit - Paste into the selection

8. Effects- Image Effects-
Seamless Tiling using the default settings
9. Layers-Duplicate
10. Image - Mirror - Mirror
vertical ( Image - Flip in older versions of PSP)
11. Layers- Merge- Merge
Down
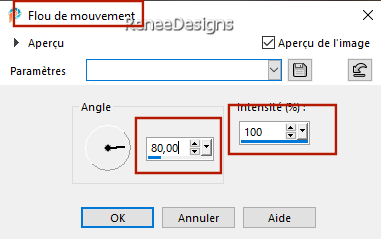
12. Adjust-Blur-Motion Blur
using the settings below
13. Adjust-One Step Photo
Fix
14. Layers-Properties-Set
the Blend Mode to Difference – Reduce the opacity of
this layer to 53%
15. Layers- Merge- Merge
Down
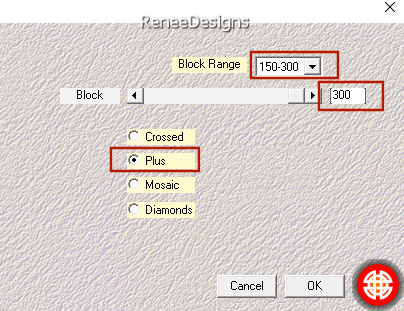
16. Effects- Plugins – Medhi – Sorting Tiles
with these settings
17. Layers-Duplicate
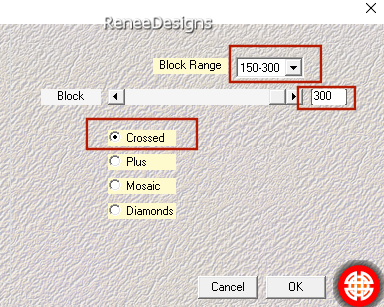
18. Effects- Plugins – Medhi – Sorting Tiles
with these settings
19. Effects- Plugins – Simple – Pizza Slice Mirror
20.
Effects-
Reflection Effects- Rotating Mirror using the settings
below
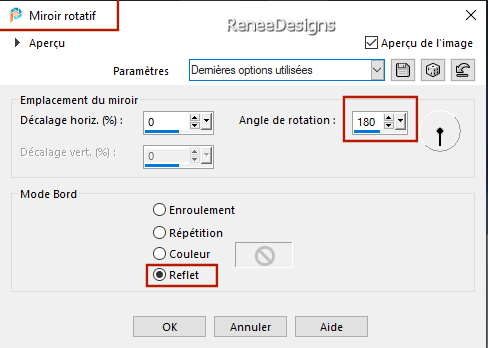
21.
Effects-Edge Effects-Enhance
22. Adjust-One Step Photo
Fix
23. Effects- Plugins - Simple –
4 Way average
24. Selections –load/save
selection –load selection from disc and select my
selection:‘’ pluie-soleil-1’’
- Selections-Promote
selection to layer

25. Effects- Plugins –
Toadies– What are you : 20/20
26. Layers-Properties-Set
the Blend Mode to Hard Light
27. Effects-3D-Effects-Drop
Shadow with these settings:10/10/80/25 Color black
- Material Properties:Set
your Foreground color to color#ffffff=White
28. Layers-New Raster Layer
29. Selections –load/save
selection –load selection from disc and select my
selection:‘’ pluie-soleil-2’’
30. Flood Fill Tool  Fill the selection with the Foreground color #ffffff
(Click in the selection three times)

31. Effects – Edge Effects – Eroder
- In the layer
palette-activate Copy of Raster 1
32. Selections –load/save
selection –load selection from disc and select my
selection: ‘’ pluie-soleil-3’’
33. Selections- Promote
selection to layer
34. Layers-Arrange-Bring to
Top
- Material Properties:Set
your Foreground color to color number 4=#fff76b
35. Activate -Color changer
Tool (F) – Click in the selection with color #fff76b
36. Effects-Plugins -Alien Skin EyeCandy 5 –Impact –Glass-Tab-Settings-User
Settings and select my file- Preset :’’ pluie-soleil’’
37. Adjust-Sharpness-Hight
Pass Sharpen with these settings
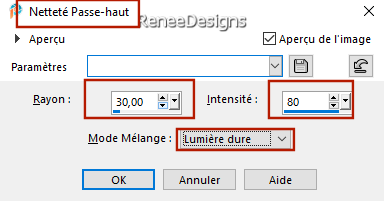

38.Open the tube:
‘’pluie-soleil-Image1’’
-Edit
- Copy- Activate your work -Edit - Paste as new layer
-Place the text in the
circle
39. Layers-New Raster Layer
40. Selections –load/save
selection –load selection from disc and select my
selection: ‘’ pluie-soleil-4’’
41.Material Properties:Set
your Foreground color to color#ffffff=White
Flood Fill Tool
 –Fill
the selection with the Foreground color#ffffff –Fill
the selection with the Foreground color#ffffff

42. Layers-Duplicate
- Layers- Merge- Merge Down
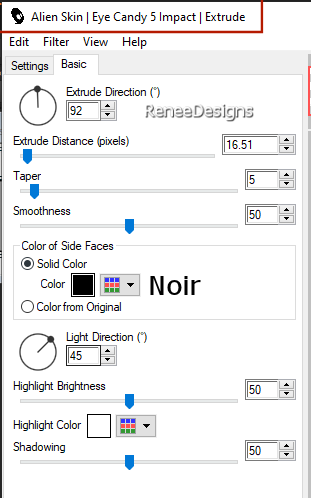
43. Effects-Plugins -Alien Skin EyeCandy 5 –Impact –Extrude
using the settings below
44. Effects-Plugins -Filters
in Unlimited 2.0 – Graphic Plus Cross
Shadow using the default settings
45.Open the tube
‘’Renee-Nuages.png’’ -Edit
-Copy-Activate your work -Edit -Paste as new layer
- Move to top right (see
finished image)
46. Layers-New Raster Layer
47. Selections –load/save
selection –load selection from disc and select my
selection: ‘’ pluie-soleil-5’’
48. Flood Fill Tool
 –
Fill the selection with the Foreground color#ffffff –
Fill the selection with the Foreground color#ffffff

49. Layers-New Raster Layer
50. Material Properties:Set
your Foreground color to color black
Flood Fill Tool
 –
Fill the layer with color black –
Fill the layer with color black
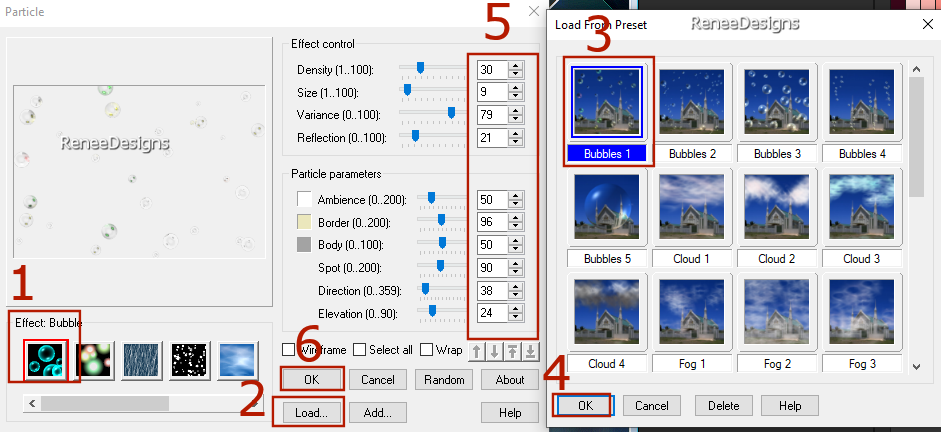
51.Effects- Plugins – Ulead Effect – Particle
1. Choose– Effect Bubble
2. Click on Load >Bubbles1
Ok
3.
Using the settings below
Ok
52. Effects- Plugins –Transparency – Eliminate Black
53. Image - Resize to 65 %
- Repeat -Image -Resize to 65 %
54. Layers-Duplicate
55. Layers- Merge- Merge
Down
- Move to top right
Option: if
you wish to change the color of the bubbles - use the
color changer tool - I opted for white (1 click on the
bubbles).)
56. Open the tube ‘’Pluie-soleil-image2’’
-Edit - Copy- Activate your work -Edit - Paste as new
layer
57. Objects – Align – Top
– Objects –Align – Right
58. Effects-Distortion
Effects-Wind-Wind strength 65-Wind direction- From Right
59. Layers-New Raster Layer
60. Selections –load/save
selection –load selection from disc and select my
selection: ‘’ pluie-soleil-6’’
61. Flood Fill Tool
 –
Fill the selection with the Background color 2 –
Fill the selection with the Background color 2
62. Effects-Plugins -Filters
in Unlimited 2.0 - ICNET-Filters –
Color Filters – Blue Sky: 164/128
63. Effects-Plugins -Filters
in Unlimited 2.0 - ICNET-Filters –Tile
& Mirror – Radial Mirror : 54/91
64. Layers-New Raster Layer
65. Activate the tube ‘’ Renee-TUBES-Pluie-ou-Soleil-26’’
- Image –Resize to 50%
- Edit - Copy- Activate
your work -Edit - Paste as new layer (move the tube in
the right place)
- Activate the layer
underneath
(Raster 10)
66. Effects- Plugins –AAA Frame – Foto Frame
using the settings below
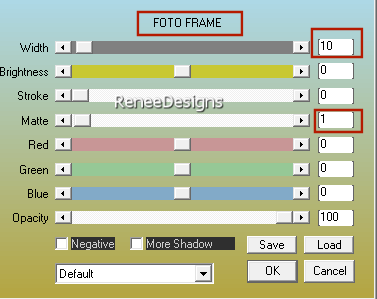
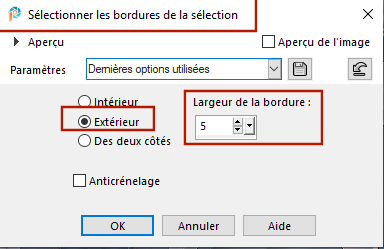
67. Selections –Modify
–Select Selection Borders-Outside checked-Border width 5
68. Flood Fill Tool - Fill
the selection with the Background color 2
69. Effects-Plugins-Filters
in Unlimited 2.0 – Graphic plus – Cross
Shadow using the default settings
 -
Replace at the top of the layers palette -
Replace at the top of the layers palette
70. Layers- Merge-Merge
Down
71.Layers-Move down 2 times
- Replace at the top of the
layers palette
72. Activate the tube ‘’Renee-TUBES-Pluie-ou-Soleil-0.’’
- Image - Resize to
75 %
- Edit - Copy- Activate
your work -Edit - Paste as new layer
73. Pick Tool: (K) on your
keyboard-Enter the following parameters on the toolbar
 Position
X 453
/ Position Y 163 Position
X 453
/ Position Y 163
Press( M )to close the Tool
74. Effects-3D-Effects-Drop
Shadow using the settings below-Color white
(Shadow on new layer
checked)
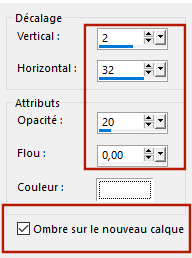
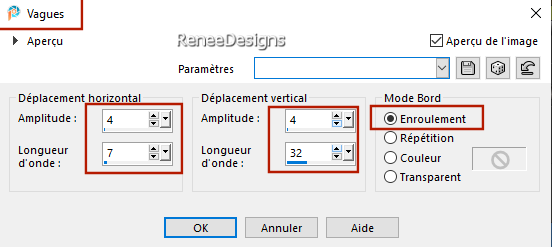
75. On the shadow layer
- Effects –Distortion
Effects –Wave using the settings below
- Replace at the top of the
layers palette
76. Activate the tube ‘’ Renee-TUBES-Pluie-ou-Soleil- Fillette’’
- Image -Resize to
80 %
- Edit -Copy-Activate your
work -Edit - Paste as new layer
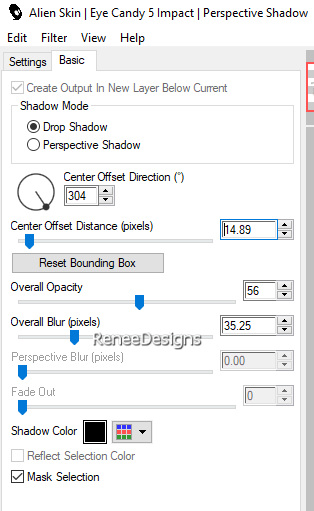
77. Effects-Plugins -Alien Skin EyeCandy 5 – Impact – Perspective
Shadow using the settings below
78. Activate the tube
‘’Renee-TUBES-Pluie-soleil -3 images’’
- This tube consists of
three layers-Copy and paste these three as a new layer
on your work and place (see finished image)
79. Image-Add
Borders-Symmetric checked:1 Pixel -Color 1
Image-Add Borders-Symmetric
checked: 10 Pixels -Color White
Image-Add Borders-Symmetric
checked: 1 Pixel -Color 2
Image-Add Borders-Symmetric
checked: 3 Pixels-Color 1
Image-Add Borders-Symmetric
checked: 35 Pixels-Color
White
Image-Add Borders-Symmetric
checked: 1 Pixel-Color 1
80. Selections - Select All
- Selections -Modify-Contract-36 Pixels
81. Effects-3D-Effects-Drop
Shadow with these settings: 0 /0/80/40 Color black (Shadow
on new layer not checked)
82. Selections – Invert
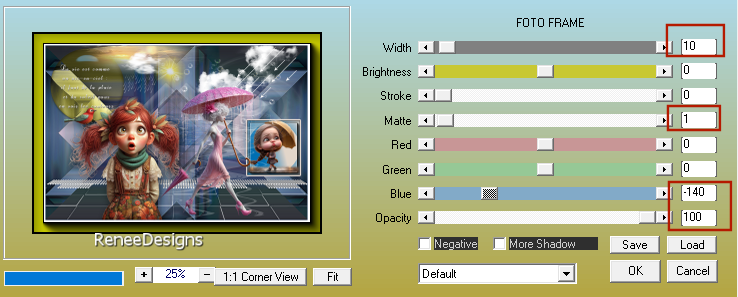
83. Effects- Plugins – AAA Frame – Foto Frame
using the settings below

84. Paste the author's
watermark on your work and your own watermark
85. Image Resize 1005
Pixels Width
86. Effects- Plugins – AAA Filters – Custom – Landscape
Save as JPG
I hope you enjoyed this
lesson
Renée
This lesson was written by
Renée
05/06/2024
Edited and Update
in 2024
*
Any similarity to an
existing lesson is coincidental.
*
Do not forget to thank the
people who are working with us and for us - I am the one
who appointed the tubeurs and the translators.
Thanks
|


 Translations


